Learn how to view, manage, and edit customer details from their profile when using Stamp Card–based loyalty programs in Loyally.
The Customer Profile gives you full visibility into each customer’s loyalty activity — including stamps, rewards, visits, and card data — with the ability to make manual balance adjustments, correct mistakes, and send personalized push notifications.
From a customer’s profile, you can:
View detailed loyalty statistics (stamps, visits, rewards, and LTV)
Adjust stamps or rewards manually
Correct data entry mistakes
Manage card status and expiration
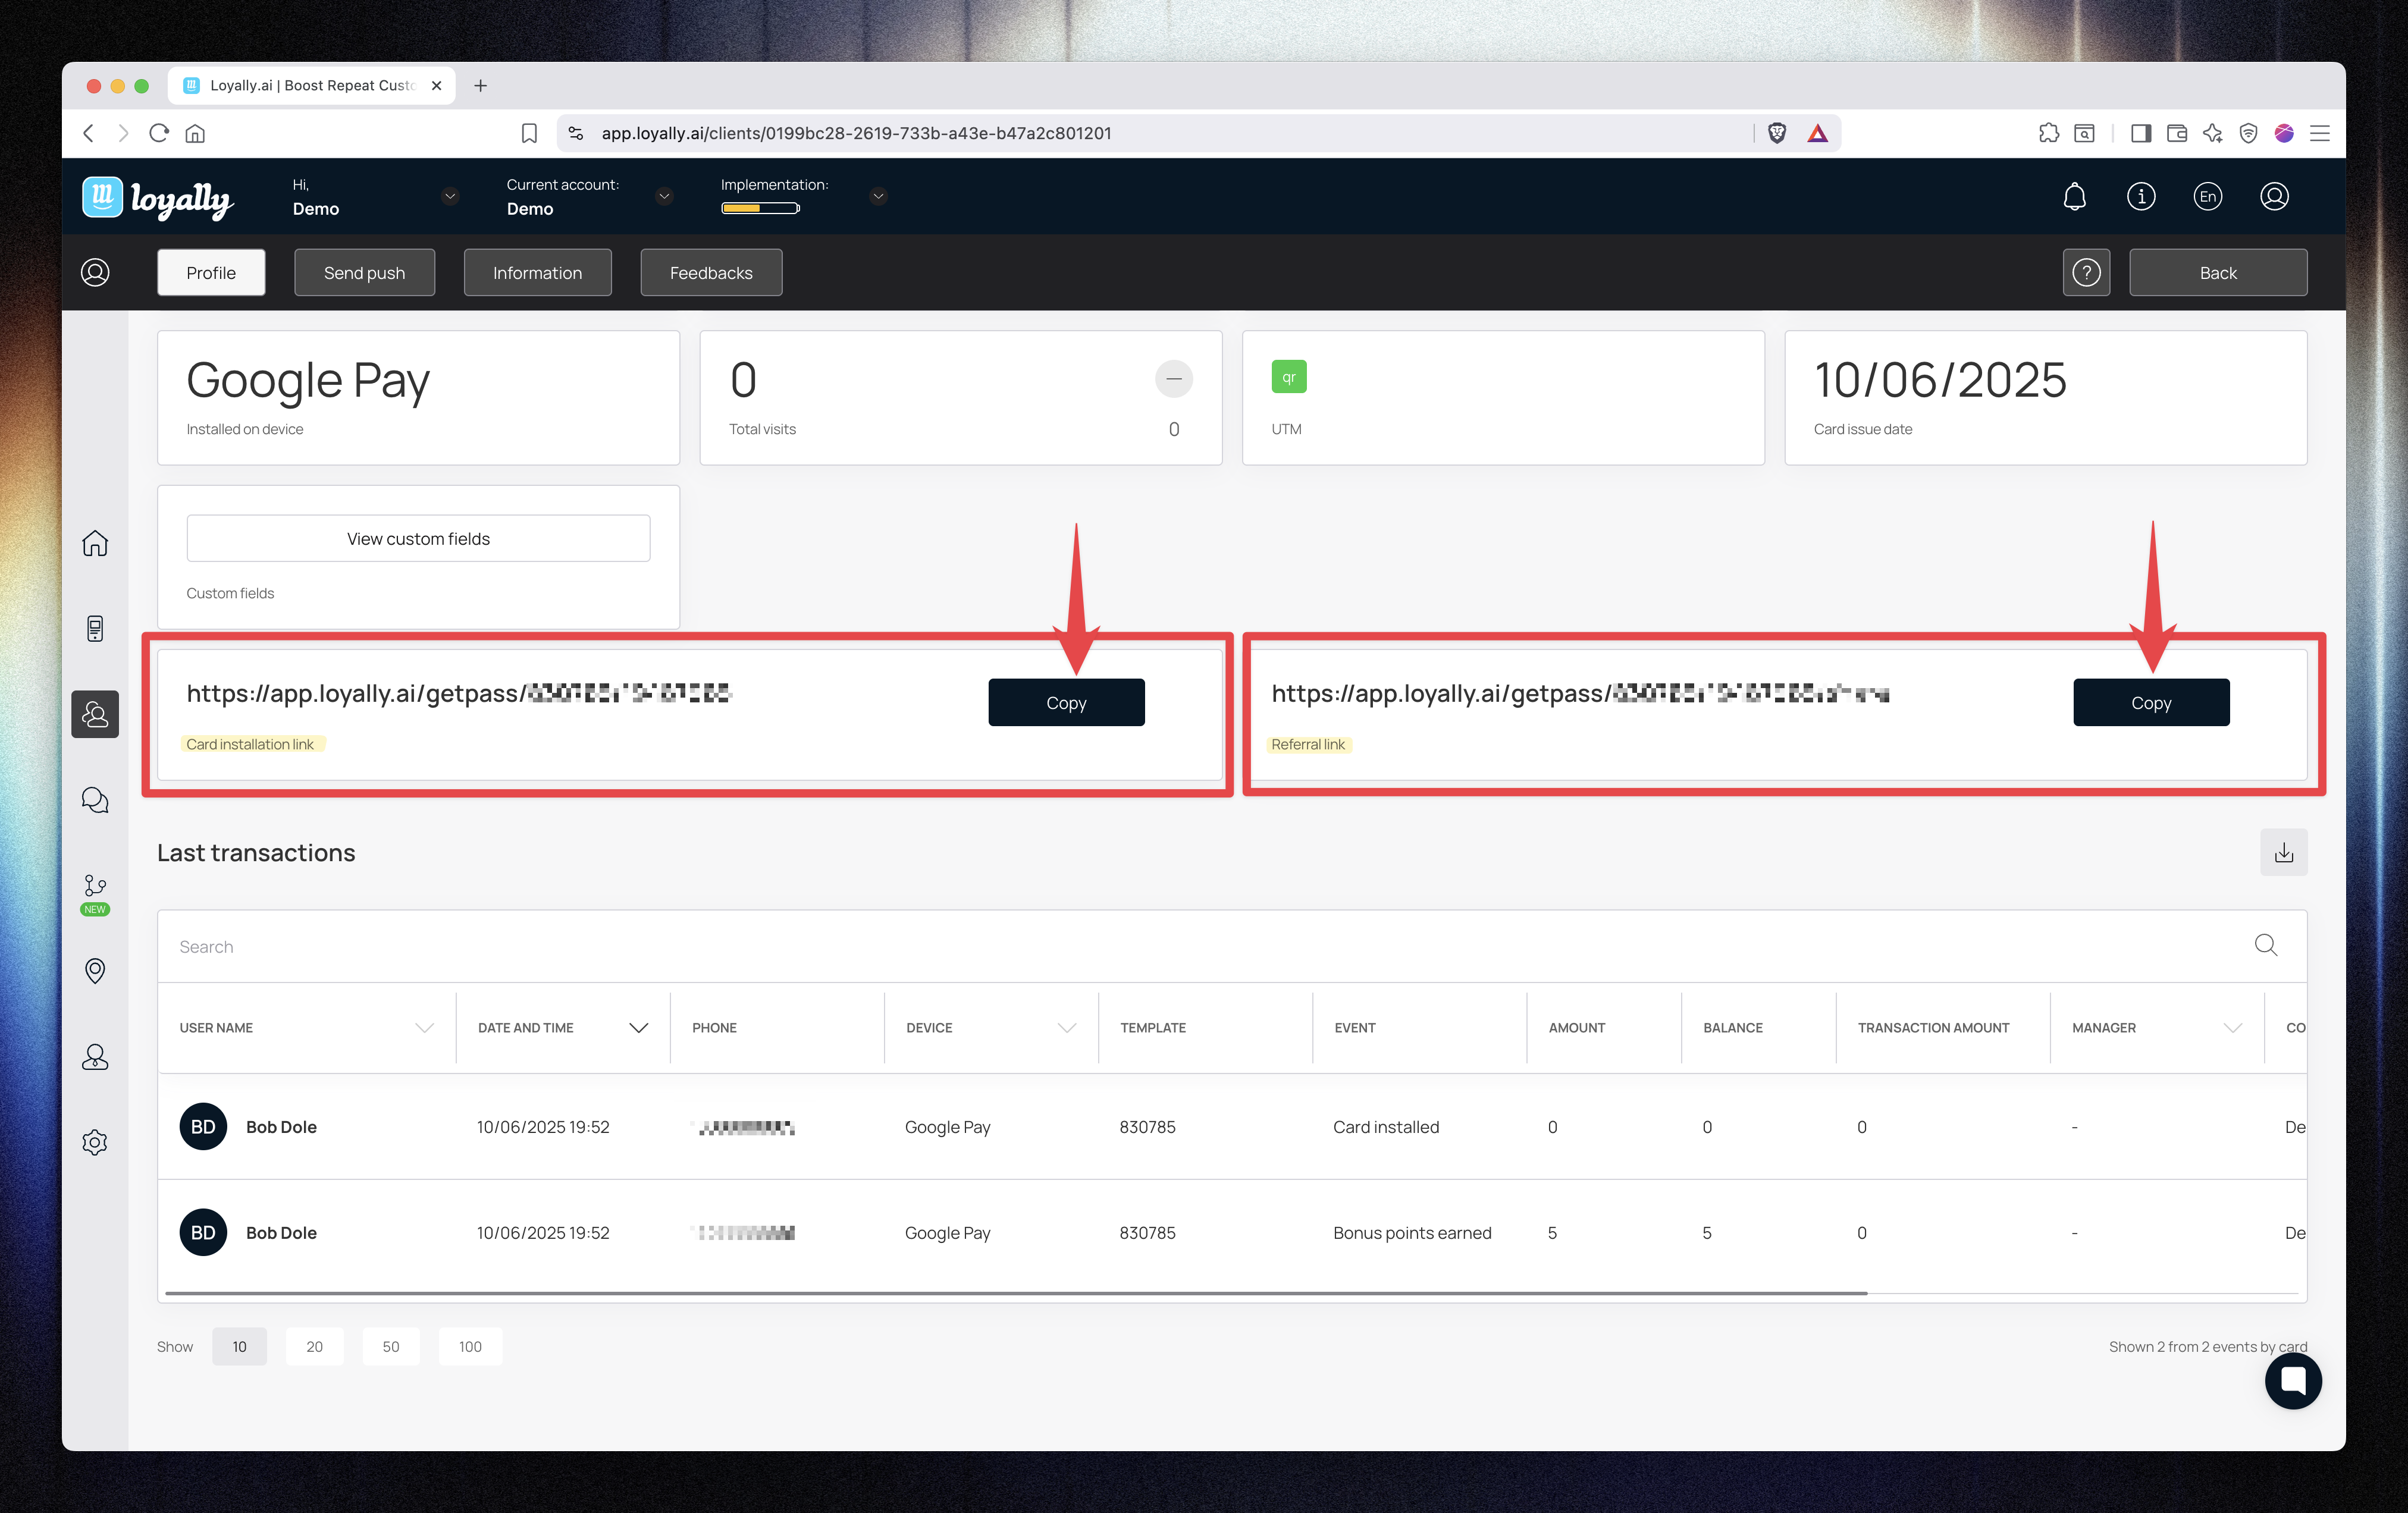
Copy personalized installation and referral links
Send push notifications directly to the customer
Review feedback, device information, and segmentation data
Each customer’s profile displays key loyalty metrics for quick insight:
Field | Description |
LTV (Lifetime Value) | Total purchase amount recorded through loyalty actions. |
Stamps Earned | Total number of stamps the customer has earned. |
Rewards Earned | Total number of rewards collected from stamps. |
Rewards Redeemed | Total number of rewards already used. |
Last Stamp Earned | Date of the most recent stamp. |
Last Reward Earned | Date the last reward was earned. |
Last Reward Redeemed | Date of the most recent reward redemption. |
Total Visits | Total number of visits recorded. |
Actual Stamp Balance | Current number of stamps available on the card. |
Stamps Earned by Referral | Number of stamps earned through referrals. |
Segments | The customer’s RFM or behavioral segment. |
Feedback Rating | Average rating provided by the customer. |
Installed on Device | Displays which wallet (Apple or Google Wallet) the card is installed on. |
Card Issue Date | The date the loyalty card was issued. |
Card Expiration Date | The card’s expiration date (editable). |
You can manually increase or decrease stamps for a customer — for example, to correct an error or to manually award loyalty stamps.
💡 Note:
The Purchase amount (Transaction amount) field represents the total value of the customer’s purchase.
It directly affects LTV (Lifetime Value) and the calculation of stamps or rewards.
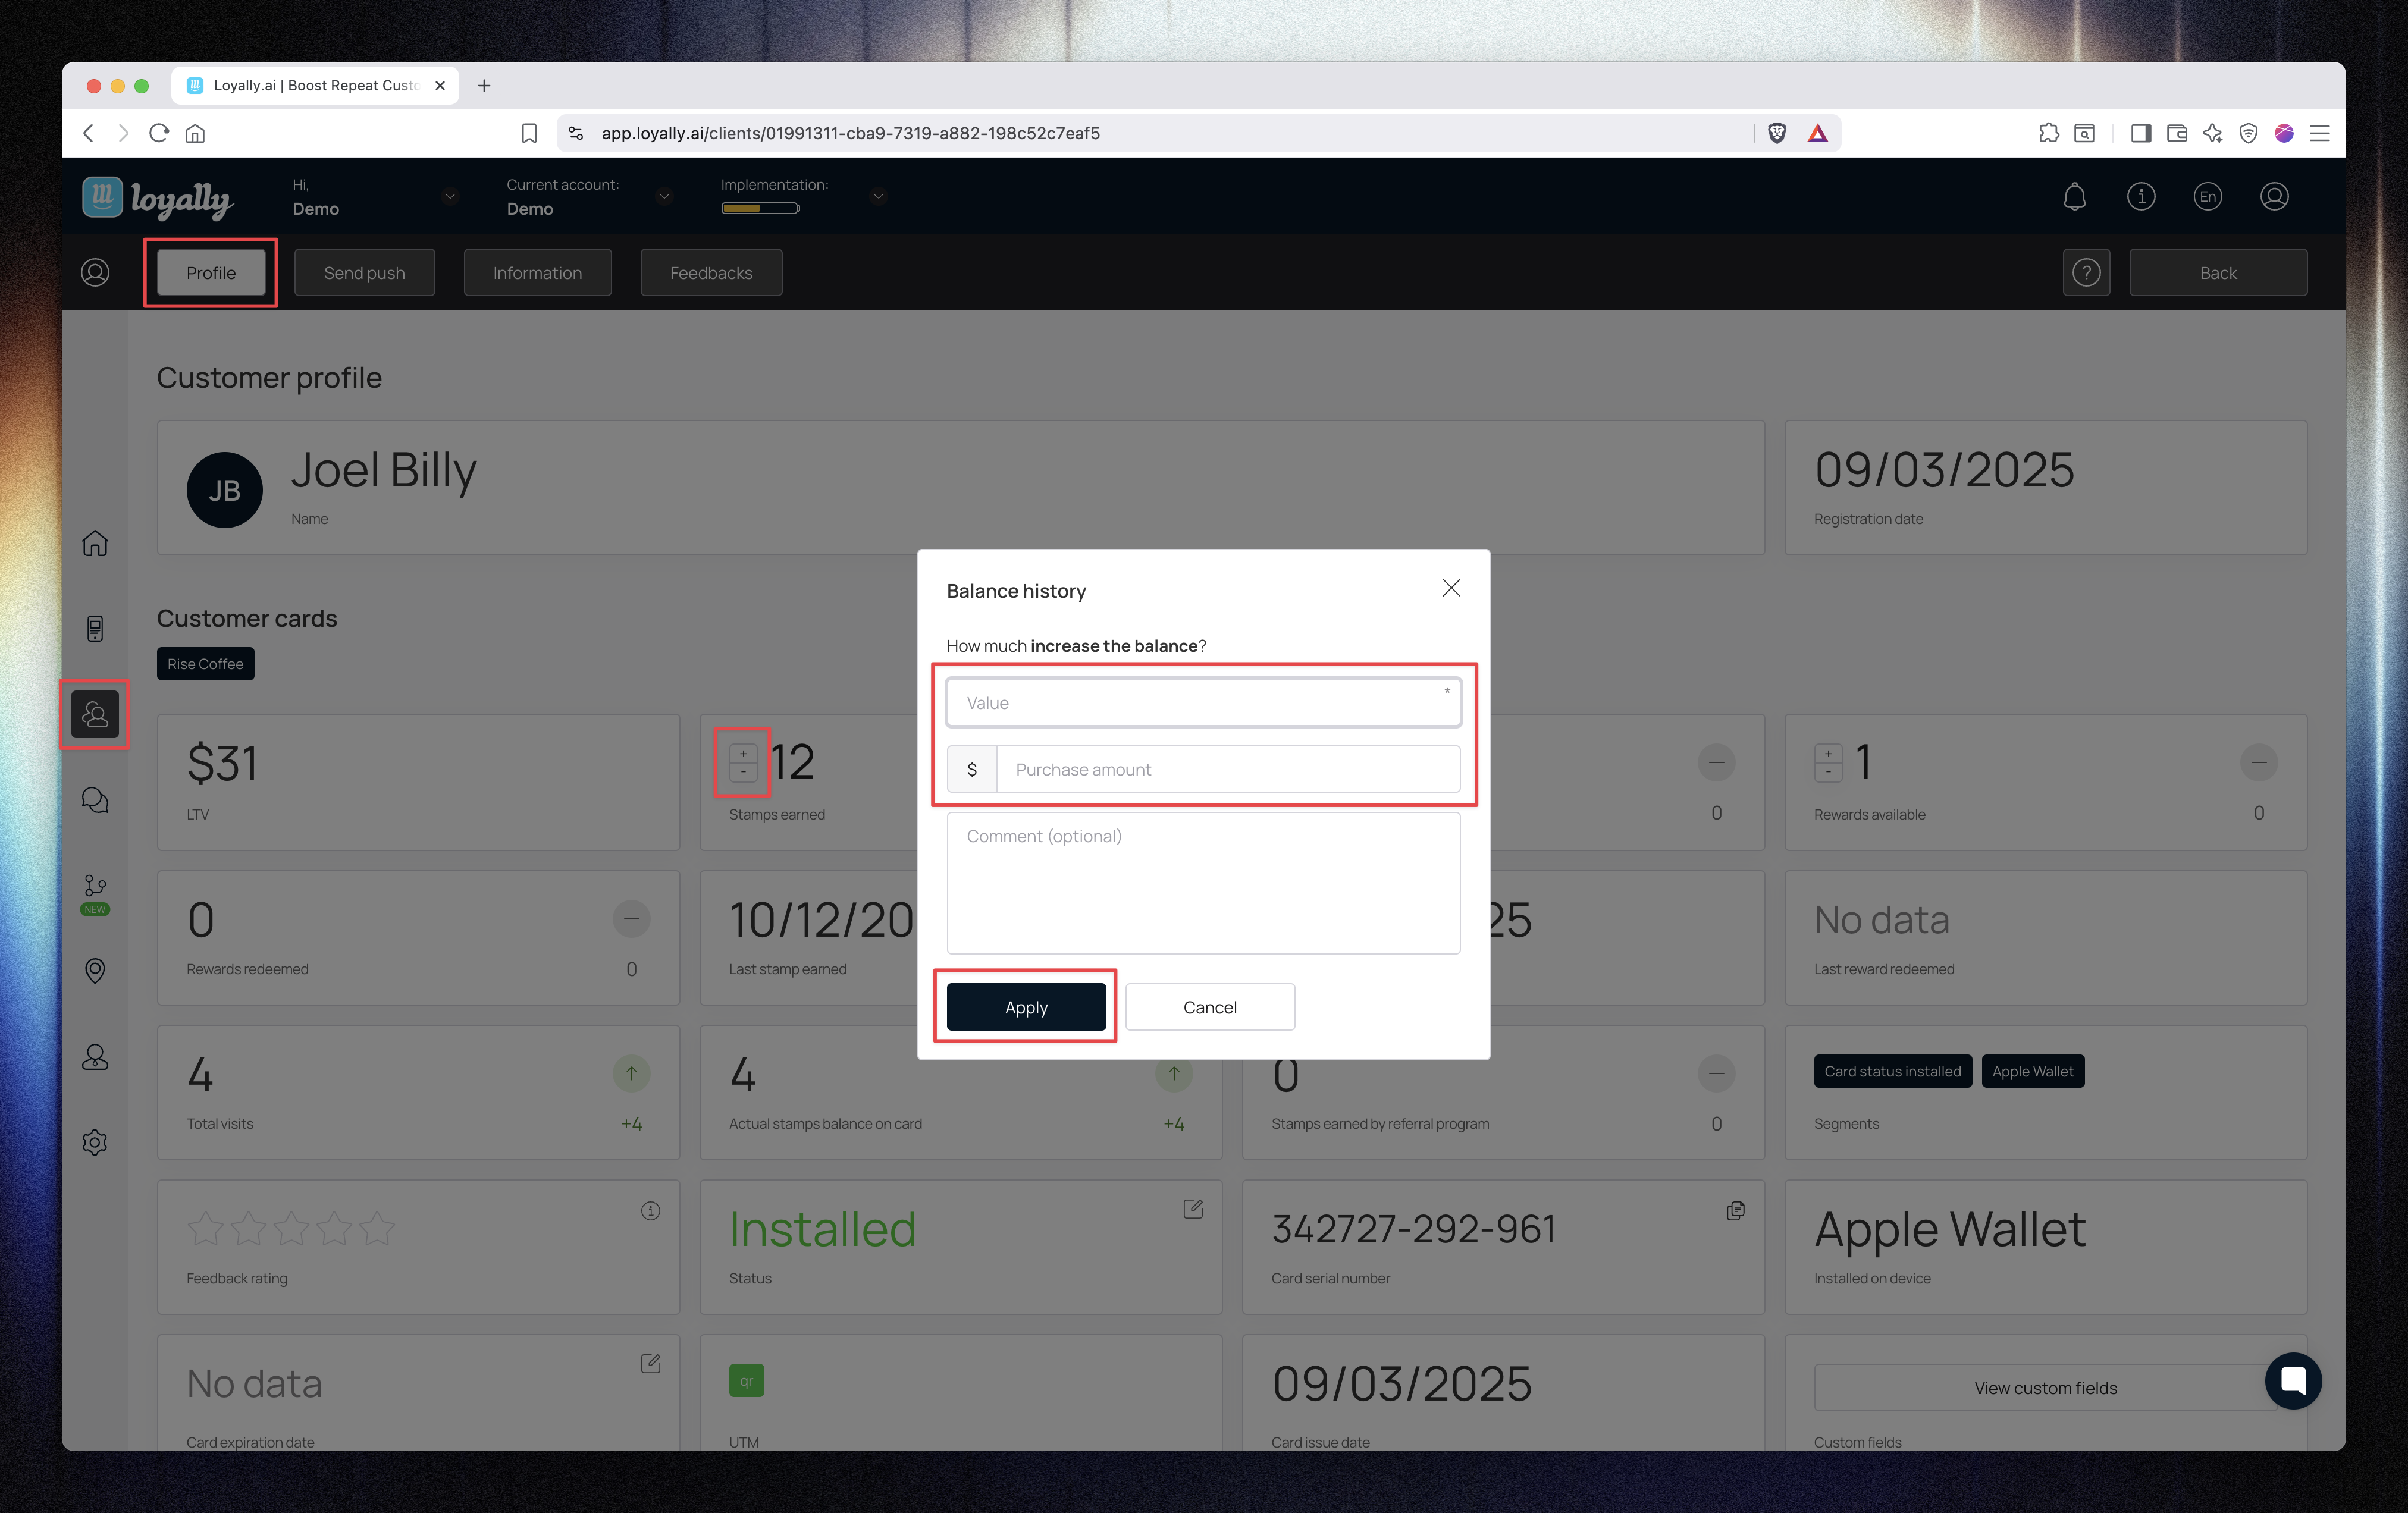
Open the customer’s profile.
Click the “+” icon beside Stamps Earned or Actual Stamp Balance.
In the Balance history popup, enter:
Value → Number of stamps to add.
Purchase amount → Total purchase value associated with this change.
Comment (optional) → Add context for the adjustment.
Click Apply.
✅ The system updates the stamp balance and adjusts the customer’s LTV automatically.
Click the “−” icon beside Stamps Earned or Actual Stamp Balance.
Enter the Value (number of stamps to remove).
(Optional) Enter a Purchase amount to adjust LTV.
Click Apply.
📉 The customer’s stamp count, LTV, and reward progress will automatically adjust.
You can manually add or subtract customer rewards to fix errors or grant bonuses.
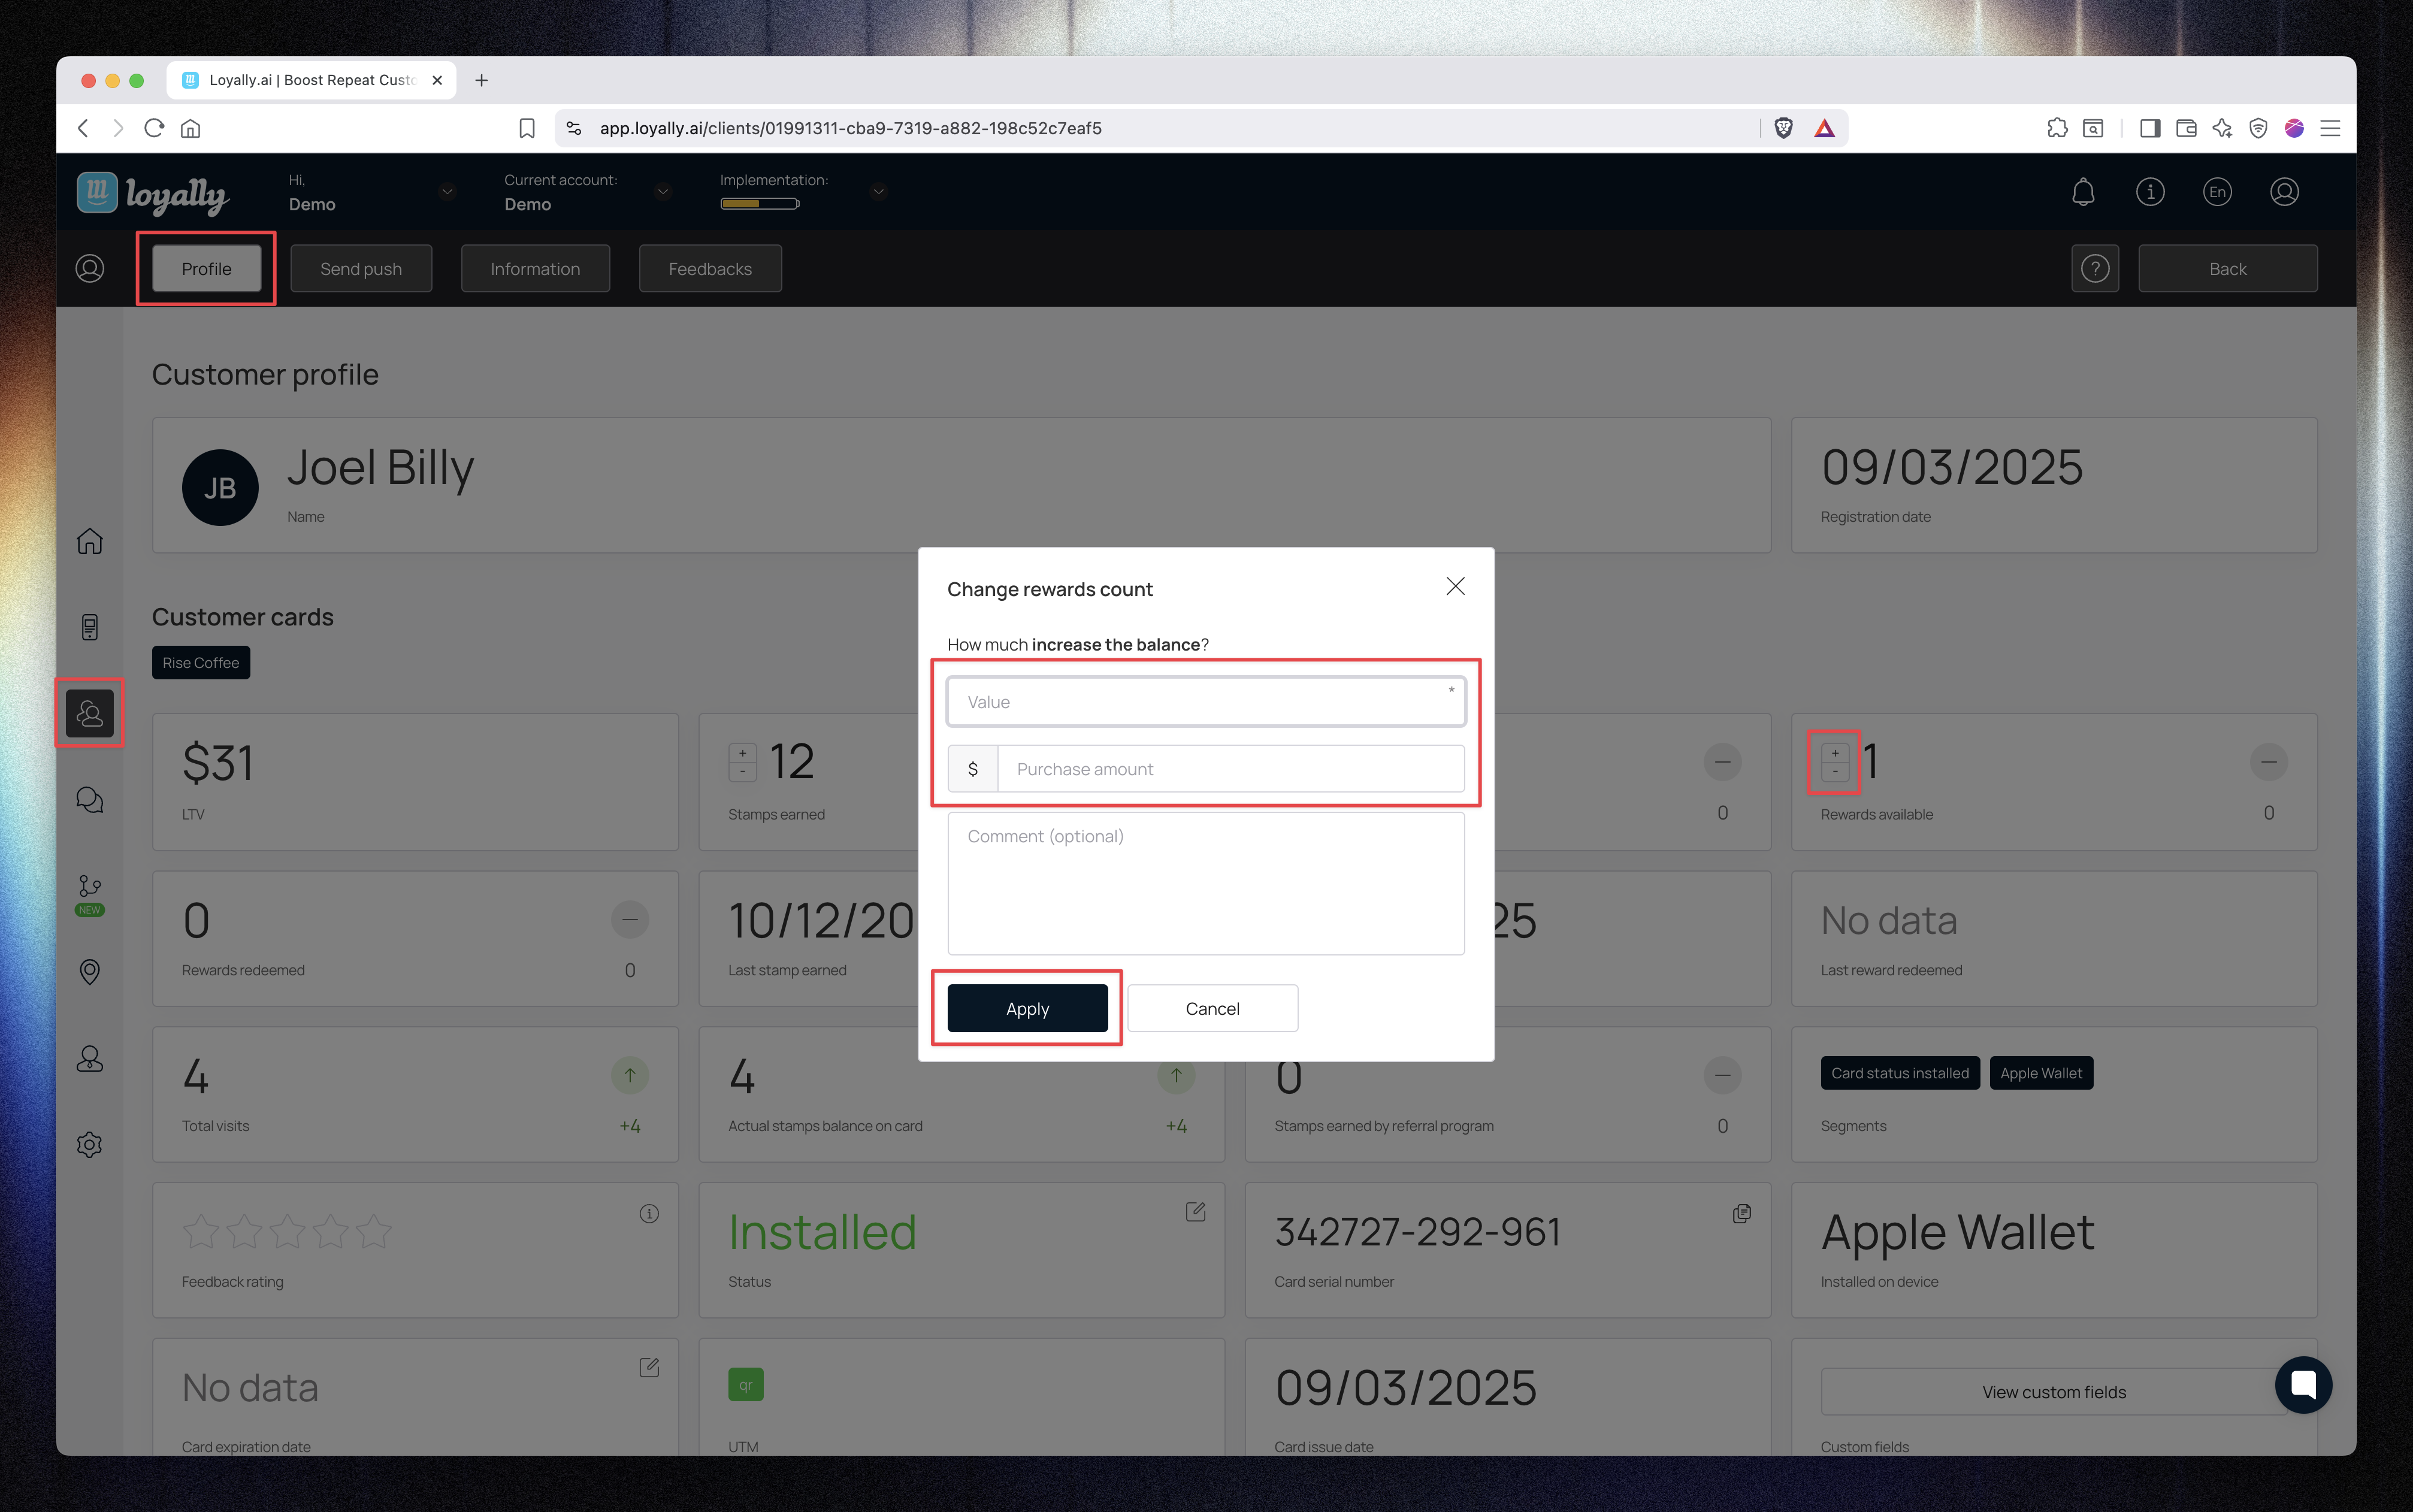
Click the “+” icon beside Rewards Earned or Rewards Available.
In the Change rewards count popup, enter:
Value → Number of rewards to add.
Purchase amount → Optional purchase value (affects LTV).
Comment (optional) → Add details for reference.
Click Apply.
✅ The new reward count will immediately appear in the customer’s profile and transaction history.
Click the “−” icon beside Rewards Earned or Rewards Available.
Enter the number of rewards to remove.
(Optional) Add a Purchase amount and comment.
Click Apply.
The rewards will update instantly in the profile and transaction log.
If an incorrect stamp or purchase value was entered, you can correct it directly from the profile.
Open the customer’s profile.
Click the “−” icon beside Stamps Earned or Rewards Earned.
Enter the number of stamps or rewards to remove.
(Optional) Enter the corrected Purchase amount.
Click Apply.
📉 The customer’s LTV and stamp totals will automatically adjust.
These changes appear in the transaction history for transparency.
⚠ Note:
For visit-based cards, adjustments apply to visit counts instead of purchase values.
The card details section provides key data and control actions.
Field | Description |
Status | Shows if the card is Installed, Not Installed, or Deleted. |
Card Serial Number | A unique identifier for the customer’s card (click Copy). |
Card Expiration Date | The date the card expires (editable). |
Card Installation Link | Unique link to reinstall the card. |
Referral Link | Personalized referral link for sharing. |
Click the pencil icon beside Status.
A Delete button will appear.
Click Delete and confirm.
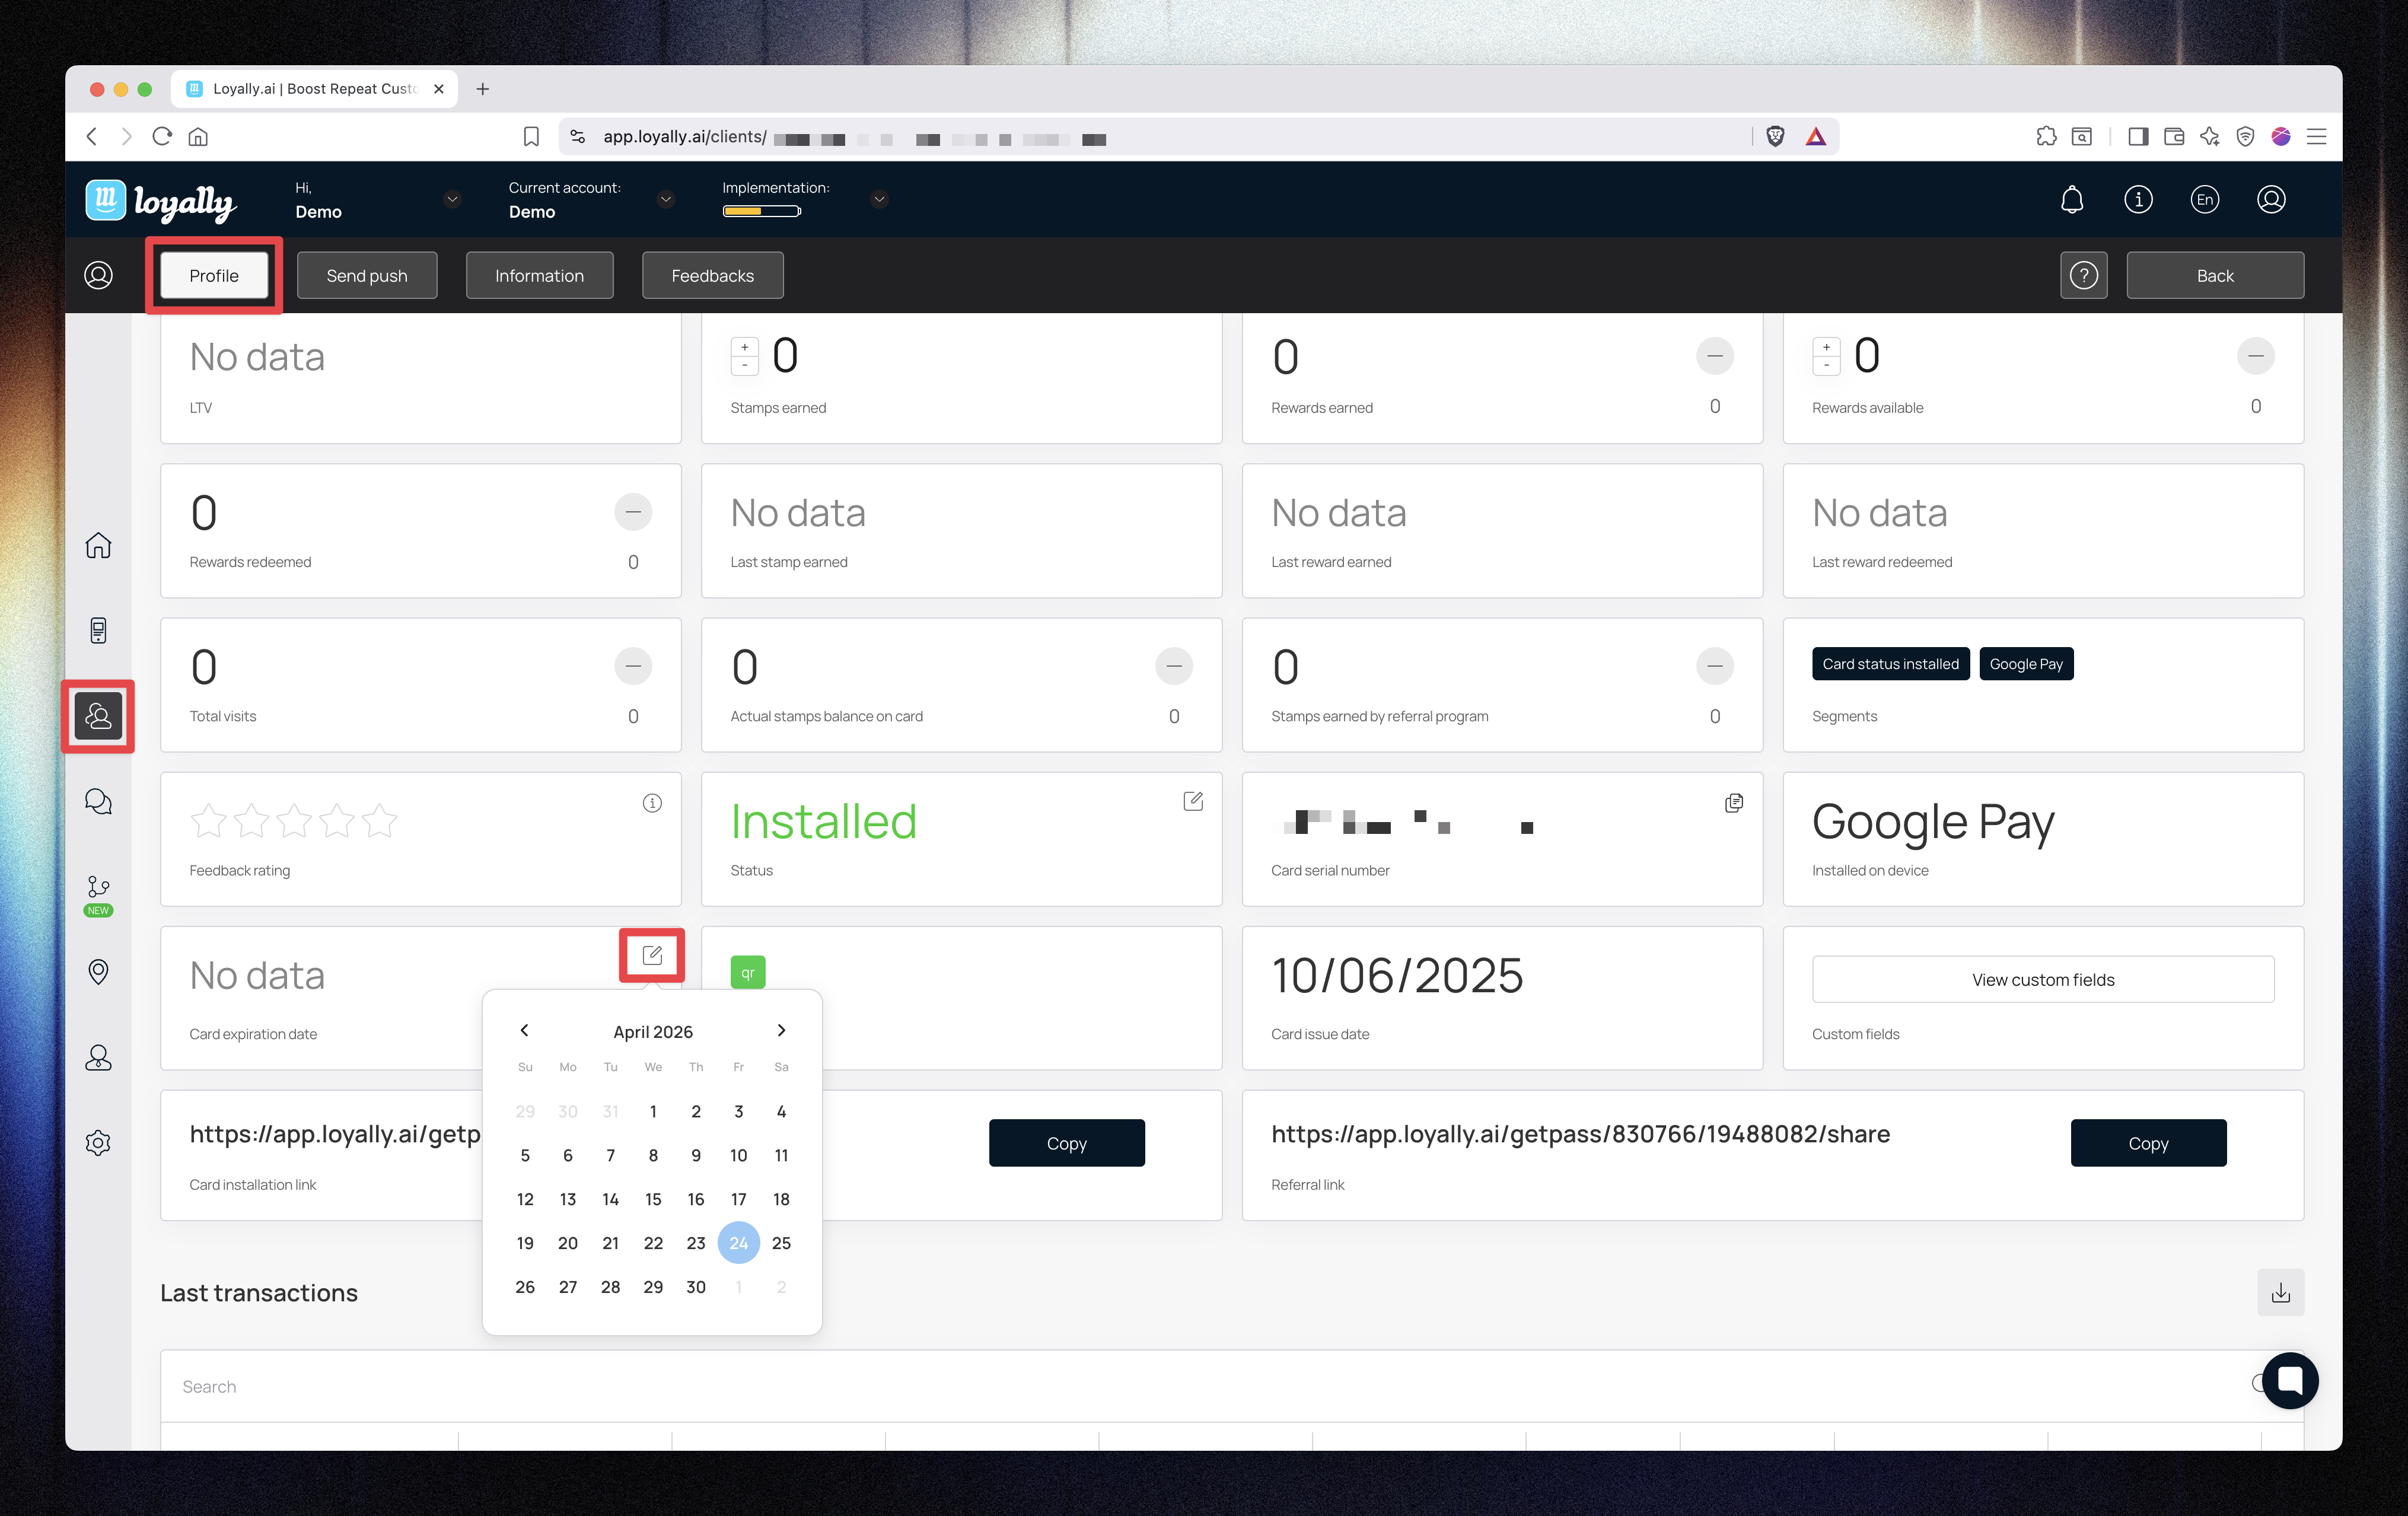
Click the calendar icon beside Card Expiration Date.
Select a new date from the calendar.
Confirm your change.
You can access any custom data fields and copy customer-specific links:
Card Installation Link: Click Copy to resend the card to the customer.
Referral Link: Click Copy to share the customer’s referral link.
These links are unique per customer and can be shared directly for reinstallations or referrals.
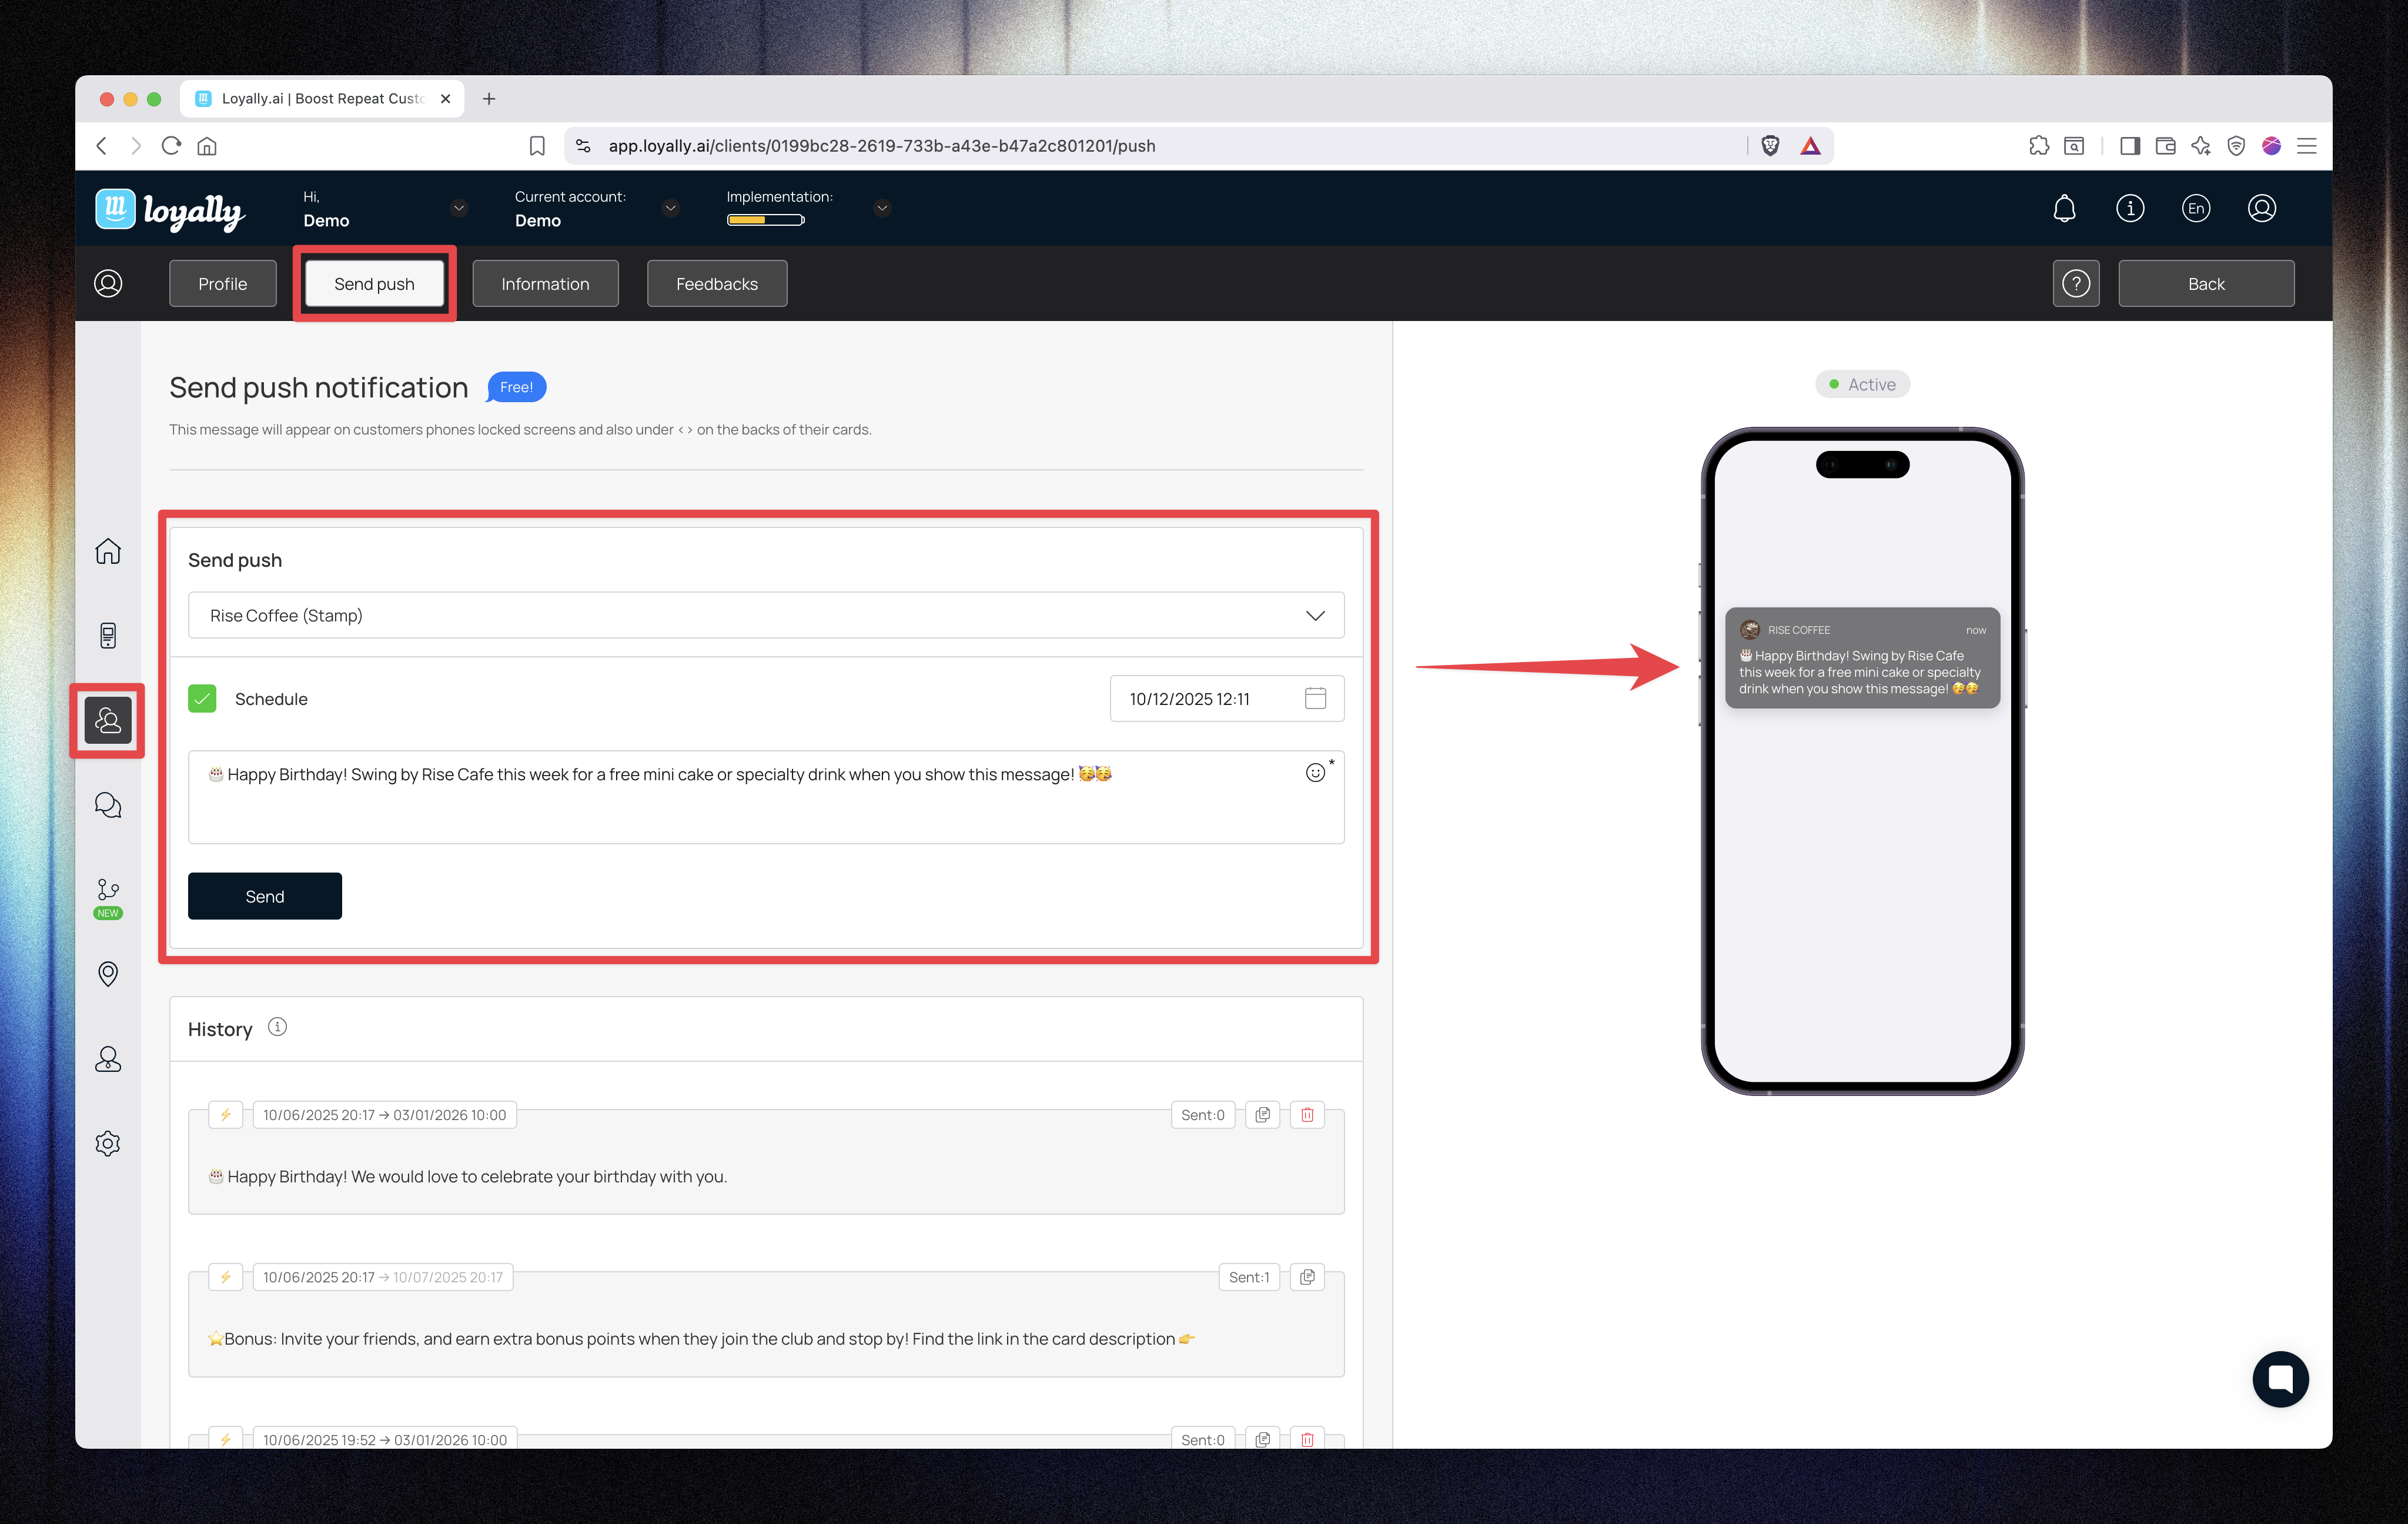
Send personalized push messages directly to individual customers.
Open the customer’s profile.
Go to the Send Push tab.
Select the card.
(Optional) Schedule a date and time for sending.
Enter your message.
Click Send.
✅ The message will be delivered only to that customer’s device.
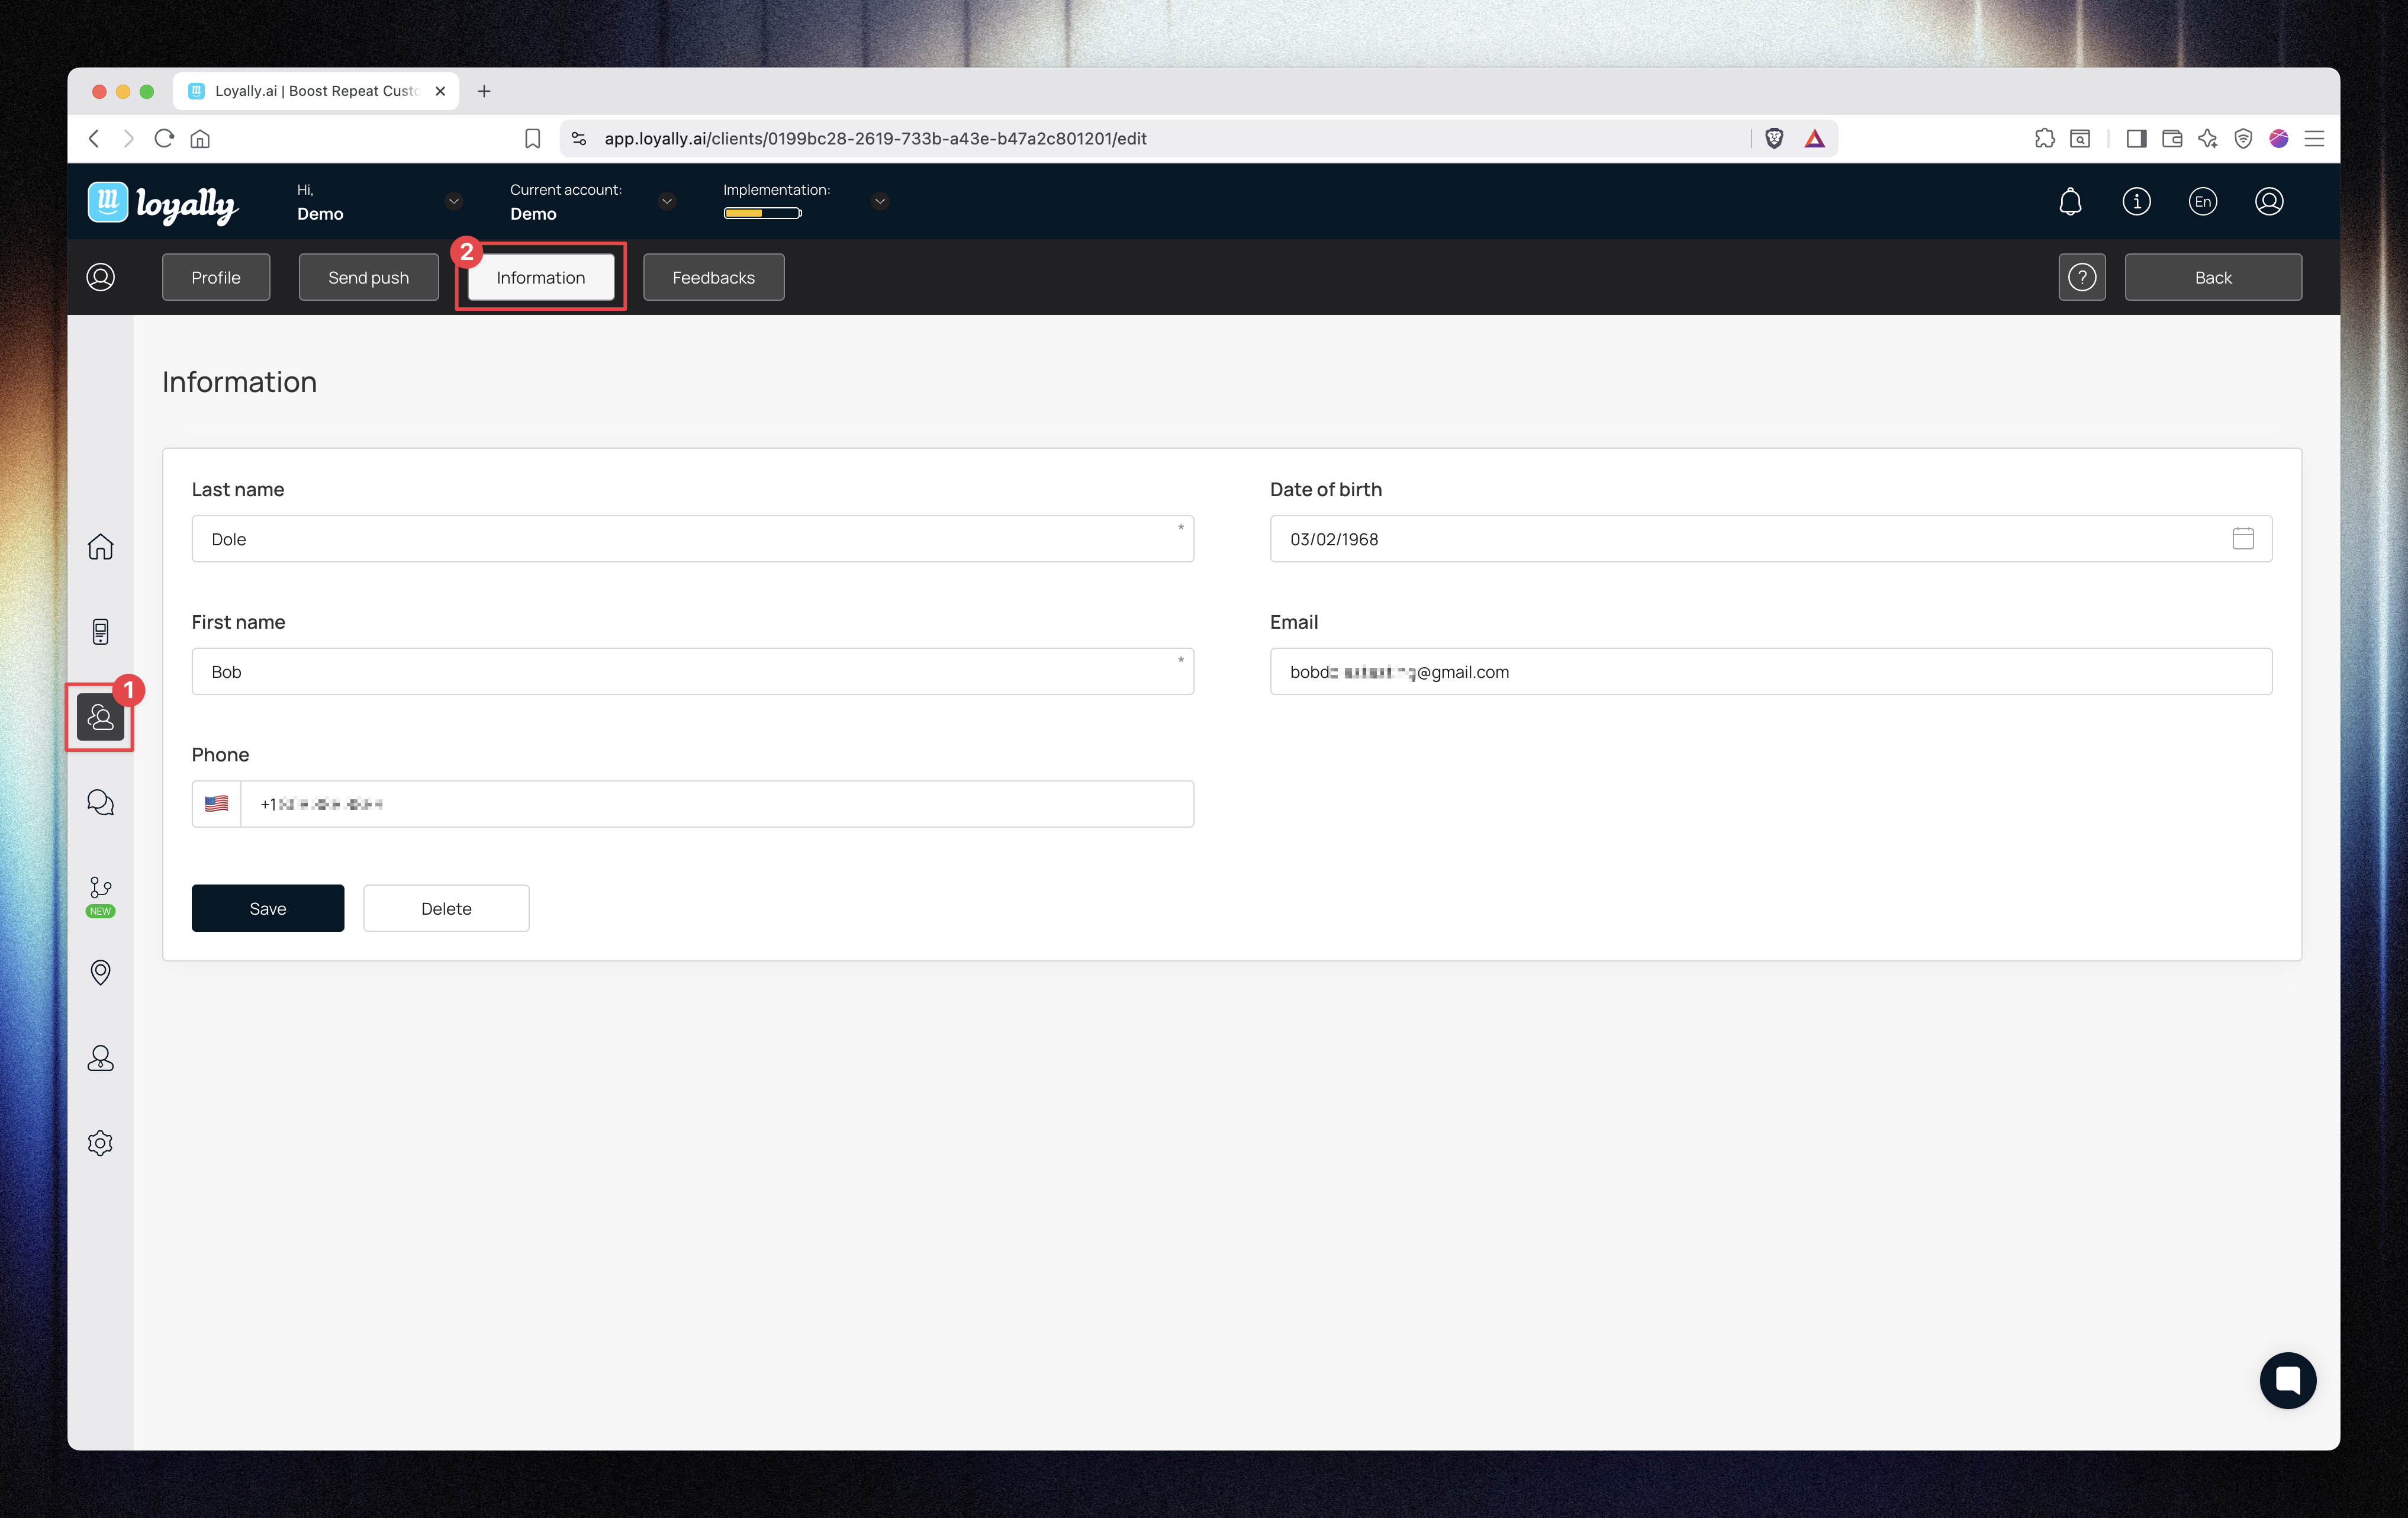
The Information tab shows all personal details for that customer:
Name
Phone
Date of birth
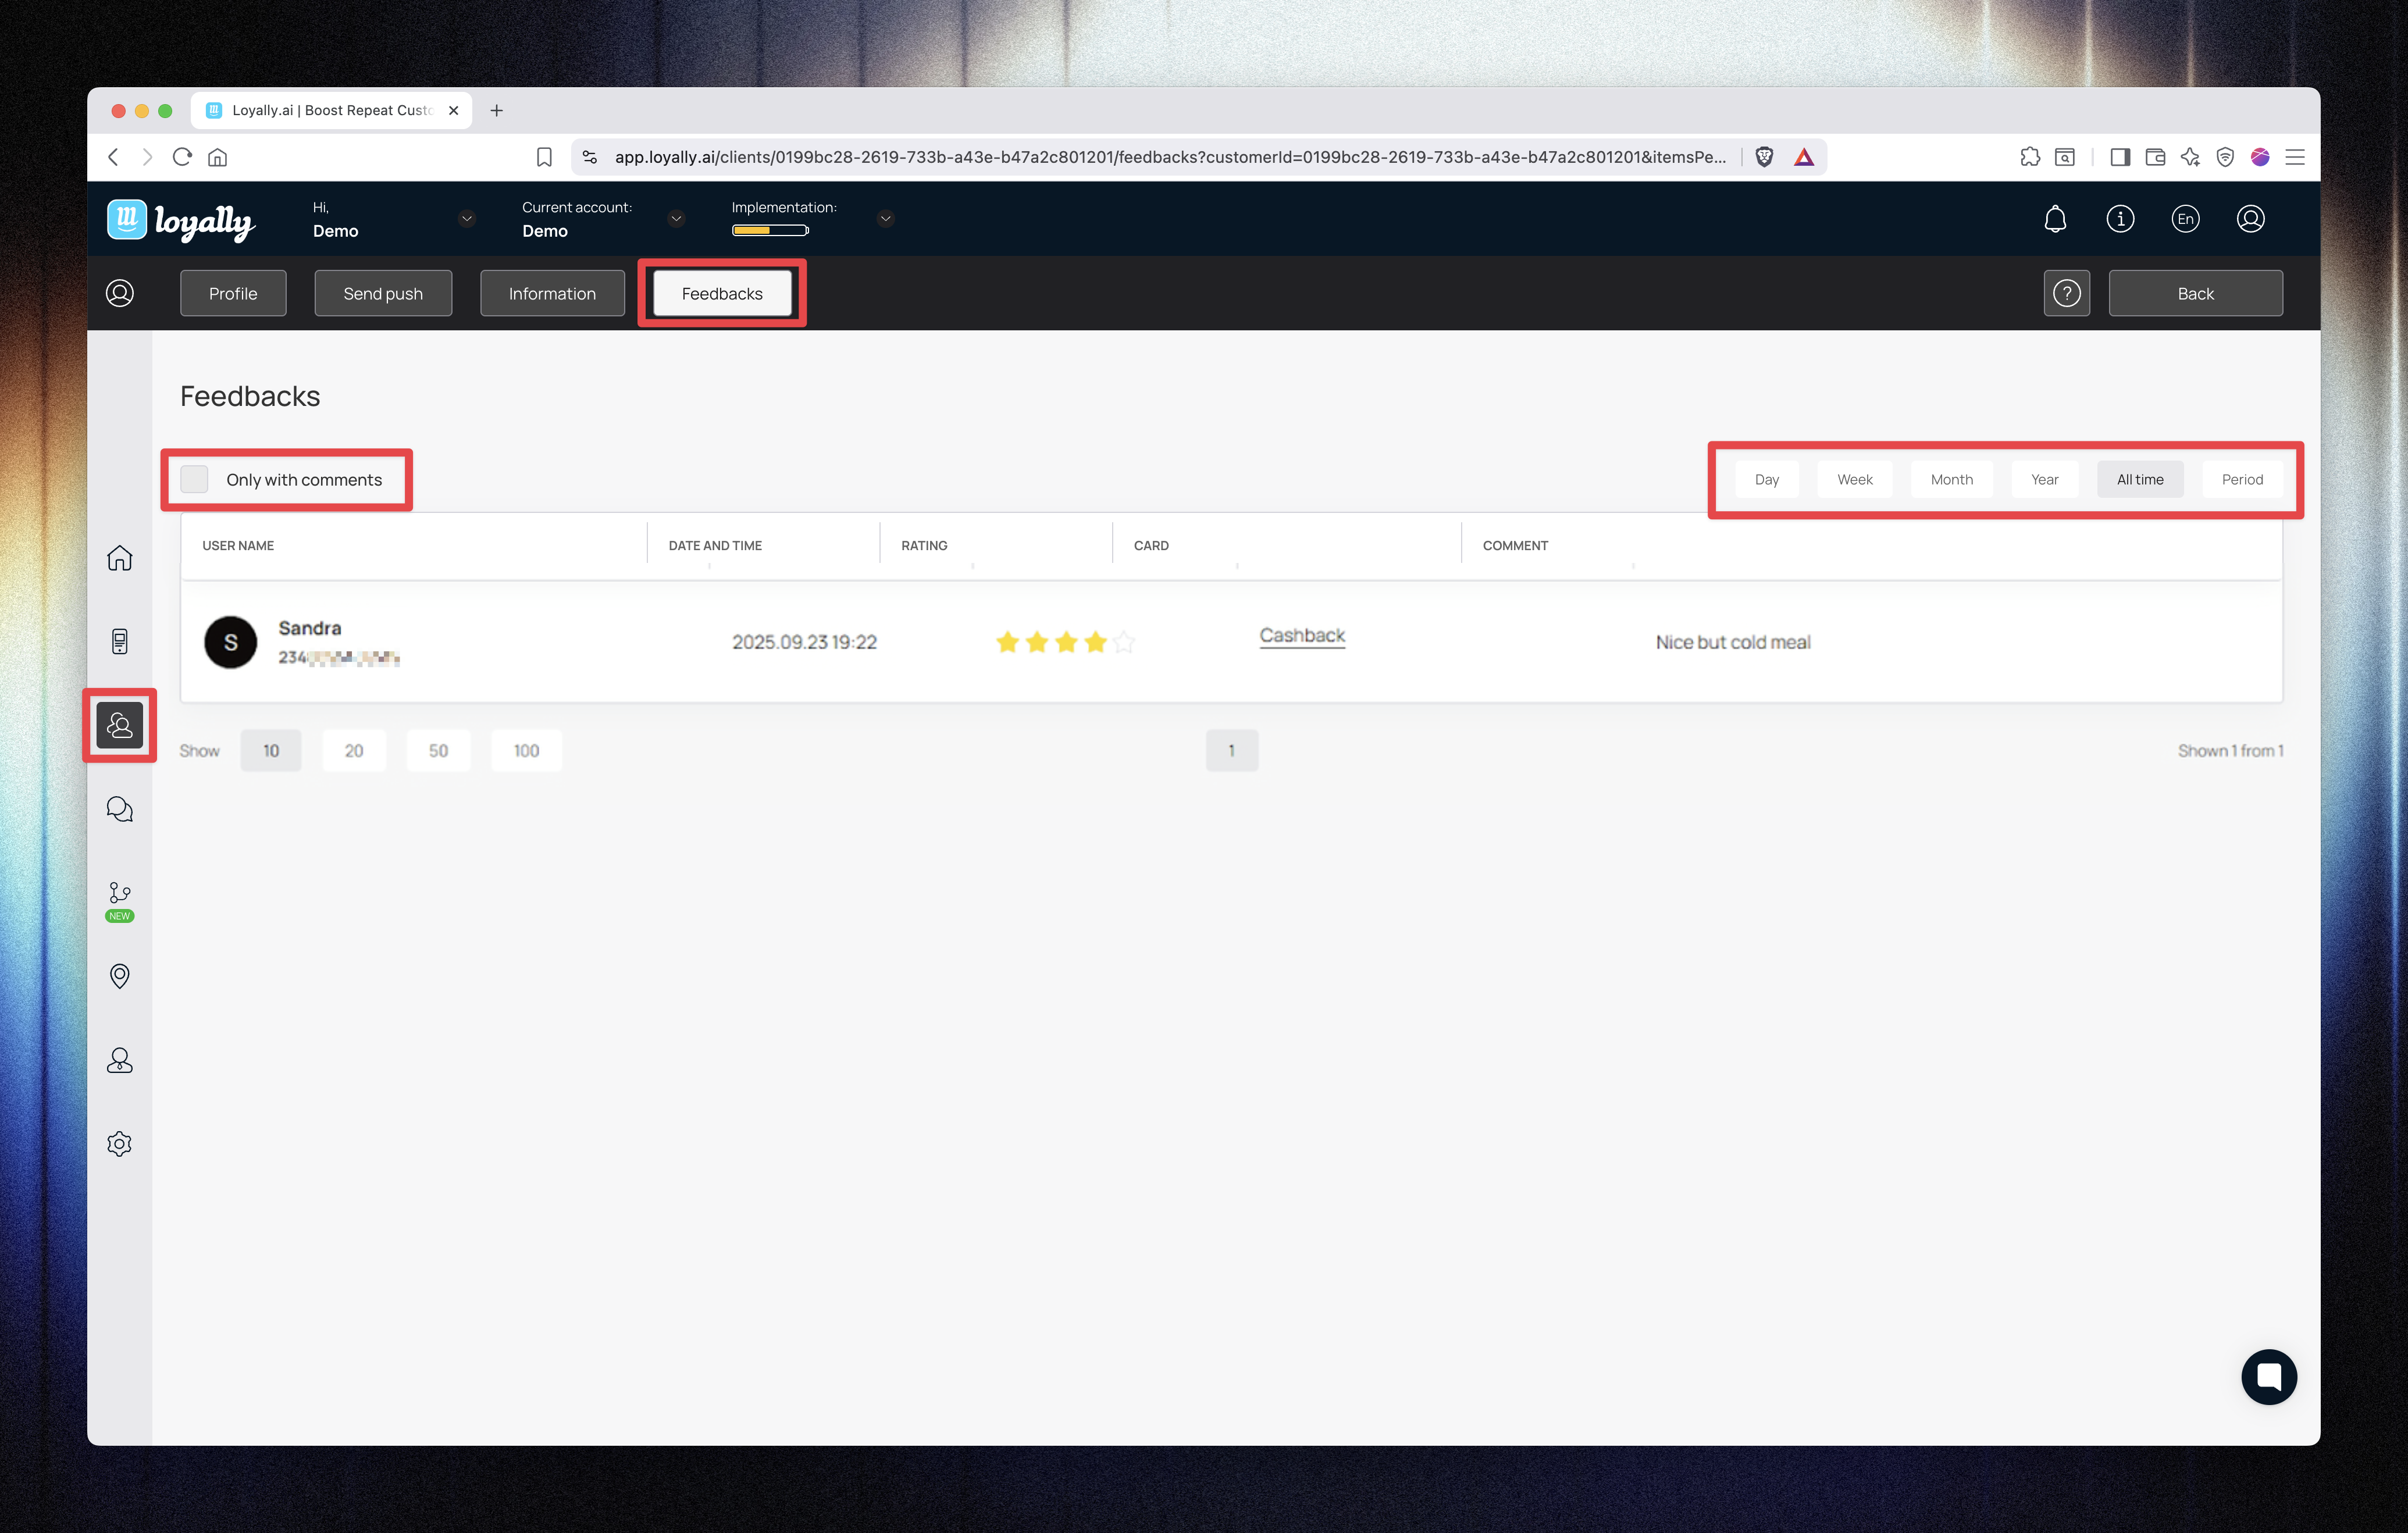
View and filter customer feedback with flexible filters:
Filter by day, week, month, year, all time, or a custom range.
Enable Only comments to show feedback that includes written text.
Use this data to track satisfaction trends and respond to issues quickly.
The Customer Profile (Stamp Card) section gives you complete visibility and control over each customer’s loyalty activity.
You can review their history, adjust balances, manage card settings, and send messages — all from one streamlined dashboard.