The Cashback Card motivates customers to spend more. Businesses sometimes fail to capitalize on the potential of increased spending per visit. This card offers cashback on purchases, encouraging larger transactions and more frequent visits.
Customer Use: Customers get a percentage of their spending back as cashback.
Business Benefit: Incentivizes higher spending and enhances customer loyalty.
Log in to Loyally.ai >> Go to 'Cards' page >> Select either ('Template' OR 'from Scratch') >> Select 'Cashback' Card Type >> Proceed through Settings, Design, Information, and Save & Preview.
Follow the interactive guide to seamlessly create your digital loyalty card with Loyally.ai.

Log into your Loyally.ai account.
Navigate to the 'Cards' page and select 'From Scratch'.
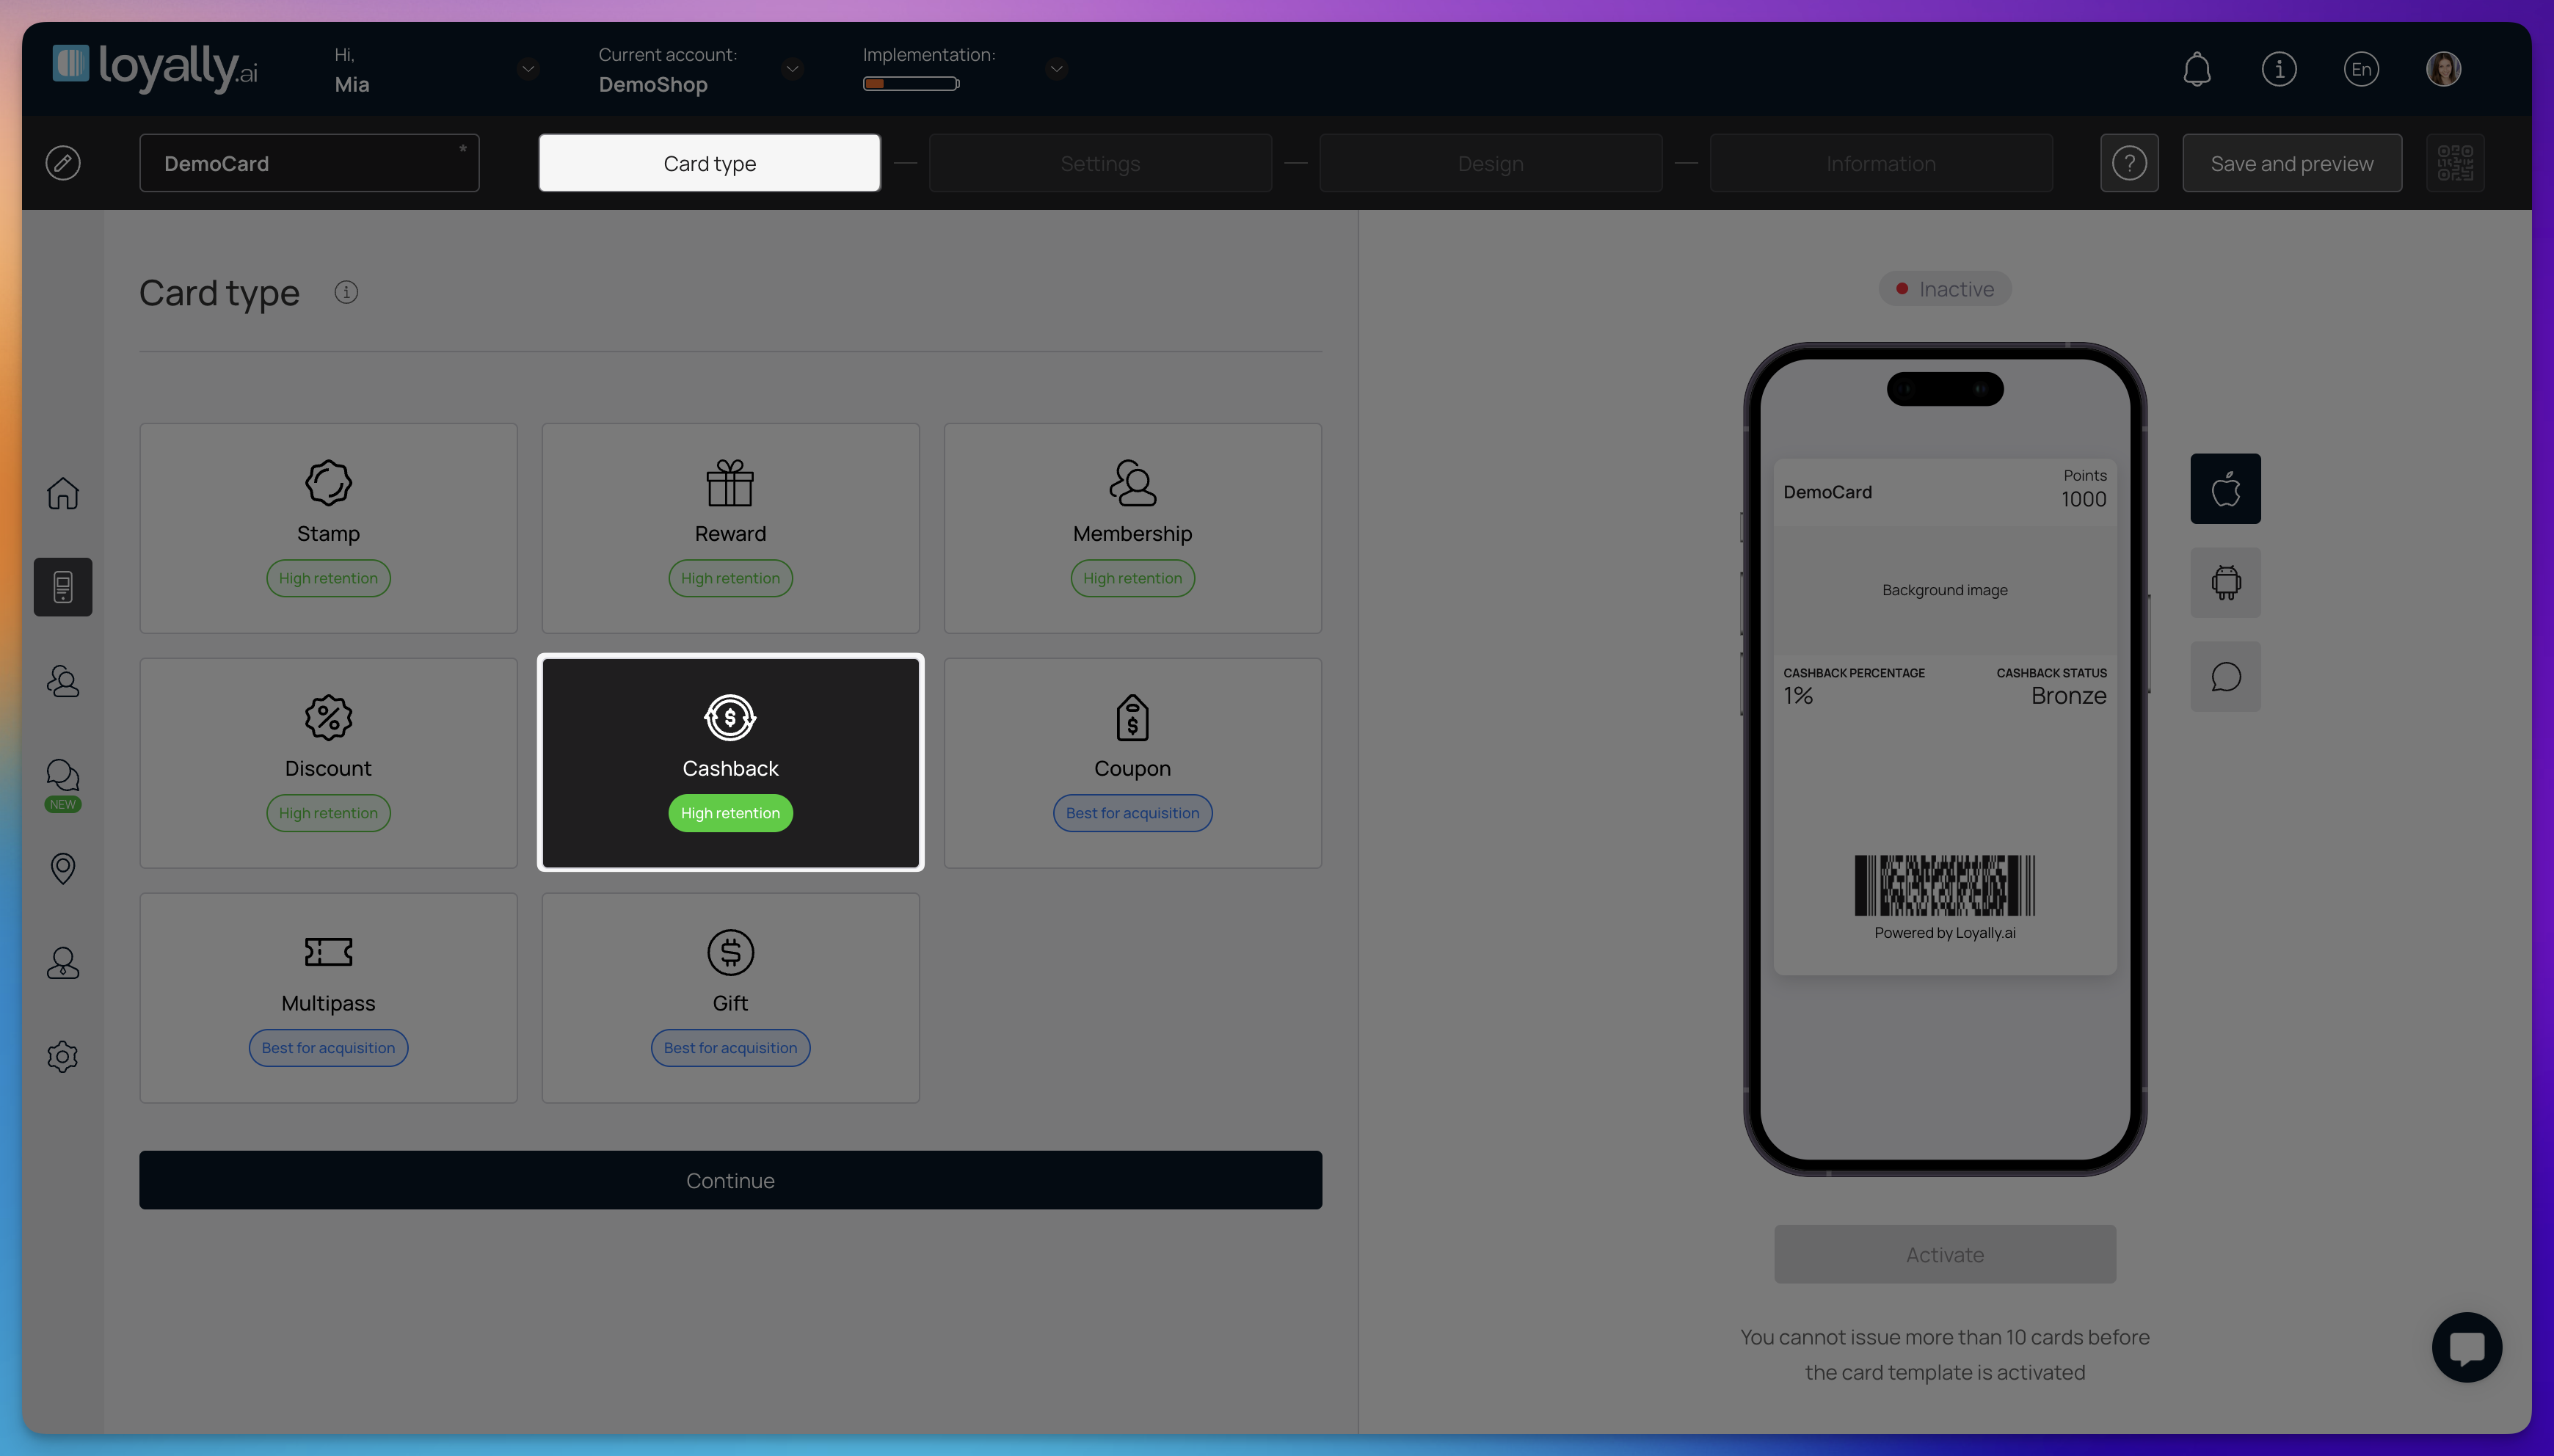
Select 'Cashback' card type and click 'Continue'.

This section configures how your Cashback Card operates, including technical formats, customer registration rules, and integration toggles.
Barcode Type – Choose how the customer's identifier appears on their digital card for scanning.
PDF417 – Displays a stacked linear barcode.
QR Code – Displays a square QR code.
Happy Hours – This feature allows you to automatically increase the cashback percentage or rewards a customer receives based on the specific time and day of their visit.
Promotions – Link your cashback card to specific marketing campaigns. You can add the card to an existing promotion or click '+' to create a new one.
Card Expiration Date – Determine the validity period of the customer’s digital card:
Unlimited – The card never expires.
Fixed Term – The card expires on a specific calendar date.
Fixed Term After Card Issuing – The card expires a set number of days after the customer installs it.

Lifetime Points – Select how long earned cashback points remain valid on a customer's card before they expire:
Unlimited – Points never expire.
Fixed Term After Bonuses Earned – Points expire after a set number of days from the date they were credited.
Locations – Select the specific business branches where this cashback card can be used and scanned.
Cardholder Status – Define or display the tier or level of the customer within your loyalty program.
Tier Name – Give your levels a unique name (e.g., Silver, Gold, Platinum).
Spend to Achieve – Set the total amount a customer must spend to unlock that specific tier.
Percentage % – Assign the specific cashback rate for that tier.
Add Tier – Click this button to create additional levels for your program.
Language – Choose the primary language displayed to the customer on the card interface.
Date Format – Select your preferred date display (e.g., DD/MM/YYYY) to match your regional standards.
Thousands & Decimal Separator – Configure how transaction amounts are displayed. You can choose between a Space, Dot, or Comma to match your local currency formatting.
Purchase Amount When Charging (Scanner App) – Toggle this ON to require staff to enter the total bill amount into the Scanner App when processing a transaction.

Card Issuing Form – Customize the registration fields customers must fill out to get their card (e.g., Name, Email, Phone).
Field Type – Choose the data type for the field, such as First Name, Email, Text, URL, Date, Number, or Photo.
Field Name – Label the field as it will appear to the customer (e.g., "Phone Number" or "Favorite Flavor").
Required – Toggle this on if the customer must fill out this field to complete registration.
Unique – Use this for fields like Email or Phone to ensure one person cannot register for multiple cards with the same info.
UTM – Add UTM parameters to track the source of your card installations (e.g., identifying if a customer signed up via a Facebook ad or an email link).
Phone Mask – Select the telephone format for the country where your business operates to ensure customers enter valid phone numbers.
Privacy Policy & Consent Toggles – Use these to display your Privacy Policy and a mandatory consent checkbox for processing personal data, ensuring compliance with regulations like GDPR.

Google Wallet & PWA Installation Buttons – Control how customers save their cards:
Google Wallet – Allows Android users to save the card to their native wallet.
PWA Installation Button – Allows customers to install the card as a web app on their home screen.
Limit the Number of Cards Issued – Set a cap on how many total cards can be distributed. Setting this to "0" allows for unlimited issuance.
Card Installation Via Shared Link – Toggle this to enable or disable the ability for customers to install the card through a direct URL link.
Number of points when issuing a card – This setting determines how many preloaded cashback points are automatically added to a customer's card when they first receive it. Set this to a specific number to offer a welcome bonus upon signup.
Number of birthday points – On the customer's birthday, the specified number of additional points will be credited to their card. The customer will receive a push notification informing them that their cashback balance has increased.
Analytics (Optional) – Insert tracking IDs (such as Google Tag Manager) to monitor customer engagement and installation data.

In this step, you customize the visual elements of your digital card to ensure it reflects your brand identity and displays the most relevant transaction data to your customers.
Logo – This is your primary brand image at the top of the card. For the best result, use an image of 480 x 150 pixels. Images smaller than 150 pixels high may appear blurry on high-resolution screens.
Icon – This image appears on the customer's lock screen alongside push notifications (e.g., "You earned $5.00 cashback!"). Use a square image, ideally 512 x 512 pixels, to avoid stretching.
Background of the Central Part – This sits behind the main content area of your card. Use a wide image (at least 1125 x 432 pixels) to give the card personality and visual depth.
Colors – Customize the palette to match your brand’s style:
Card Background – The primary color of the digital card surface.
Text Color – The color for all labels, balances, and instructions.
Background Color of the Central Part – The specific color of the "plate" or field where your main cashback data sits.
Fields Name (iPhone Only) – These fields allow you to customize the specific data points displayed on the front of the loyalty card for iOS users. You can choose up to two rows of information to show progress in real-time.
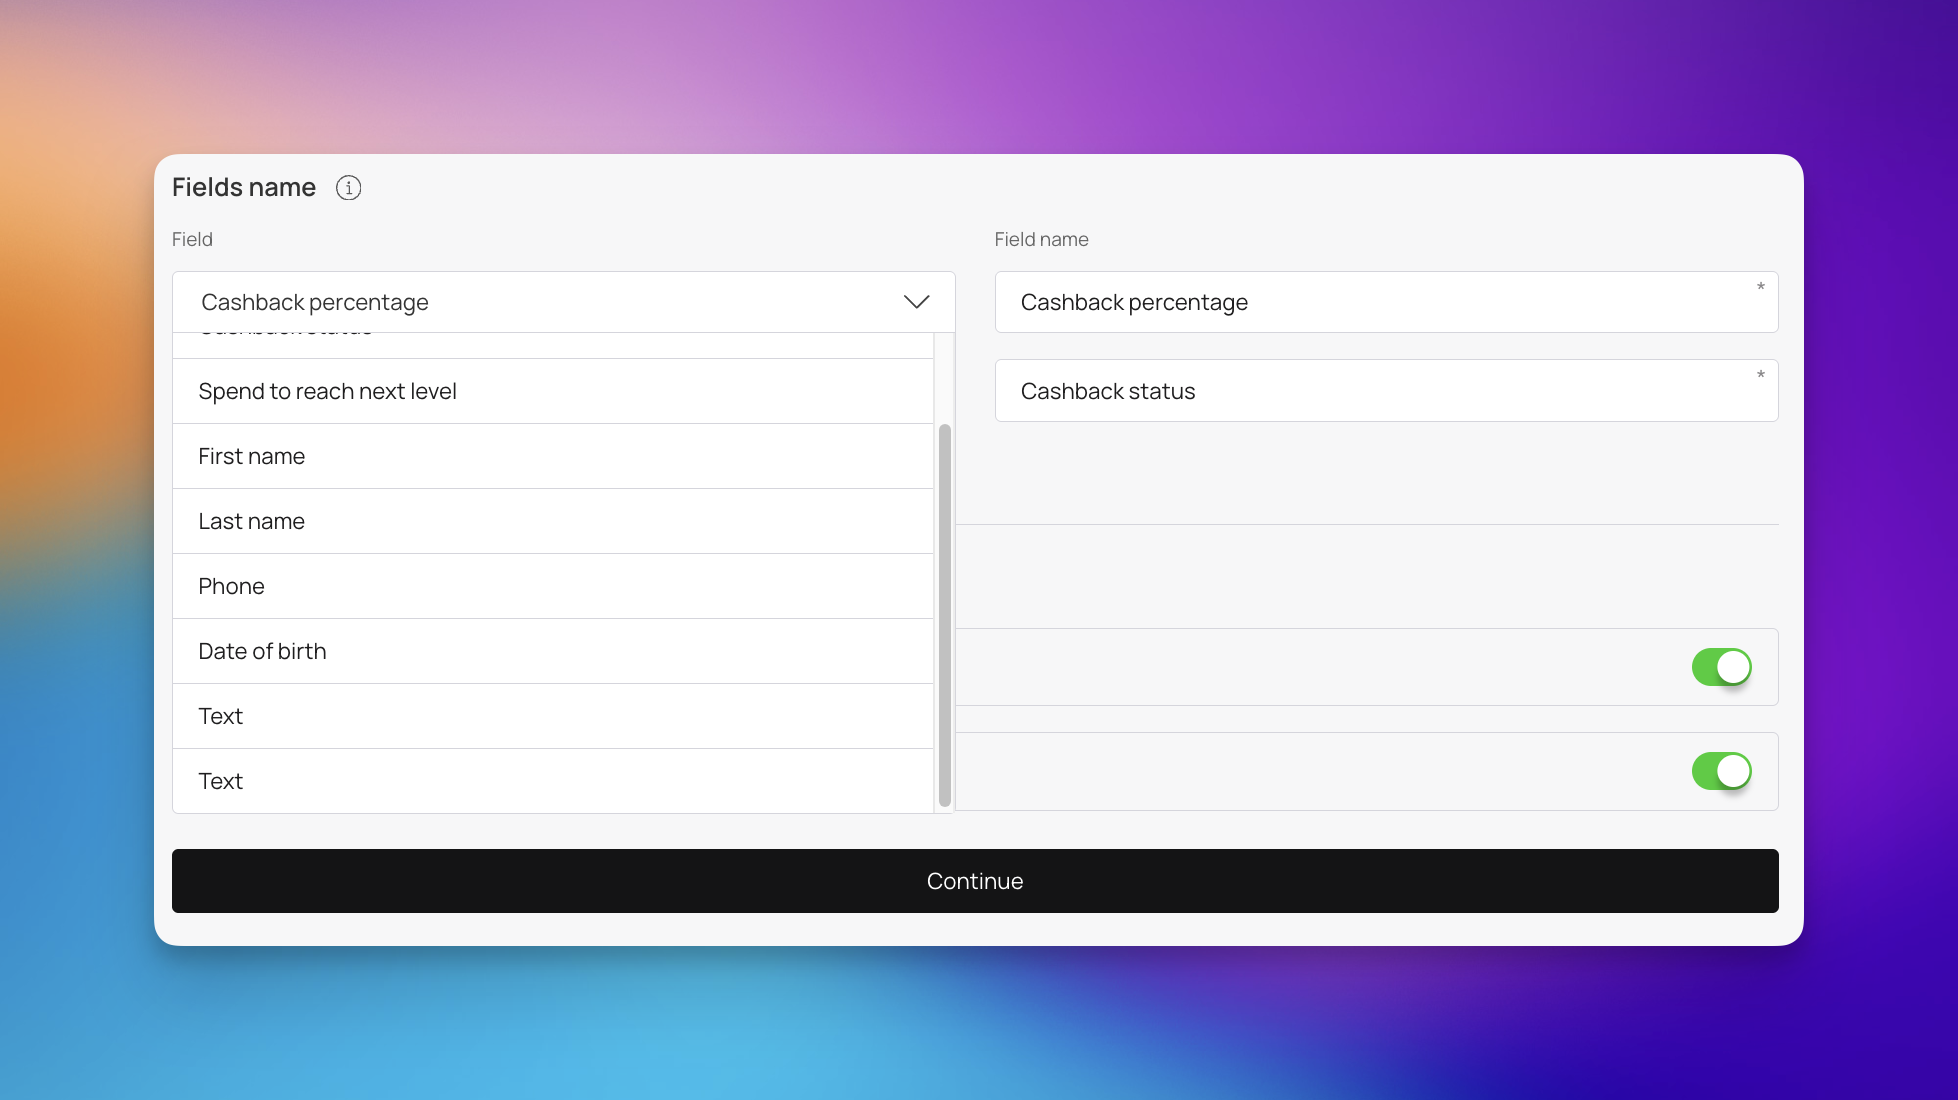
Field – Select the data point you want to display from the dropdown menu, including:
Cashback Percentage – Shows the current rate the customer is earning.
Cashback Status – Displays their current tier level.
Spend to Reach Next Level – Shows the remaining amount needed to upgrade.
First Name / Last Name – Personalizes the card with the customer's name.
Phone / Date of Birth – Displays registered contact or profile info.
Field Name – This acts as the label that corresponds to the data (e.g., "Your Current Rate" or "Next Tier Progress").
Show Logo at Card Issuing Form – Toggle this ON to display your brand logo at the top of the signup page, ensuring brand recognition from the moment a customer clicks your link.
Show Background Color on Card Issuing Form – This setting applies your chosen brand colors to the header of the registration form for a cohesive user experience.

In this step, you will set up your card's basic information, reward rules, and contact details to clearly show customers how your loyalty program works.
Card Description – A brief summary of your program. Use this space to explain the primary value to the customer (e.g., "Earn 5% cashback on every purchase!").
Company Name – Your official business name as it should appear on the digital card.
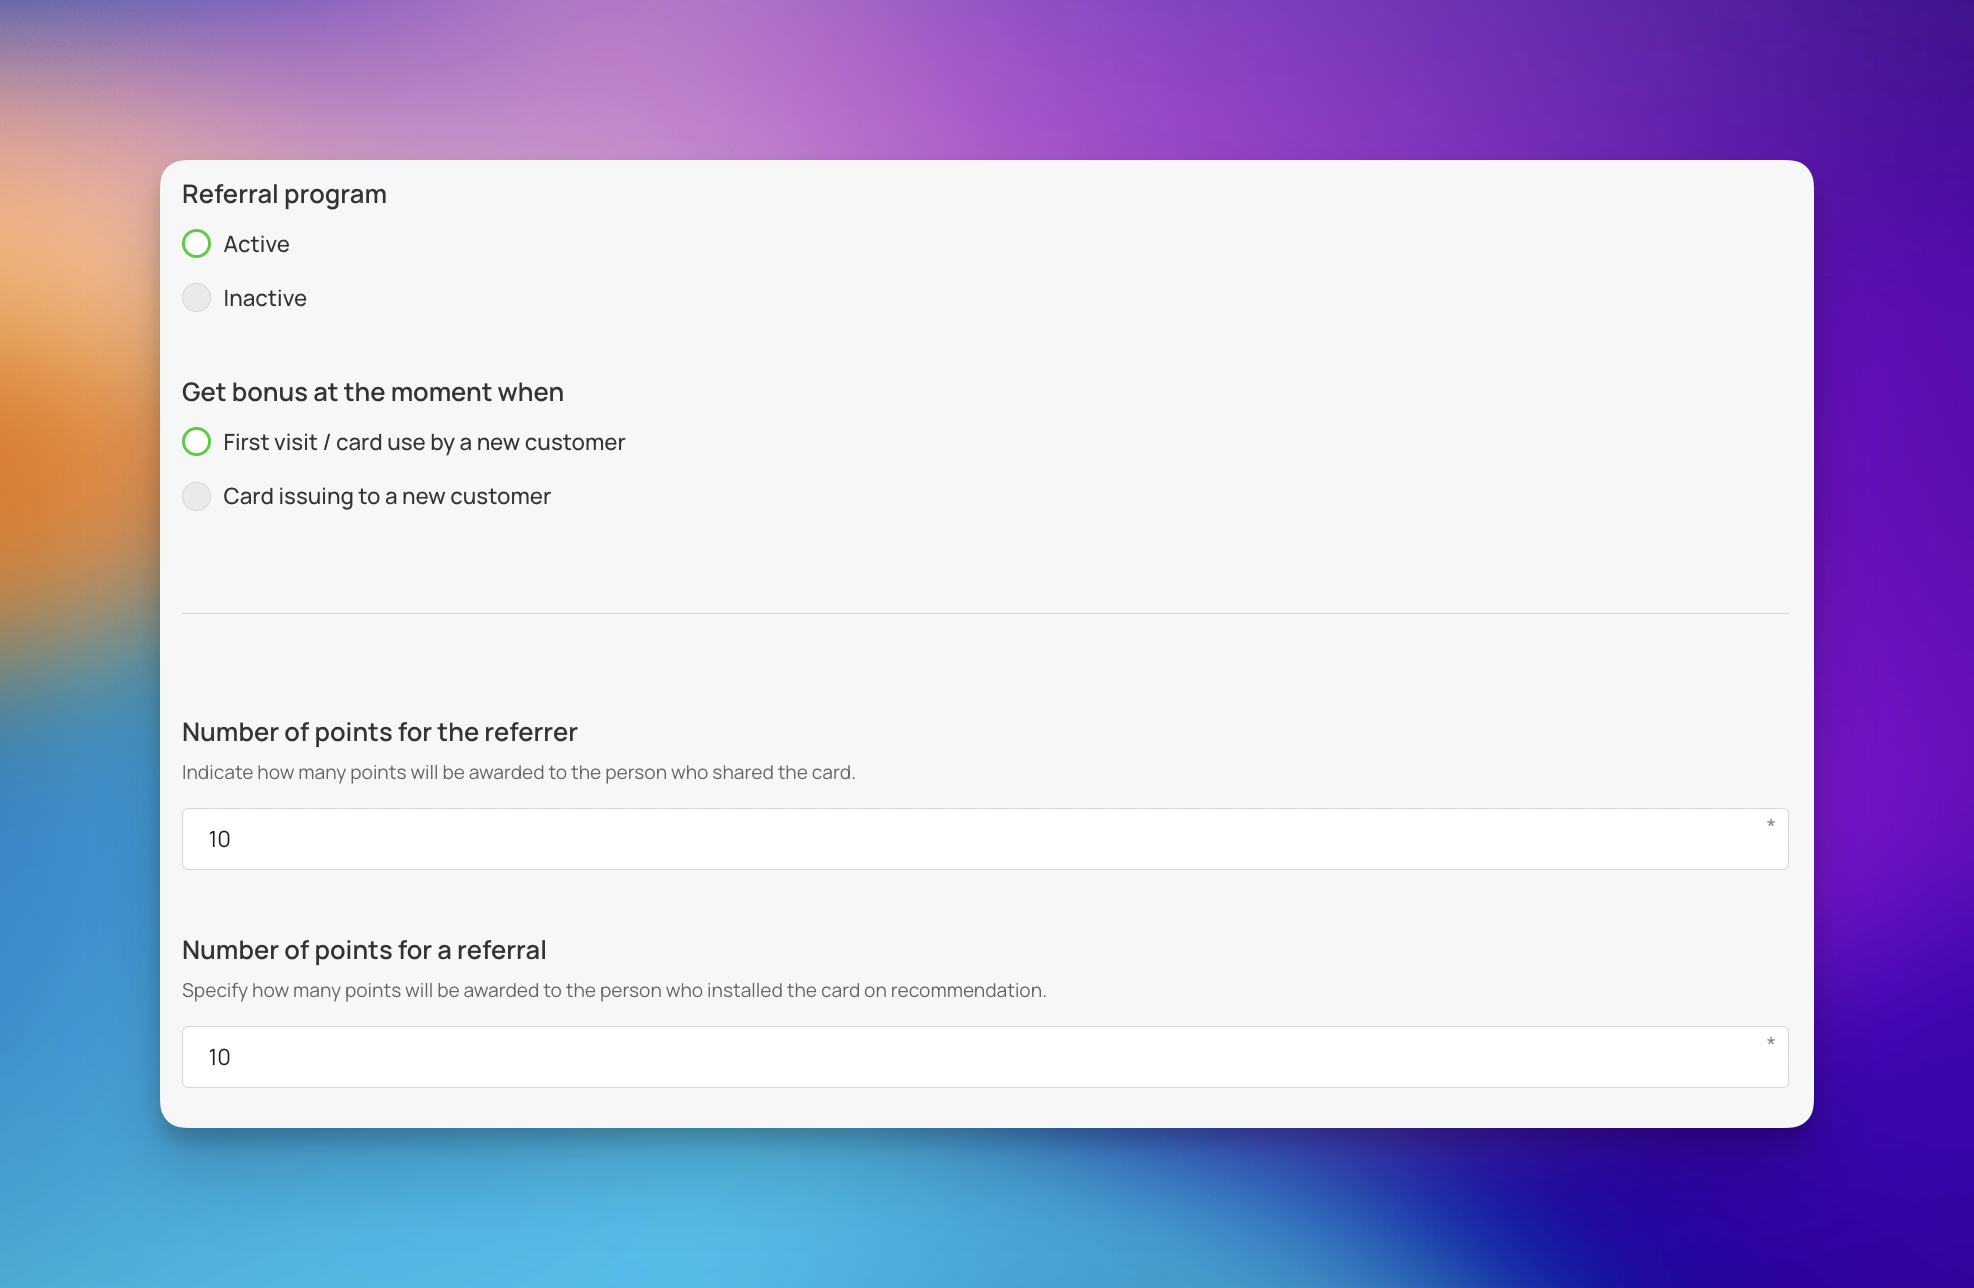
Referral Program – Encourage your regulars to invite their friends by offering bonus cashback to both parties.
Inactive – No referral bonuses are offered.
Active – You can configure specific rewards for successful referrals. If choose to include a referral program you can choose how to award your customer by:
First Visit / Card Use by a New Customer – The bonus is awarded only after the referred friend successfully uses their card for a transaction.
Card Issuing to a New Customer – The bonus is awarded immediately once the referred friend installs the card.
Number of points for the referrer – Indicate how many points will be awarded to the person who shared the card.
Number of points for a referral – Specify how many points will be awarded to the person who installed the card on recommendation.
Active Links – This section allows you to provide a link and custom text for essential contact information and resources. Choose the category from the dropdown menu, such as URL, Phone, Email, or Address.
Feedback Links – Add direct links to various review platforms and business directories like Google, Yelp, or Facebook. This makes it easy for customers to leave a review directly from their digital card
Link for Redirection After Card Installation – The user will be redirected to this URL after installing the card. Note that this setting primarily applies to cards installed in Apple Wallet
Terms of Use – Use the switch in the top right corner to enable or disable the visibility of your terms on the digital card. In the text area, list your specific rules, such as:
How cashback is earned and redeemed.
Any excluded items or services.
Expiration policies and non-transferability rules.
Link to Full Terms and Conditions (Optional) – If your legal requirements are extensive, provide a link here to a full document on your website.
Issuer Information – Provide customers with a way to contact you if they have questions about their cashback balance. This information is typically found on the back of the digital card.
Company Name – Your official registered business name.
Email – A monitored customer support or business email address.
Phone Number – Use the international format (e.g., +1 for the US/Canada) so customers can tap the number to call you directly.

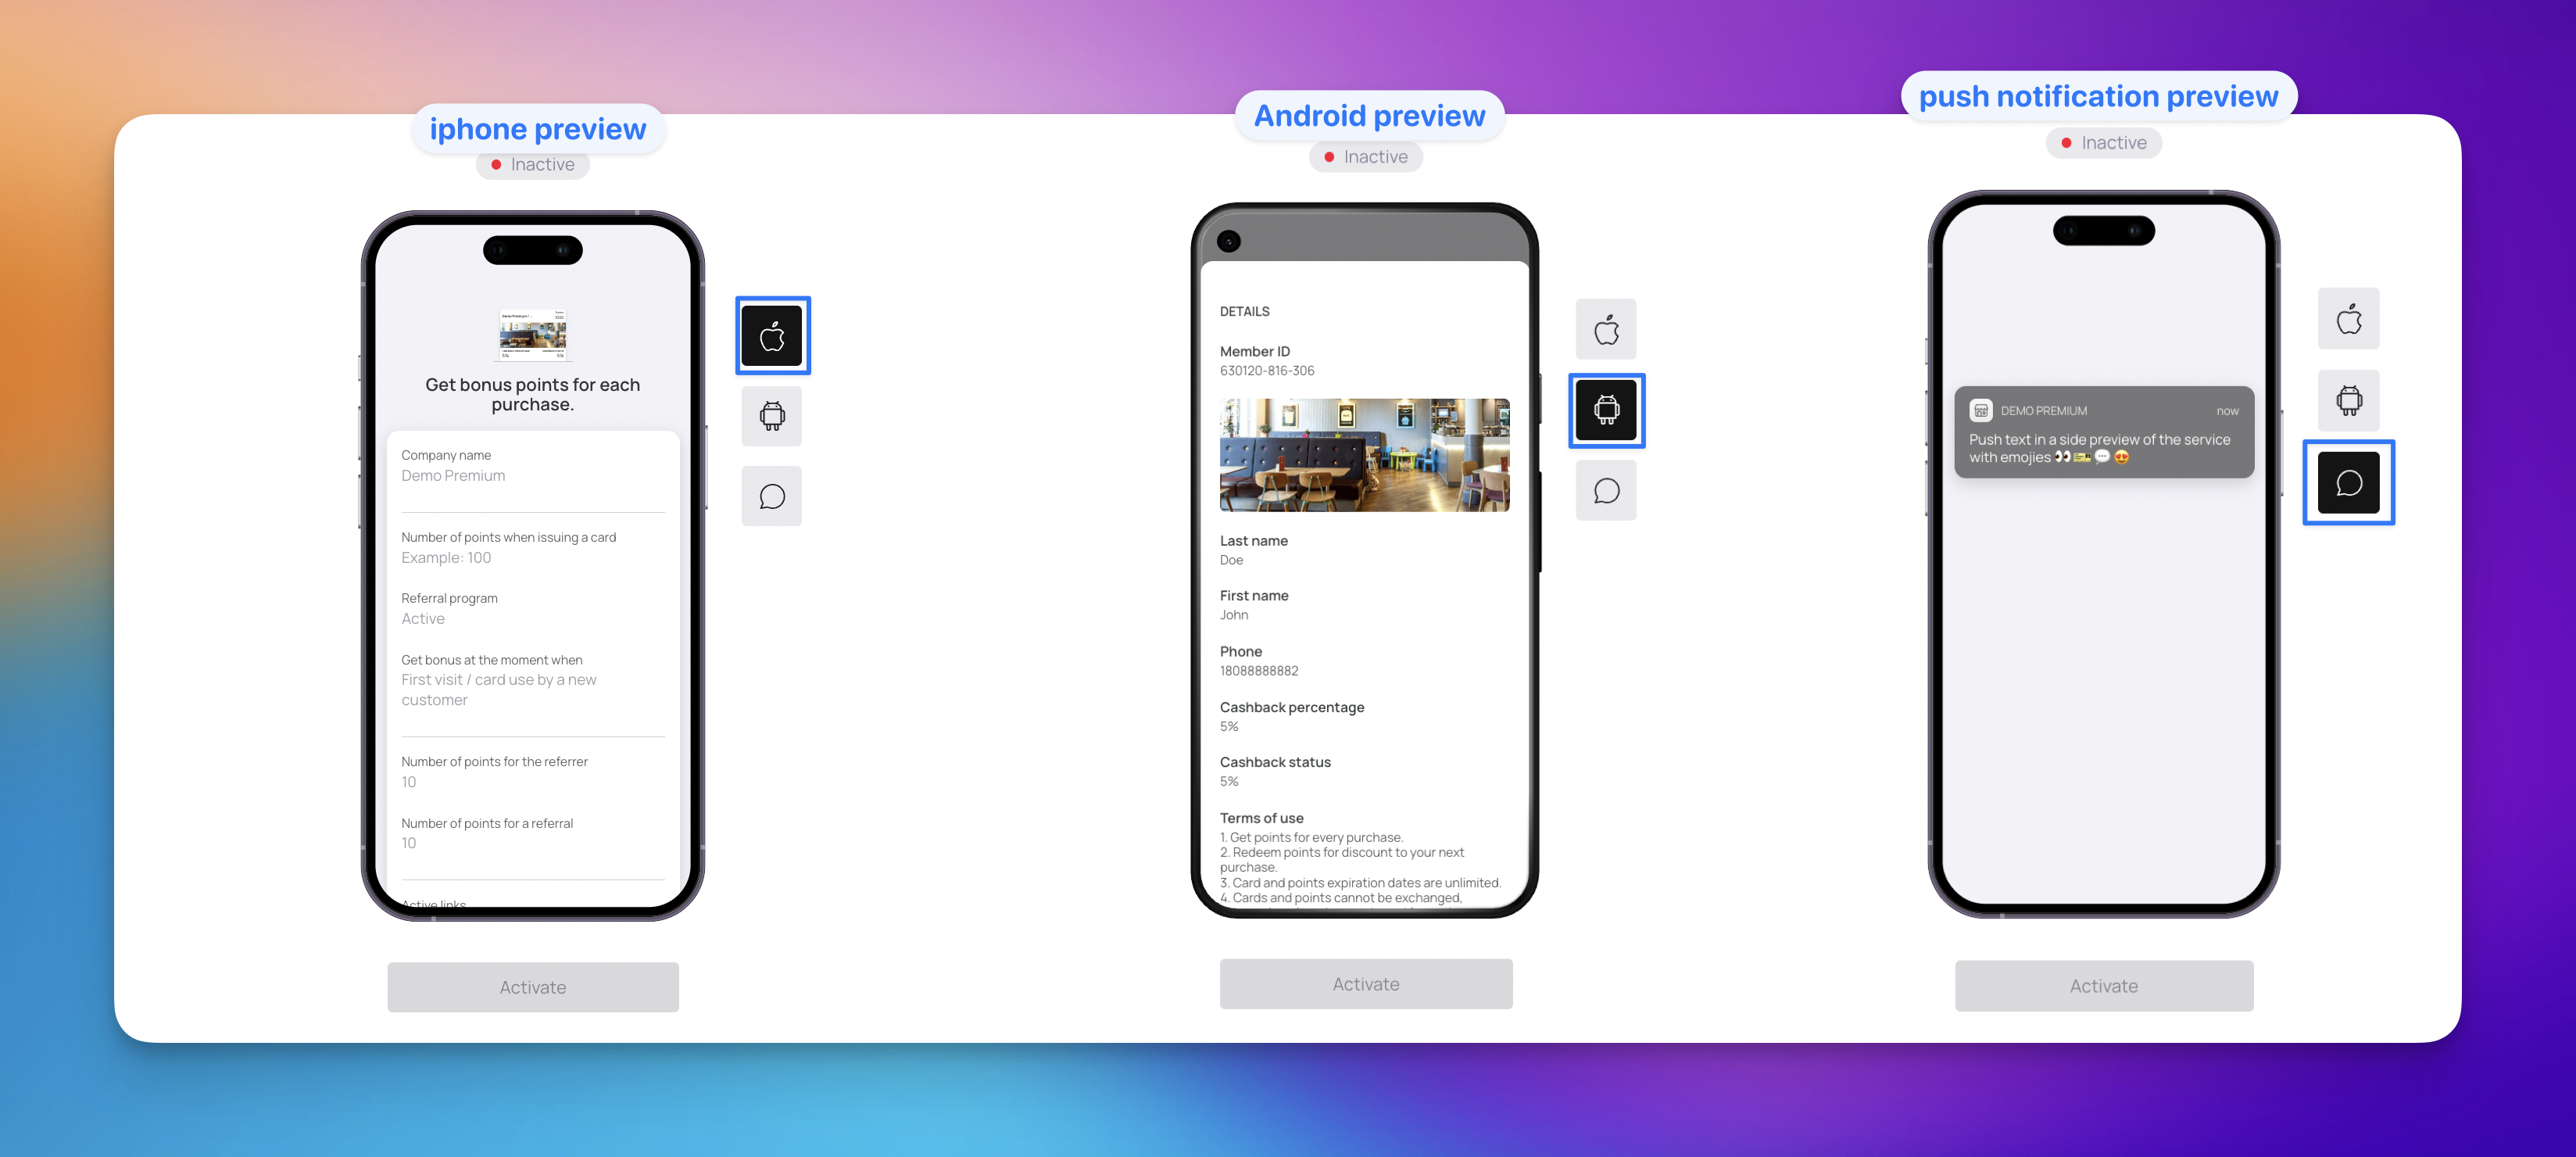
Before you finish, take a moment to review how your Cashback Card will appear to your customers across different platforms. The preview window updates in real-time as you make changes to your design and settings.
To the right of the mobile mockup, you will find three icons. Click these to toggle between the following views:
Apple Preview: Click the Apple icon to see how the digital cashback card looks when stored in an iOS device. This shows the card's layout, logo placement, and how your selected Fields (like Cashback Percentage or Tier Status) appear on the front of the card.
Android Preview: Click the Android icon to view the card from a Google Wallet perspective. This view highlights the member ID, current cashback balance, and the QR code or barcode specific to the Android interface.
Push Notification Preview: Click the Speech Bubble icon to see a mock-up of how push notifications (such as "You earned $5.00 cashback!") will appear on a customer’s lock screen. This allows you to verify that your messaging is clear and fits within the notification window.
Review all three views to ensure your text is legible, your branding looks consistent, and your tier names fit correctly within the display. Once you are satisfied with the appearance:
Click Activate to launch your cashback program and make it ready for distribution.
Click 'Download PDF' to print a display for your table or counter, perfect for showcasing your new card. Share the QR code or link with your customers - they can simply scan or click to discover what you've created. Let's start spreading the word about your exciting new card! 🚀
Test the Notification: Ensure your push notification message is punchy. Instead of "Points added," try "You just earned cashback! Check your new balance."
Check Accessibility: View the card in both Apple and Android previews to ensure your text color doesn't blend into your background image.
Verify Field Names: Make sure the labels you created in the "Design" step (e.g., "Spend to Level Up") look clear and aren't cut off on the mobile screen.
The Power of Digital Cards for Customer Loyalty
Revolutionize Your Loyalty Program with Digital Solutions
Card Marketing Kit: Boost Loyalty Sign-Ups Offline
Download a print-ready professional marketing kit for offline card distribution
Card Distribution - Offline
Distribute your loyalty card offline in the local store
Card Distribution - Online
Distribute your loyalty cards online via the different channels