The 'Membership Card' is designed to elevate your client's commitment to your service. Gyms, clubs, and subscription services often need a boost in customer retention. This card offers exclusive benefits, creating a sense of belonging and encouraging continual engagement.
Customer Use: Gain access to exclusive services, discounts, or content.
Business Benefit: Enhances customer loyalty and retention through exclusive offers and benefits, creating a sense of community.
Log in to Loyally.ai >> Go to 'Cards' page >> Select either ('Template' OR 'from Scratch') >> Select 'Membership' Card Type >> Proceed through Settings, Design, Information, and Save & Preview.
Follow the interactive guide to seamlessly create your digital loyalty card with Loyally.ai.

Log into your Loyally.ai account.
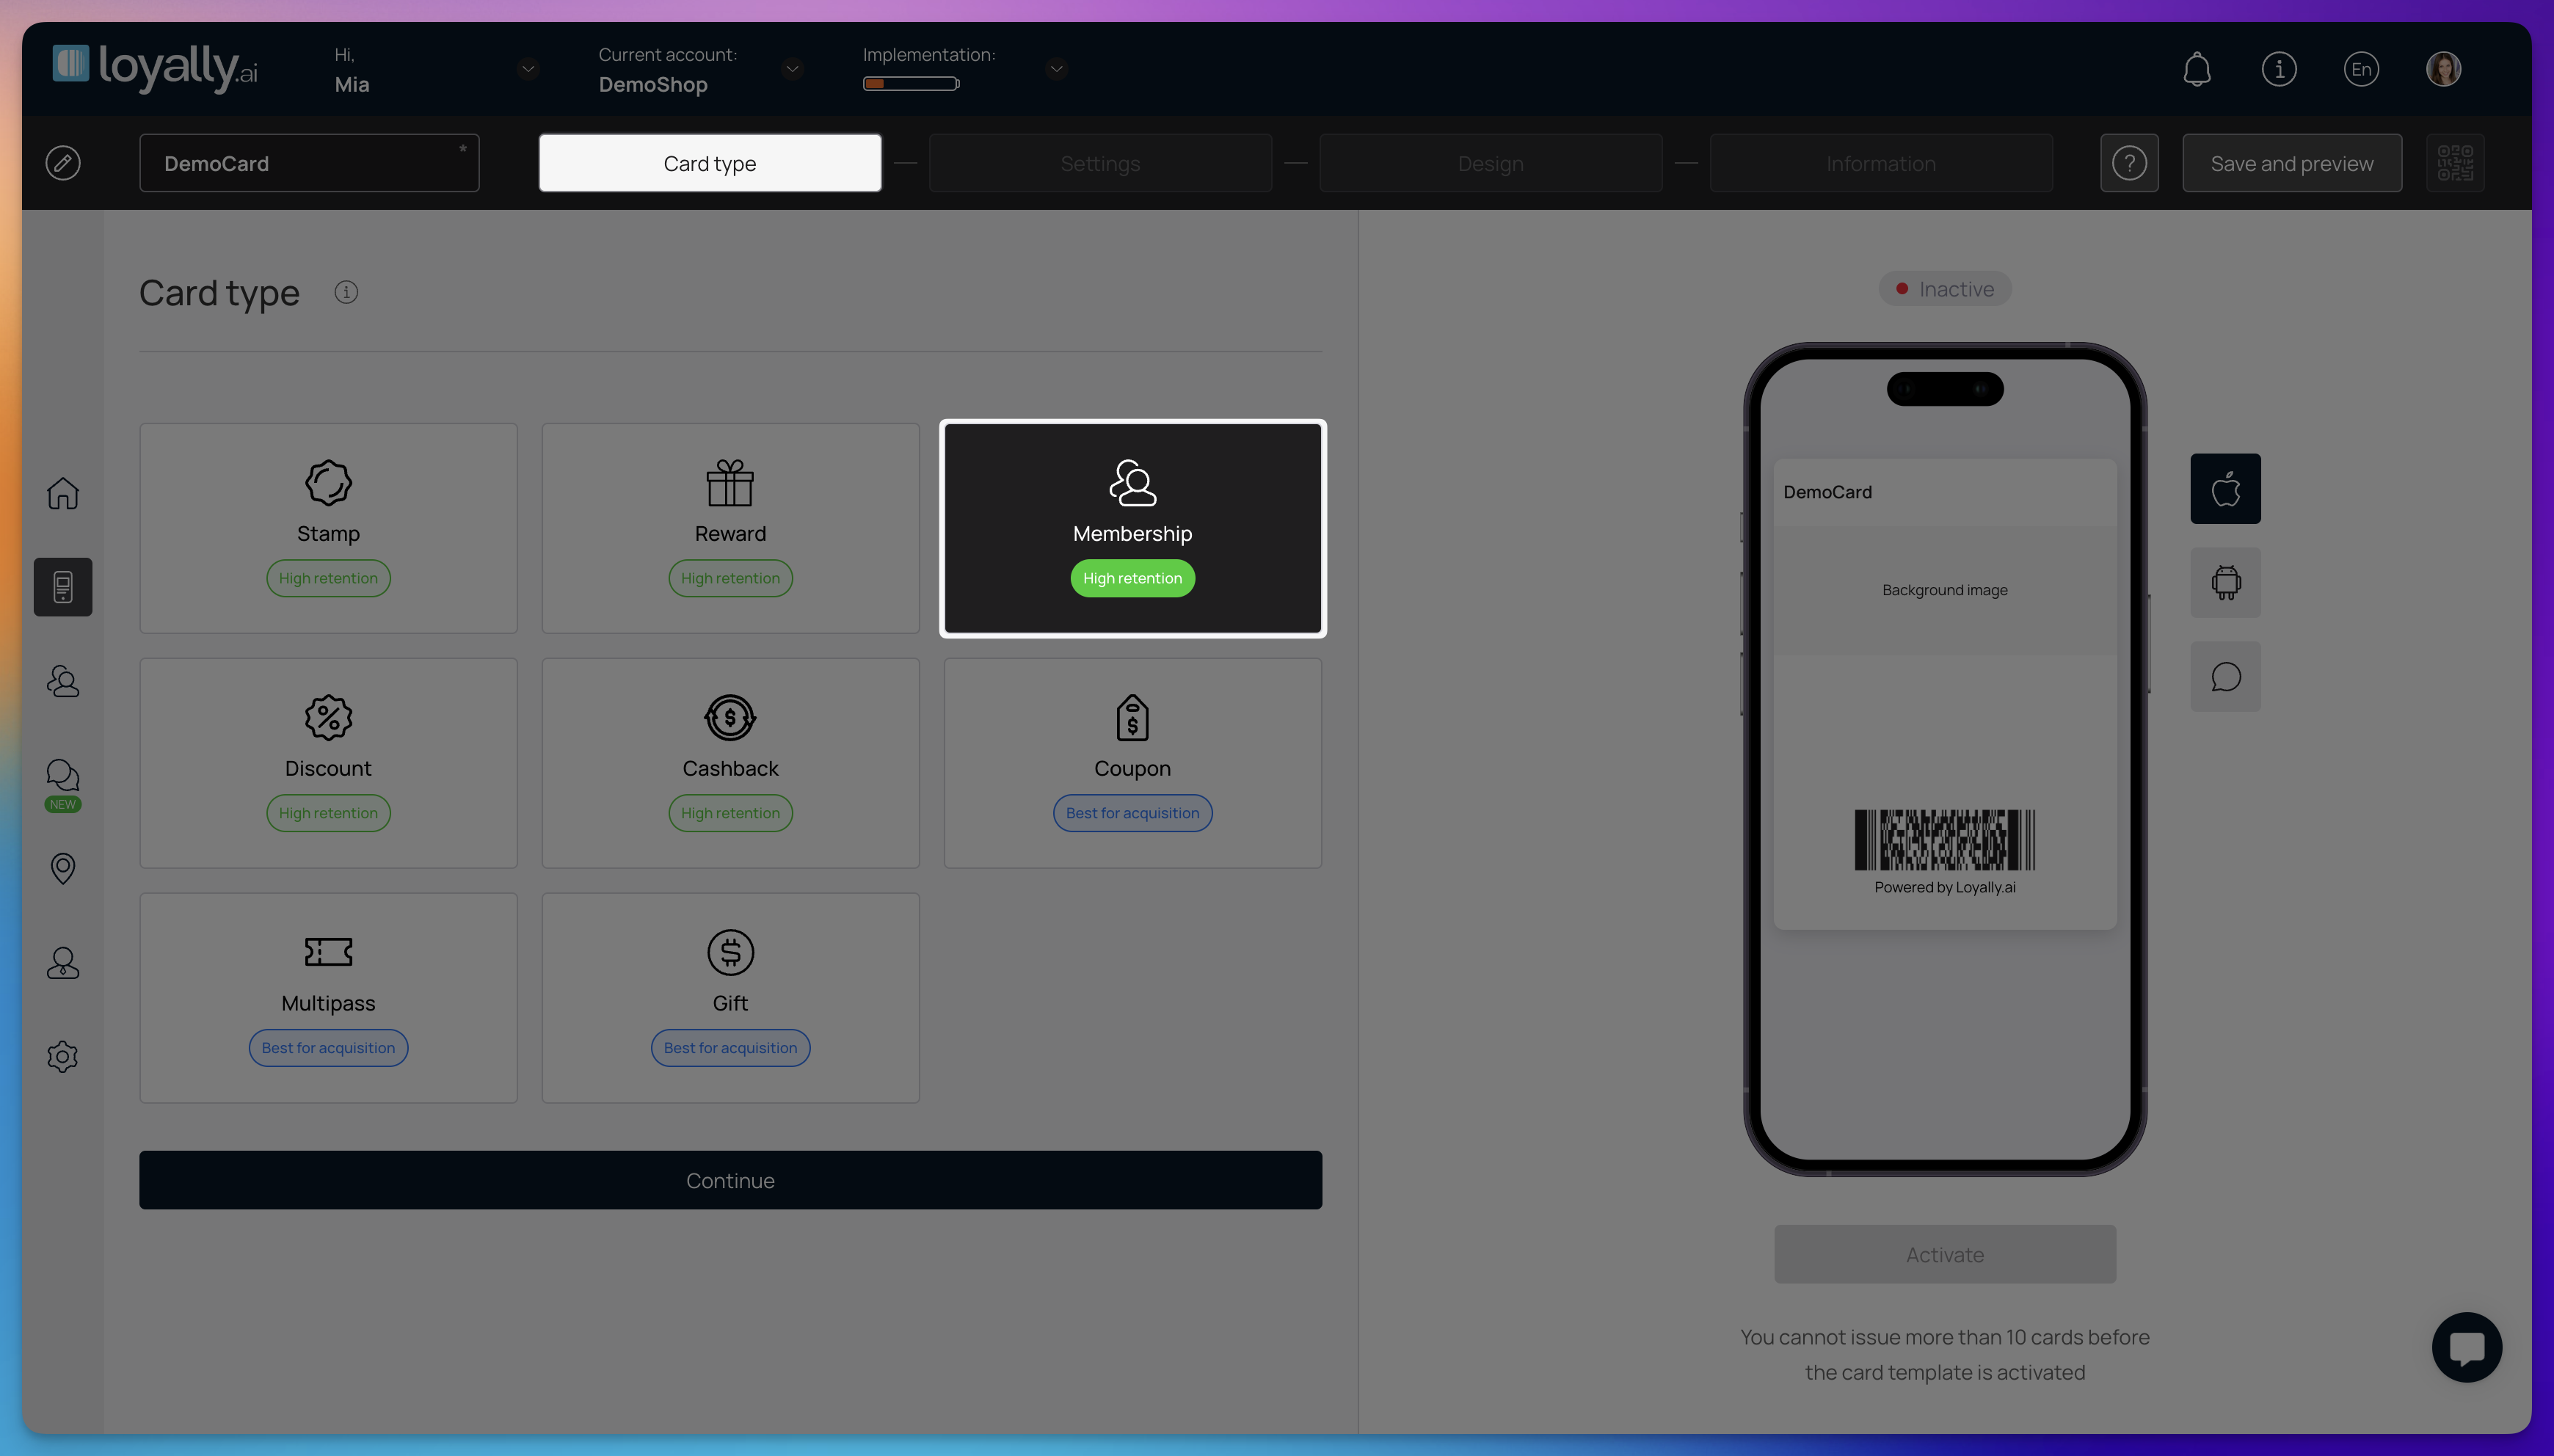
Navigate to the 'Cards' page and select 'From Scratch'.
Select 'Membership' card type and click 'Continue'.

Configure the functional and aesthetic aspects of your loyalty program's membership card. Proper configuration ensures seamless integration with your existing business workflows and enhances the customer experience.
Barcode Type – Define the format of the barcode displayed on the digital card to match your point-of-sale system's scanner capabilities. Selecting the correct type ensures quick and accurate scanning during customer check-ins.
PDF 417 – Displays a stacked linear barcode.
QR Code – Displays a square QR code.

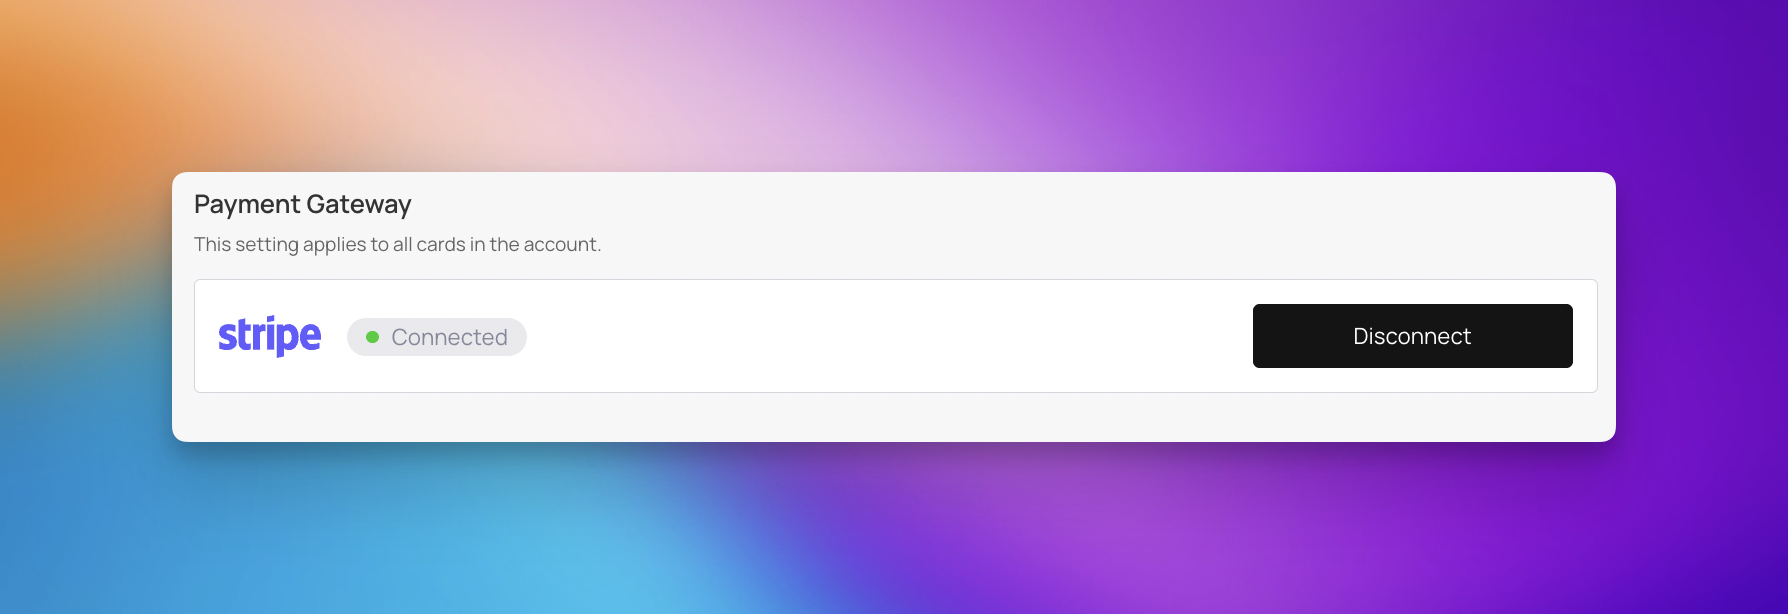
Collect Payments – Select "Yes" to charge customers for the membership directly, or "No" to distribute free cards. This setting applies to all cards in the account.
Payment Gateway - Select the processor for handling transactions when "Collect Payments" is set to "Yes". This ensures secure and seamless financial processing for membership purchases.

Auto-renewal – Select "Yes" to create subscriptions that automatically charge customers for recurring renewals. Select "No" if you want to offer lifetime memberships that do not expire.
Membership expiration – This setting allows you to control the lifecycle of the loyalty card and manage when member benefits cease to be active.
Specific time and date - Use this option for memberships without auto-renewals to set a precise expiration timestamp.
Unlimited - Select this option to make the membership card valid indefinitely without an expiration date.
Fixed term - Choose this to set a specific duration or expiration date for the membership.
Fixed term after card issuing - Set this option to have the card expire a specific number of days, weeks, or years after it is issued to the customer.
Membership Tier Unit Measure Name – Set the name for your loyalty levels, such as "Points," "Levels," or "Status." This label appears on the card to show customer progress.
Trial Period – Set the number of days a customer can use the card for free before the paid membership begins. Enter "0" if you do not want to offer a trial period, with a maximum allowable trial of 30 days.
Membership tiers – Define the specific levels of your program to categorize your members. Creating structured tiers encourages customers to interact more with your brand to reach higher statuses.
Tier Name - Customize the name of each level, such as Bronze, Silver, or Gold, to establish a recognizable hierarchy for your members.
Description - Give a brief and clear description of each membership tier.
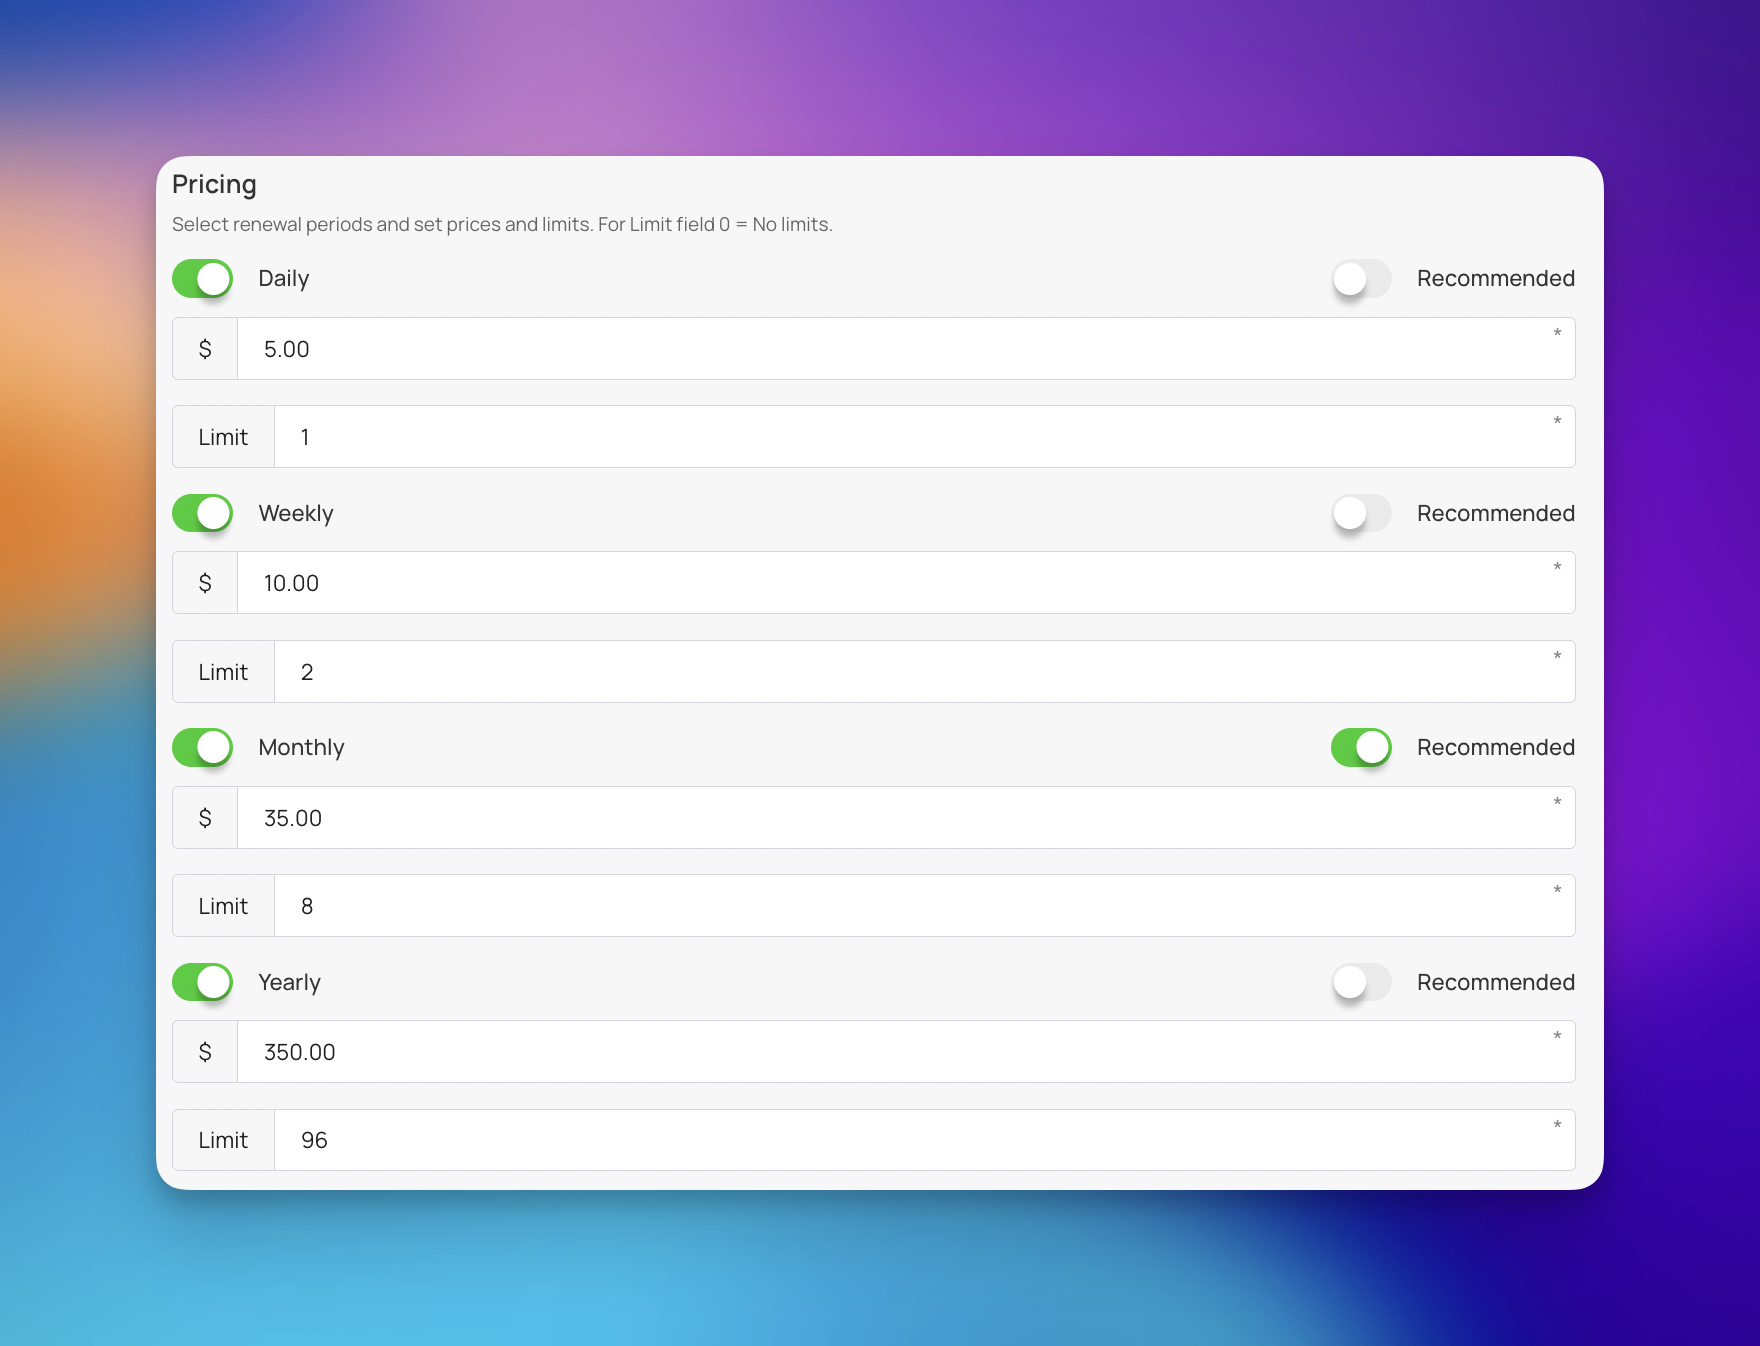
Pricing – You can specify the exact amount and limit for each billing cycle to manage revenue. Set for each tier based on a daily, weekly, monthly, or yearly schedule.
Benefits – Outline the exclusive perks, discounts, or rewards members receive for holding a specific tier. Clearly defining these benefits encourages customers to upgrade their status.
Card Issuing Form – Customize the data you collect from customers when they register for their digital loyalty card. Collecting essential information allows you to personalize their experience and target them with relevant promotions.
First Name
Last Name
Phone
Date of Birth
Promotions – Link marketing campaigns to the card to incentivize sign-ups. These offers can be displayed on the card face.
Locations – Specify which physical business branches accept and validate the membership card. This ensures customers use benefits at authorized venues.
Language – Select the primary language displayed on the digital card and customer interface. Using the customer's native language improves engagement.
Date Format – Choose how expiration dates and transaction times are displayed (DD/MM/YYYY). Proper formatting avoids confusion regarding when benefits expire.
Thousands Separator – Define the symbol used to separate thousands in pricing and point totals, choosing from a comma, period, or space. This ensures clarity in financial and point-based reporting for both you and the customer.
Decimal Separator – Select the symbol used for decimal places in currency or point values, choosing from a comma or a period. Consistent use of this separator prevents inaccuracies in billing or point tracking on the digital card.
Purchase Amount When Charging – Set the default price charged to the customer if "Collect Payments" is active. This streamlines the checkout process for new members.
UTM – Add tracking parameters to the installation link to analyze which marketing channels drive sign-ups. This helps optimize your advertising spend.
Phone Mask – Configure the required format for customer phone numbers to ensure data consistency. This is useful for enforcing specific digit counts or international formats.
Privacy Policy – Input the link or text for your company's privacy policy that customers must agree to. Transparency builds trust and ensures legal compliance.
Consent to the Processing of Personal Data Toggle – Enable this to require customers to opt-in to having their data used for marketing. This is essential for compliance with data regulations.
Privacy Policy (Full Text) – Provide the complete text of your privacy policy directly within the card interface. This ensures all terms are easily accessible to the customer.
Google Wallet Installation Button – Activate this feature to allow customers to instantly add their card to Google Wallet. This increases card usage convenience and check-in rates.
PWA Installation Button – Enable the option for customers to install the card on their mobile device home screen. This provides a native-app-like experience without app store downloads.
Limit the Number of Cards Issued – Set a maximum cap on the total number of memberships available to manage inventory or create exclusivity. Enter 0 for unlimited card issuance.
Analytics – Configure tracking options to monitor metrics like activation rates and revenue. This data is crucial for measuring the effectiveness of your program.

Customize the visual appearance of your digital loyalty card to align with your brand identity. Proper design choices make the card recognizable and appealing to your customers.
Logo – Upload your company logo to be prominently displayed on the digital card. A clear logo enhances brand recognition whenever the customer views their card.
Icon – Select an icon to represent your loyalty program, which may appear in mobile wallet apps or on the customer's phone screen. This small visual cue helps users quickly identify their membership card.
Background of the Central Part – Choose an image or solid color to be displayed in the middle section of the card. This customization helps highlight specific loyalty information or visual elements.
Colors – Select the primary and secondary color palette for the card to match your brand guidelines. Consistent colors ensure the card looks professional and cohesive with your other marketing materials.
Card Background – Choose the main background image or color for the entire digital card face. This is the foundation of your card's design and sets the overall aesthetic tone.
Text Color – Select the color for the text displayed on the card to ensure it is legible against the background. High contrast between the text and background is crucial for usability.
Background Color of the Center Part – Choose a specific background color for the central section of the card if you are not using an image. This allows for clean, minimalist designs while still highlighting key information.
Show Name on the Card Toggle – Enable this toggle to display the customer's name directly on the card face. Personalizing the card increases the customer's sense of ownership and loyalty.
Show Photo on the Card Toggle – Activate this feature to show the customer's profile photo on the card for added security and personalization. This ensures the card is only used by the registered member.
Field – Select which customer data points, such as membership tier, available limits, locations, last name, phone, email, or date of birth, are visible on the card. This allows you to show only the most relevant information to the customer.
Field Name – Customize the labels for the data fields displayed on the card, such as changing "Points" to "Stars". Custom labels make the loyalty program feel unique to your business.
Show Logo at Card Issuing Form Toggle – Enable this toggle to display your company logo on the form where customers sign up for the card. A branded form increases trust and conversion rates during the onboarding process.
Show Background Color on Card Issuing Form Toggle – Activate this setting to apply your chosen card background color to the registration form. This creates a seamless, branded experience from sign-up to card usage.

Manage the descriptive text, contact details, and external links associated with your loyalty card. Providing clear information ensures customers understand how to use their card and how to contact your business.
Card Description – Enter a brief overview of the loyalty program, outlining benefits or how to earn rewards. This description appears within the digital card details to guide customer usage.
Company Name – Input your business name as you want it to appear on the digital card. Consistent branding helps customers instantly recognize the card in their digital wallet.
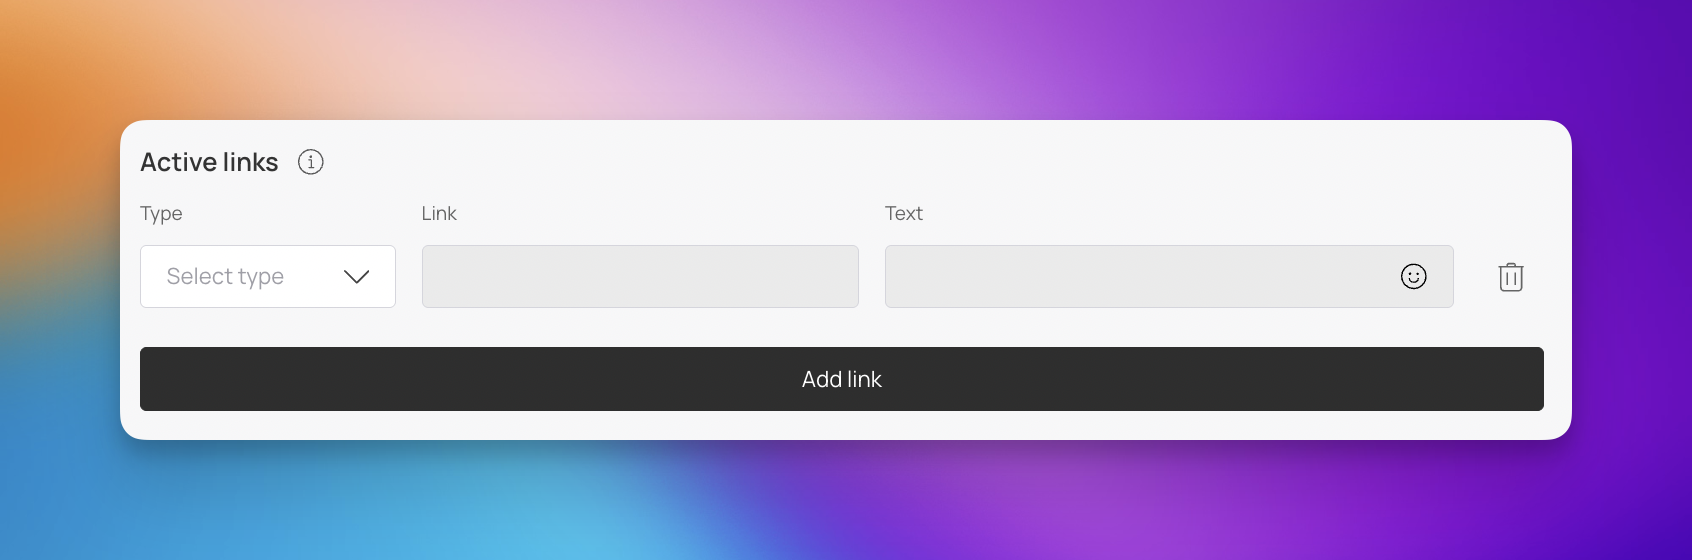
Active Links – Configure clickable links on the card for quick access to your website, phone number, email, or physical address. Customers can use these links to immediately contact you or view program updates.
Feedback Links – Add a specific link for customers to submit reviews or provide input about their experience with the loyalty program. Gathering feedback helps you improve your services and understand customer needs.
Link for Redirection After Card Installation – Set a specific URL to take customers to a webpage immediately after they add the card to their digital wallet. This is ideal for directing them to a "Thank You" page, a special offer, or a specific part of your website.
Terms of Use Toggle – Enable this switch to require customers to acknowledge your program's rules before installing the card. This toggle helps protect your business by ensuring legal compliance and setting clear expectations.
Link to Full Terms and Conditions (Optional) – Insert a URL directing customers to a comprehensive document outlining all rules, restrictions, and policies of the loyalty program. Making this accessible builds trust and transparency.
Issuer Information – Enter the official business contact details to easy for customers to reach out for support regarding their membership.
company name
phone number


Before you launch, check exactly how your new membership card will look to customers on their phones. The preview window updates immediately as you edit, allowing you to perfect your loyalty program's appearance before distribution.
To the right of the mobile mockup, you will find three icons to toggle between different views, ensuring your membership card looks perfect before launch.
Apple Preview – Click the Apple icon to see how the digital membership card looks when stored in an iOS device. This view allows you to verify the card's layout, logo placement, and basic member information.
Android Preview – Click the Android icon to view the card from a Google Wallet perspective. This highlights the membership ID, tier progress, and reward details specific to the Android interface.
Push Notification Preview – Click the Speech Bubble icon to see a mock-up of how push notifications (such as "Membership tier upgraded!") will appear on a customer’s lock screen. This allows you to verify that your messaging is clear and fits within the notification window.
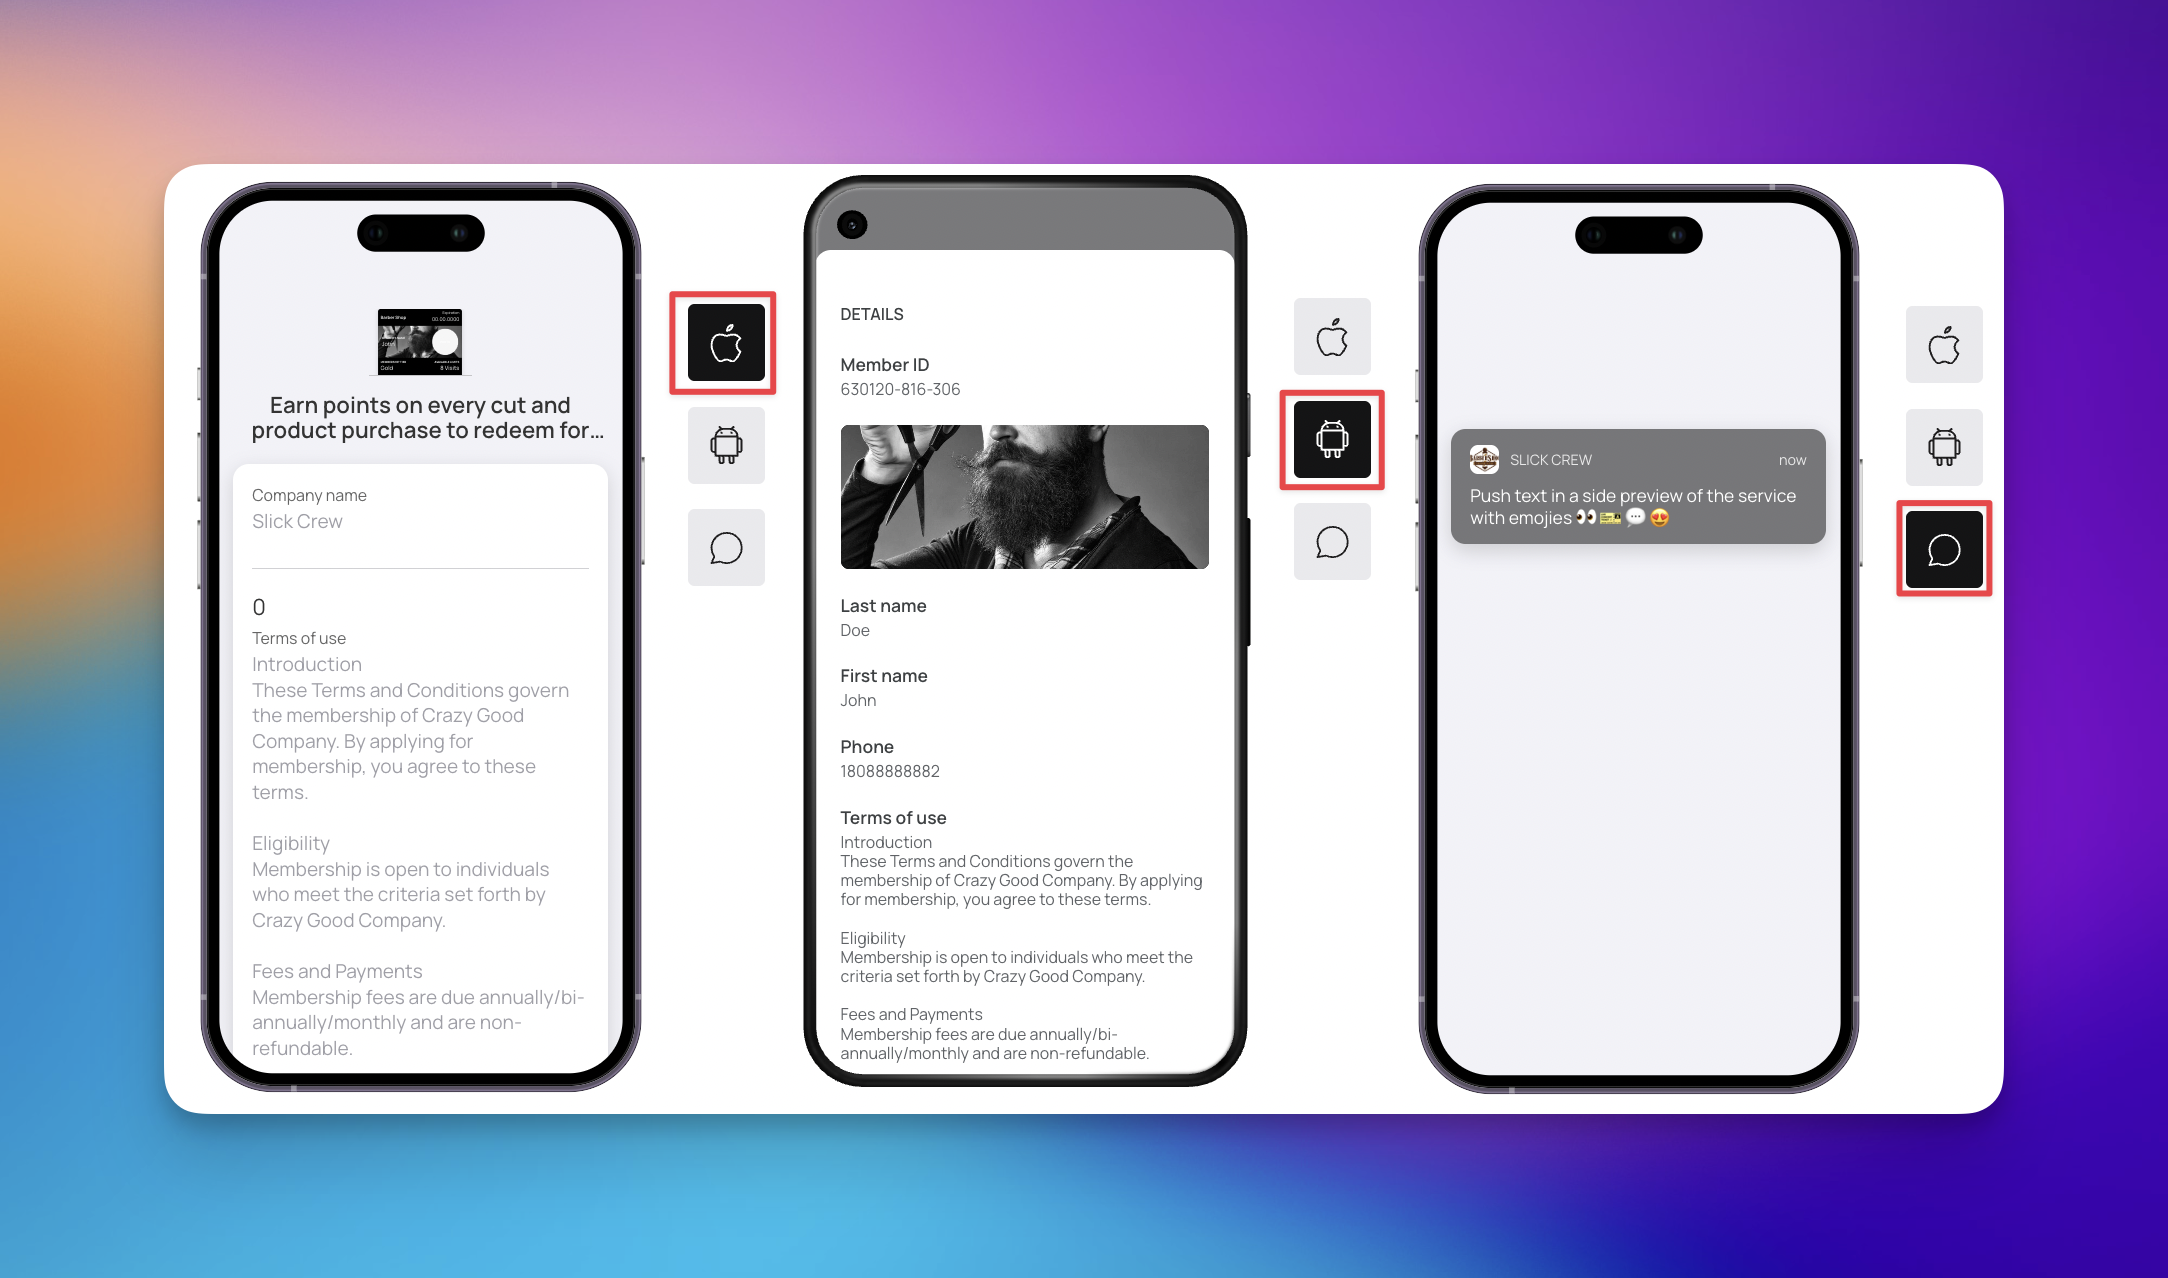
Review all three views to ensure your text is legible and your branding looks consistent. Once you are satisfied with the appearance, click ‘Finish’ to launch your membership card and make it ready for distribution.
Click 'Download PDF' to print a display for your table or counter, perfect for showcasing your new card. Share the QR code or link with your customers - they can simply scan or click to discover what you've created. Let's start spreading the word about your exciting new card! 🚀
Digital membership cards are ideal for businesses looking to build recurring relationships and track customer frequency.
Gyms and Fitness Studios – Use cards to manage member check-ins and track tier status based on attendance frequency.
Cafes and Restaurants – Implement tiered programs to offer exclusive perks to frequent diners or high-spending loyal customers.
Members Only (Club) Stores (Costco, Sam’s club, etc) – Track customer purchase history and offer automatic discounts based on loyalty tier.
Salons and Spas – Manage appointment bookings and offer rewards for recurring service purchases.
Customer Profile: Membership Card
Learn how to manage membership tiers, expiration dates, and subscription settings for customers in Loyally.
Loyalty Card Editing: Understanding Greyed-Out Fields
Learn what specific fields lock once loyalty cards are active.