The Discount Card directly addresses this common issue. Many businesses struggle to drive repeat sales. This card offers discounts on purchases, enticing customers to shop more frequently and increasing overall sales volume.
Customer Use: Customers receive immediate discounts on purchases.
Business Benefit: Boosts sales by offering immediate discounts, appealing to both regular and new customers.
Log in to Loyally.ai >> Go to 'Cards' page >> Select either ('Template' OR 'from Scratch') >> Select 'Discount' Card Type >> Proceed through Settings, Design, Information, and Save & Preview.
Follow the interactive guide to seamlessly create your digital loyalty card with Loyally.ai.

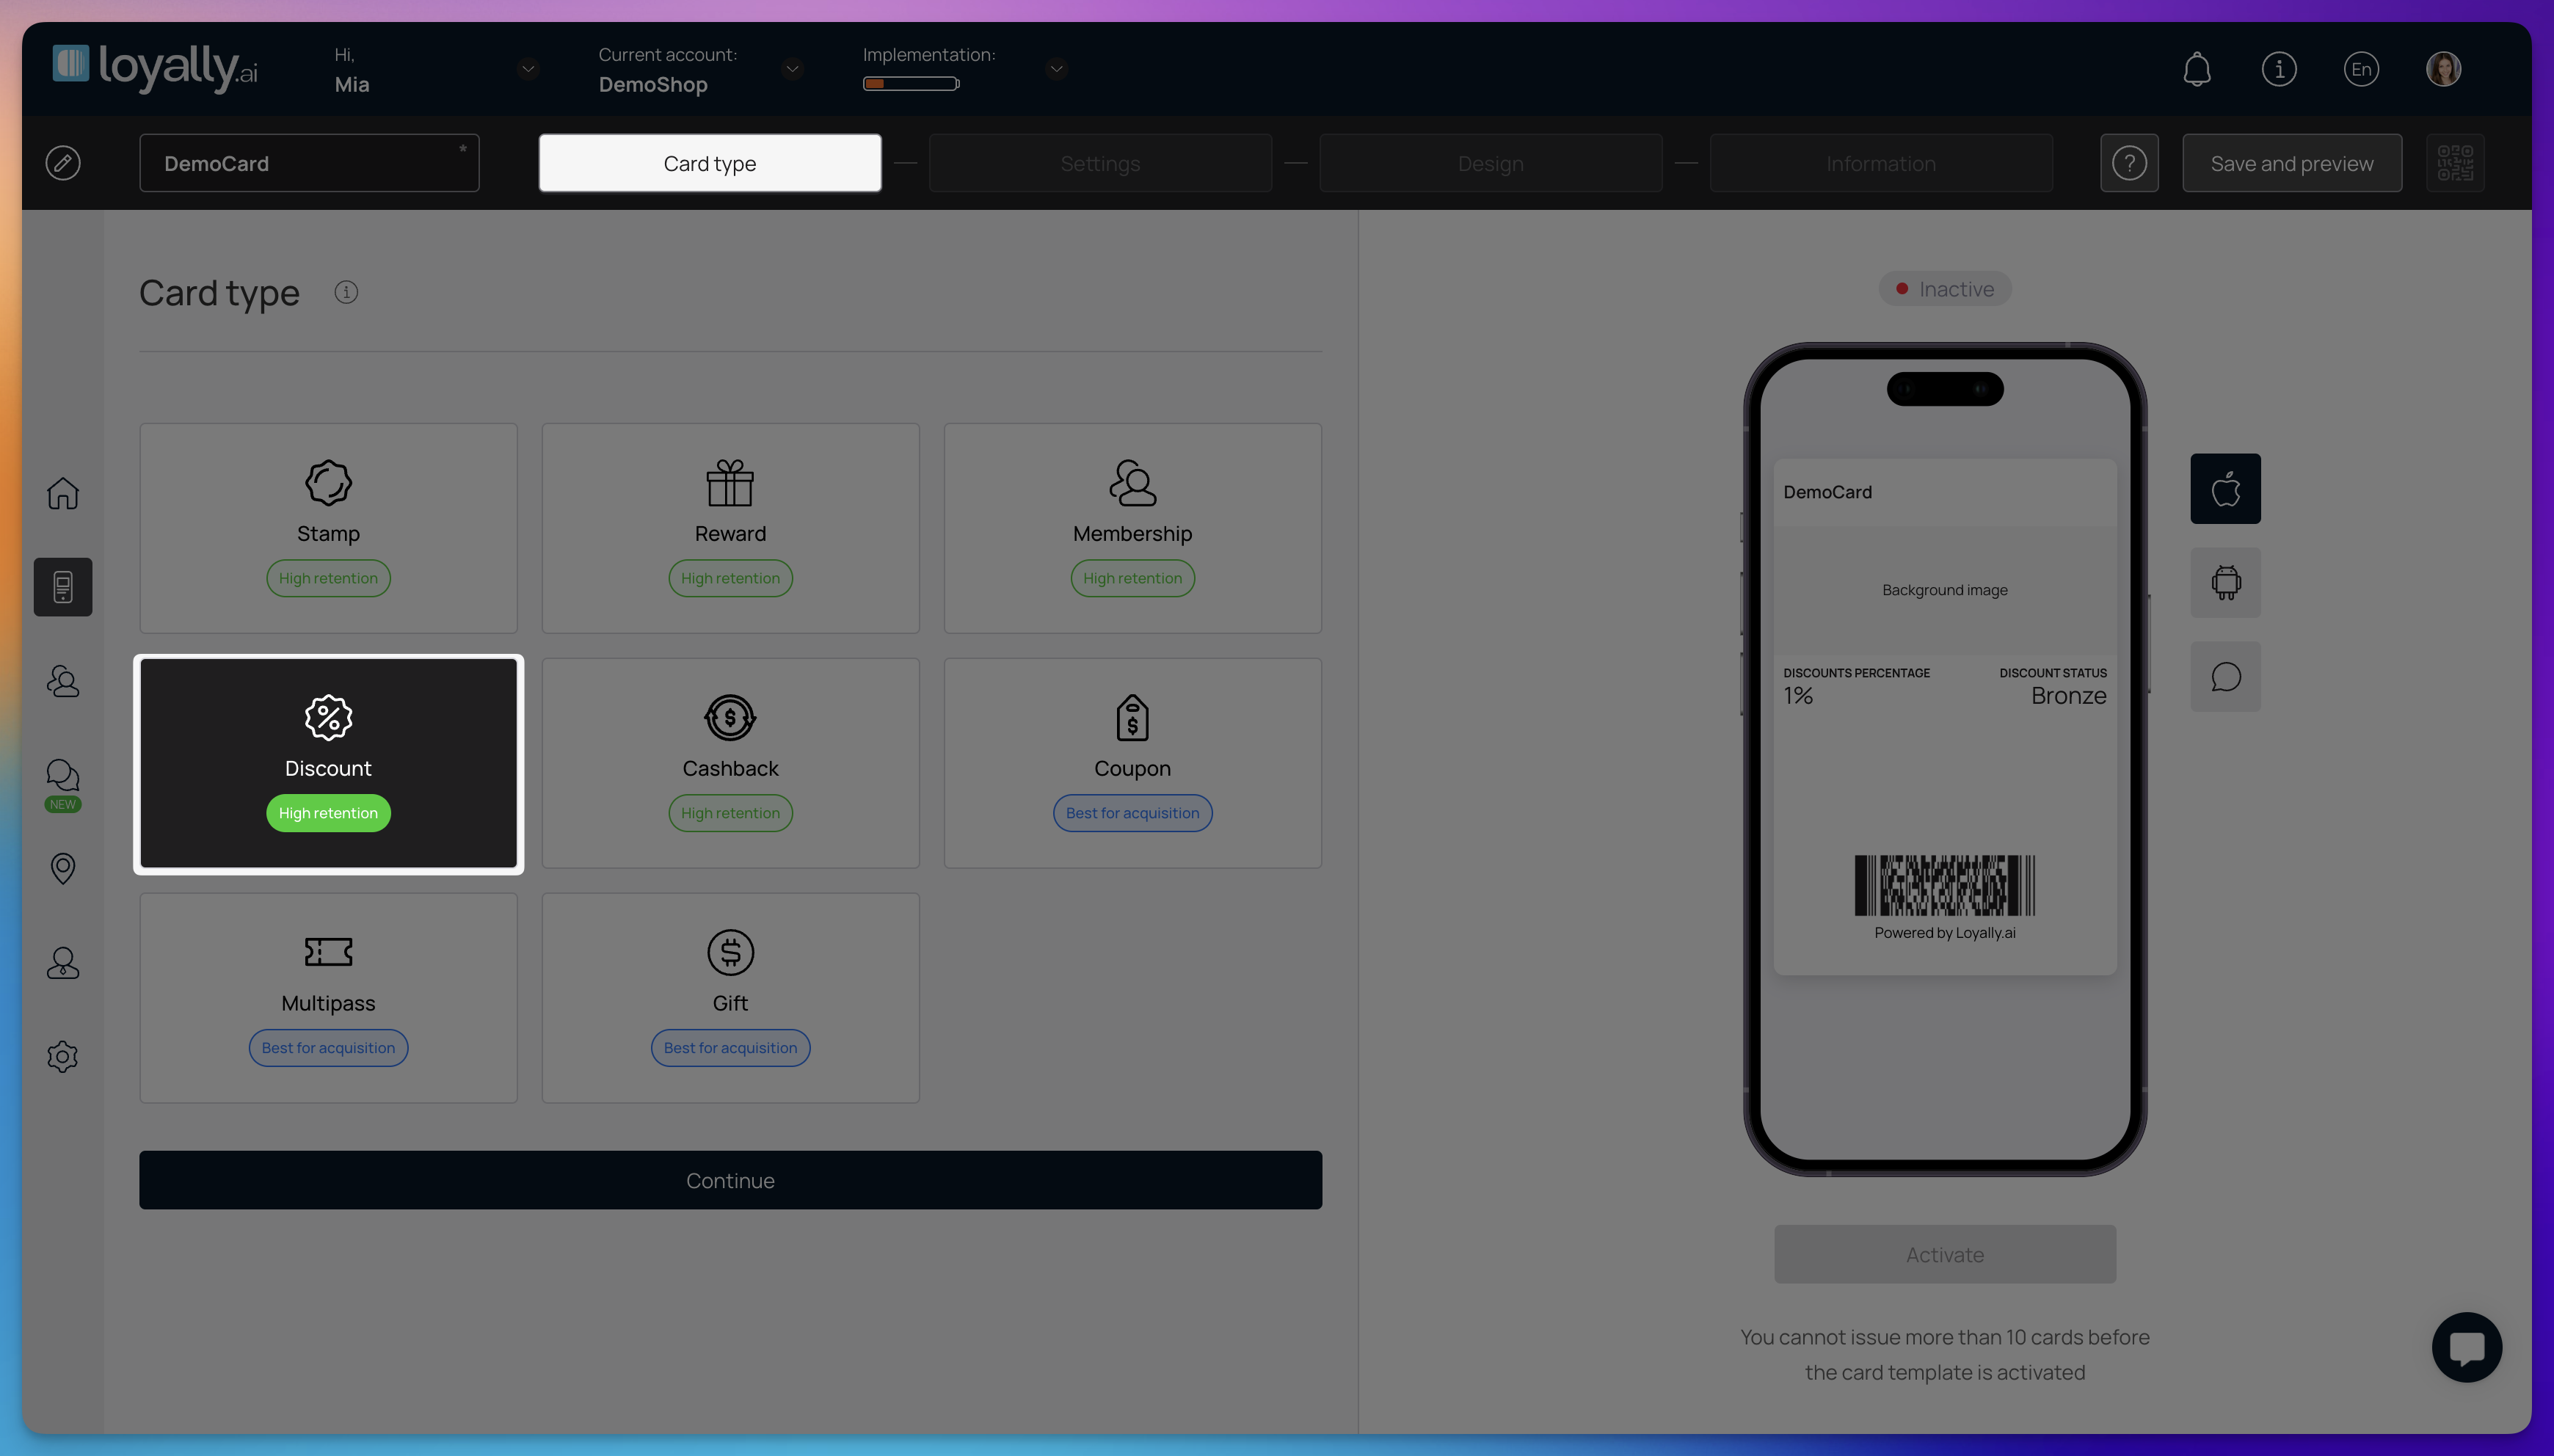
Log into your Loyally.ai account.
Navigate to the 'Cards' page and select 'From Scratch'.
Select 'Discount' card type and click 'Continue'.

Barcode Type (PDF 417, QR Code) - Select the format for the digital barcode that customers will scan to redeem their discount. Choose the type that best fits the scanning technology used at your locations.

Happy Hours - Define specific time slots or days when the discount card offers enhanced rewards or higher savings. This encourages customers to visit during slower periods to maximize their discount.
Multiplier: Set a numerical factor to increase the reward value during specified hours.
From-Till: Select the start and end times for when the enhanced rewards apply.
Days: Choose the specific days of the week that are included in the promotion.
Promotions - Link the discount card to an existing promotion or create a new one to define the specific rewards customers receive. This ensures the card automatically applies the correct discount when used.
Card Expiration Date – Use this setting to determine how long a customer’s digital card remains valid. Select from the three options to set how long a customer’s digital card remains valid.
Unlimited – The card never expires. (Best for long-term loyalty.)
Fixed Term – The card expires on a set date and can be customized. (Great for seasonal promotions.)
Fixed Term After Card Issuing – The card expires a set number of days after issuance. (Encourages faster use.)
Locations - Specify which business branches or stores accept this particular discount card. This prevents confusion by ensuring customers only use the card at participating locations.
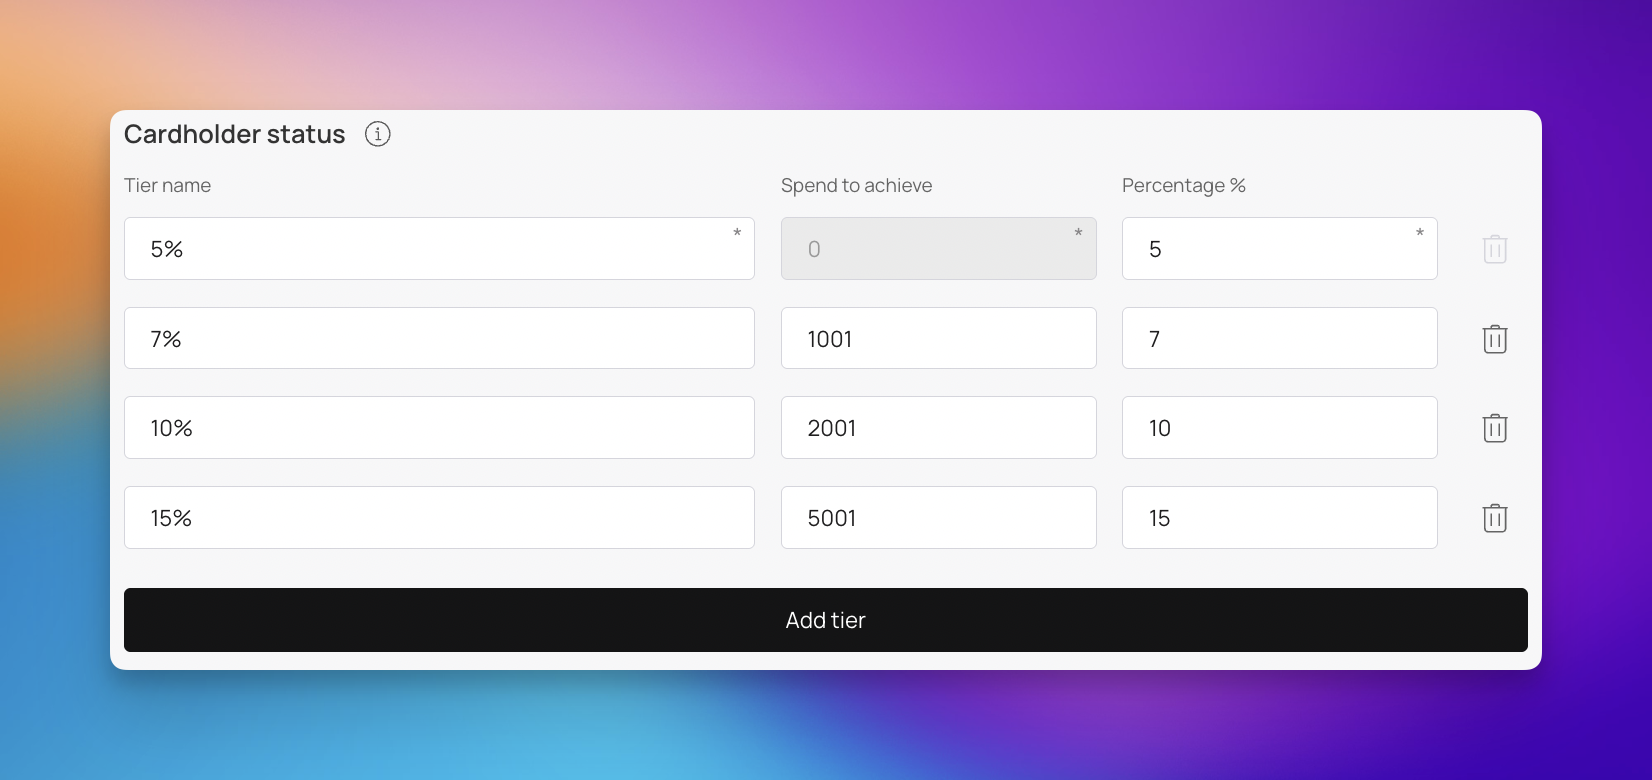
Cardholder Status - Determine the criteria or tier required for a customer to receive or utilize this discount card. This allows you to create exclusive rewards for loyal or VIP members.
Tier name: Define the label for the discount level, such as the percentage savings.
Spend to achieve: Set the minimum amount a customer must spend to unlock this specific tier.
Percentage %: Enter the actual discount value percentage for this tier.
Language - Choose the primary language displayed on the digital card interface for your customers. This ensures clear communication of the discount terms to your target audience.
Date Format - Select how dates are displayed to the customer (DD/MM/YYYY). Consistent formatting avoids confusion regarding when the discount is valid.
Thousands & Decimal Separators - Define the symbols used to separate thousands and decimals in monetary values, ensuring readability based on regional standards by choosing from period, space, or comma. Proper formatting is crucial for accurately displaying discounted prices.
Purchase amount when charging - Toggle this setting to enable a minimum purchase threshold required for the discount card to be activated or applied. This encourages higher spending per transaction to unlock the savings.
Card Issuing form - Customize the form customers fill out to register for or receive the discount card. This allows you to collect necessary information while making the sign-up process quick and easy.
First Name
Last Name
Phone
Date of Birth
UTM - Add tracking parameters to the digital card link to monitor the effectiveness of your marketing campaigns. This data helps you understand how customers are discovering and installing the card.
Phone Mask - Set the required format for phone numbers in the registration form to ensure data consistency. This makes it easier to validate customer contact information for marketing purposes.
Privacy policy - Toggle this setting to provide a link to your company’s privacy policy regarding how customer data collected via the card is used. Transparency builds trust and ensures legal compliance.
Privacy Policy (full text) - Toggle this setting to input the complete text of your privacy policy directly if you do not want to use an external link. This makes the terms immediately accessible to the customer during registration.
Google Wallet Installation button - Enable this button to allow customers to easily add the discount card to their Google Wallet. This increases accessibility and convenience for Android users.
PWA Installation button - Activate this feature to let customers install the discount card as a Progressive Web App on their device. This provides a fast, app-like experience without needing to download from an app store.
Limit the number of cards issued - Set how many cards can be distributed to control the scope of the promotion. Entering zero(0) ensures an unlimited number of cards can be issued.
Card installation via shared link toggle - Turn this option on to allow customers to share the card installation link with friends or family. This can help increase the reach of your discount program through word-of-mouth.
Analytics - Enable tracking to monitor how often the card is installed and used by customers. This data is essential for measuring the success and ROI of your discount card campaign.

Customize the visual appearance of your discount card to match your brand identity. These settings determine how the card looks to customers on their mobile devices.
Logo - Upload your company logo to be displayed on the digital discount card. This helps reinforce brand recognition every time a customer opens their card.
Icon - Select a small icon to represent the card in the customer's digital wallet app. This icon makes it easy for users to quickly identify your discount card among others.
Background of the central part - Choose an image to feature in the main section of the discount card. This allows you to add branded graphics or textured backgrounds to enhance the card's visual appeal.

Colors - Define the color palette for your card, ensuring a professional and consistent appearance.
Card Background: Select the primary background color for the overall card.
Text Color: Choose a contrasting color to ensure all text is easy to read.
Background Color of the Center Part: Set a distinct color for the main section to make key details stand out.

Fields Name - Customize the labels for the data fields displayed on the card, such as changing "Cardholder Name" to "Member Name". This ensures the terminology aligns with your specific loyalty program.
Field: Select the data point to display, such as:
Discount percentage
Discount status
Spend to reach next level
First name
Last name
Phone
Date of birth
Field name: Enter the custom label for the selected field (e.g., changing "Cardholder Name" to "Member Name").
Show logo at card issuing form toggle - Turn this toggle on to display your logo on the registration page where customers sign up for the card. This builds brand trust immediately during the card acquisition process.
Show background color on card issuing form toggle - Activate this toggle to apply your chosen card background color to the registration form page. This creates a cohesive look between the signup experience and the final card design.

Define the essential details, links, and legal terms associated with your discount card. Properly filling out this information ensures customers know how to use the card and how to contact you.
Card description - Provide a brief explanation of what the card offers, such as specific discount rates or rewards. Clear descriptions help customers understand the value of the card immediately.
Company name - Enter your business name exactly as you want it to appear on the digital card. This reinforces brand identity and ensures customers recognize the issuer.
Referral program - Enable this feature to encourage customers to share the card with others in exchange for rewards. This is a powerful tool for growing your customer base through word-of-mouth.
Active links - Add functional links to the card, such as your website, contact page, or social media profiles.
Type: Select the purpose of the link (e.g., phone, email, address, url).
Link: Enter the URL, phone number, or email address.
Text: Define the label that appears on the button for the customer to click.
Feedback links - Include a link allowing customers to easily send feedback or reviews about their experience. This data is invaluable for improving your customer service and promotional offers.
Link for redirection after card installation - Set a specific URL to which customers are sent immediately after installing the card, applicable only to Apple Wallet. This is ideal for directing users to a "Thank You" page or a special landing page.
Terms of use toggle - Turn this setting on to require customers to acknowledge your terms before acquiring the card. This ensures legal compliance and sets clear expectations for card usage.
Link to full terms and conditions (optional) - Provide a URL to a webpage containing the detailed legal terms of the discount program.
Issuer Information - Enter contact details for your business, such as phone number, email, or address. This makes it easy for customers to get support if they have issues with the card.

Take a look at how your new discount card will appear to customers before it goes live. These tools ensure your design and messaging look perfect on all devices.
Apple Preview: Click the Apple icon to see how the digital discount card looks when stored in an iOS device. This shows the card's layout, logo placement, and basic information.
Android Preview: Click the Android icon to view the card from a Google Wallet perspective. This view highlights the member ID, barcode, and reward details specific to the Android interface.
Push Notification Preview: Click the Speech Bubble icon to see a mock-up of how push notifications (such as "Discount applied!") will appear on a customer’s lock screen. This allows you to verify that your messaging is clear and fits within the notification window.
Once you have confirmed everything is correct, simply press 'Activate Card' to make the promotion accessible to your customers.
Click 'Download PDF' to print a display for your table or counter, perfect for showcasing your new card. Share the QR code or link with your customers - they can simply scan or click to discover what you've created. Let's start spreading the word about your exciting new card! 🚀
Digital discount cards are exceptionally effective for businesses looking to drive repeat visits and increase average spend. They work best for brands offering frequent, consumable products or services where a small reward can significantly influence customer behavior.
Coffee Shops and Cafes: Encourage daily visits by offering a free drink after a certain number of purchases.
Retail and Boutiques: Drive sales during slow periods or promote specific product lines with percentage-based discounts.
Fast Casual Restaurants: Increase order frequency by linking rewards to meal purchases or app check-ins.
Beauty Salons and Barbershops: Foster long-term loyalty by providing tiered discounts based on total lifetime spend.
Local Services (Car Washes, Dry Cleaners): Reward customers for consistent use of your services with exclusive member pricing.
Customer Profile: Discount Card
Learn how to add or deduct client transaction amounts and track discounts within customer profiles in Loyally.
Loyalty Card Editing: Understanding Greyed-Out Fields
Learn what specific fields lock once loyalty cards are active.
Card Distribution - Online
Distribute your loyalty cards online via the different channels