Introducing the 'Reward Card', a powerful solution to keep your customers engaged and returning. In retail and service industries, maintaining customer interest can be challenging. This card rewards purchases with points or perks, keeping your brand at the forefront of your customers' minds.
Customer Use: Earn points per purchase, redeemable for various rewards.
Business Benefit: Keeps customers engaged by allowing them to accumulate points, fostering repeat purchases and loyalty.
Log in to Loyally.ai >> Go to 'Cards' page >> Select either ('Template' OR 'from Scratch') >> Select 'Reward' Card Type >> Proceed through Settings, Design, Information, and Save & Preview.
Follow the interactive guide to seamlessly create your digital loyalty card with Loyally.ai.

Log into your Loyally.ai account.
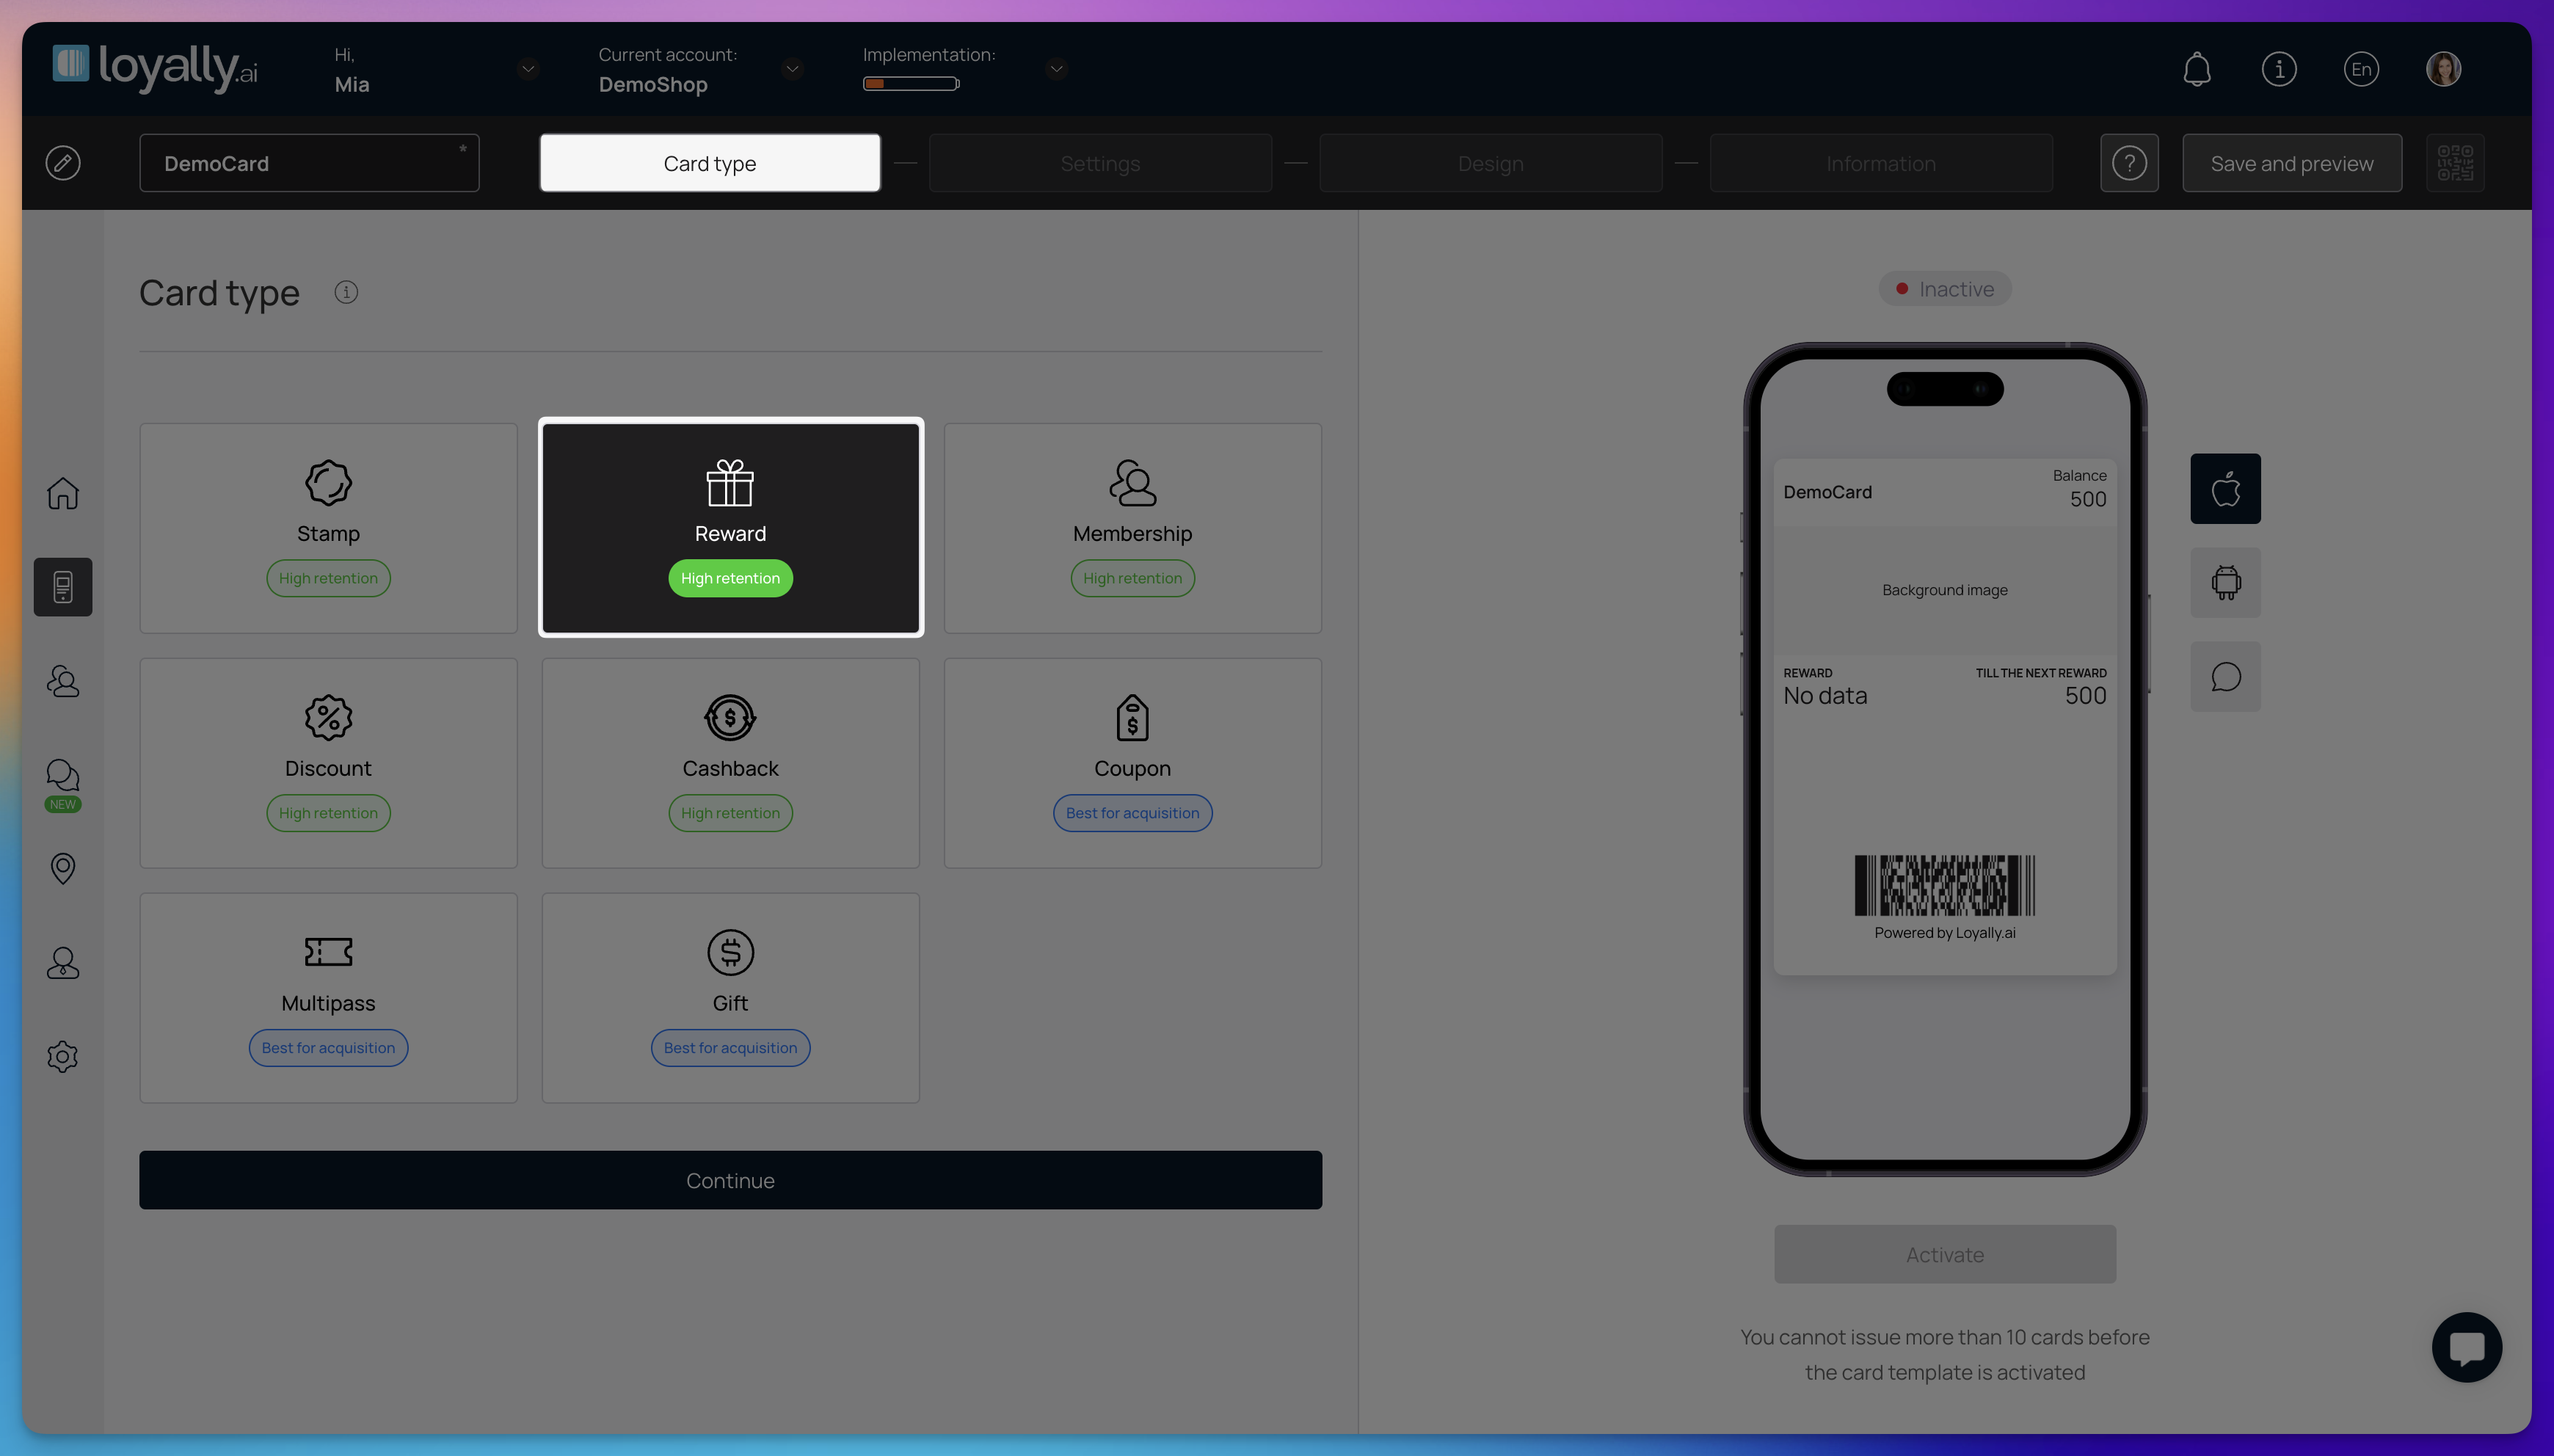
Navigate to the 'Cards' page and select 'From Scratch'.
Select 'Stamp' card type and click 'Continue'.

This section configures the core logic of your Reward Card, including how points are earned, customer data collection, and regional formatting.
Barcode – Select the barcode format, such as a QR Code or PDF 417, that is compatible with your business's scanning hardware. This visual element allows staff to quickly identify the customer and manage their point balance.
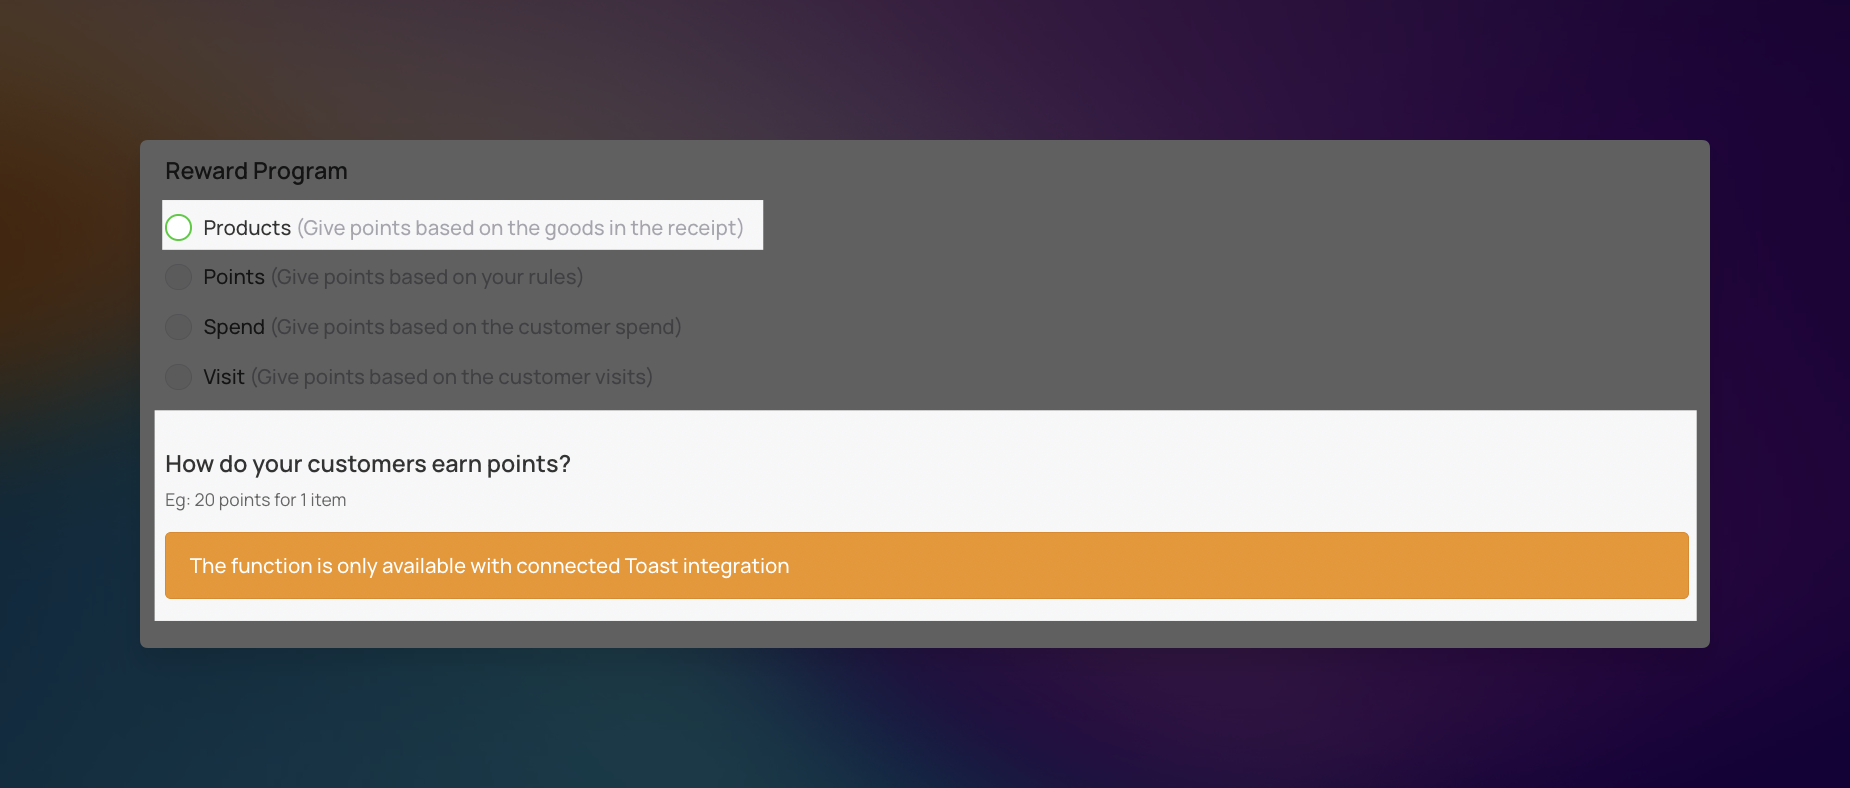
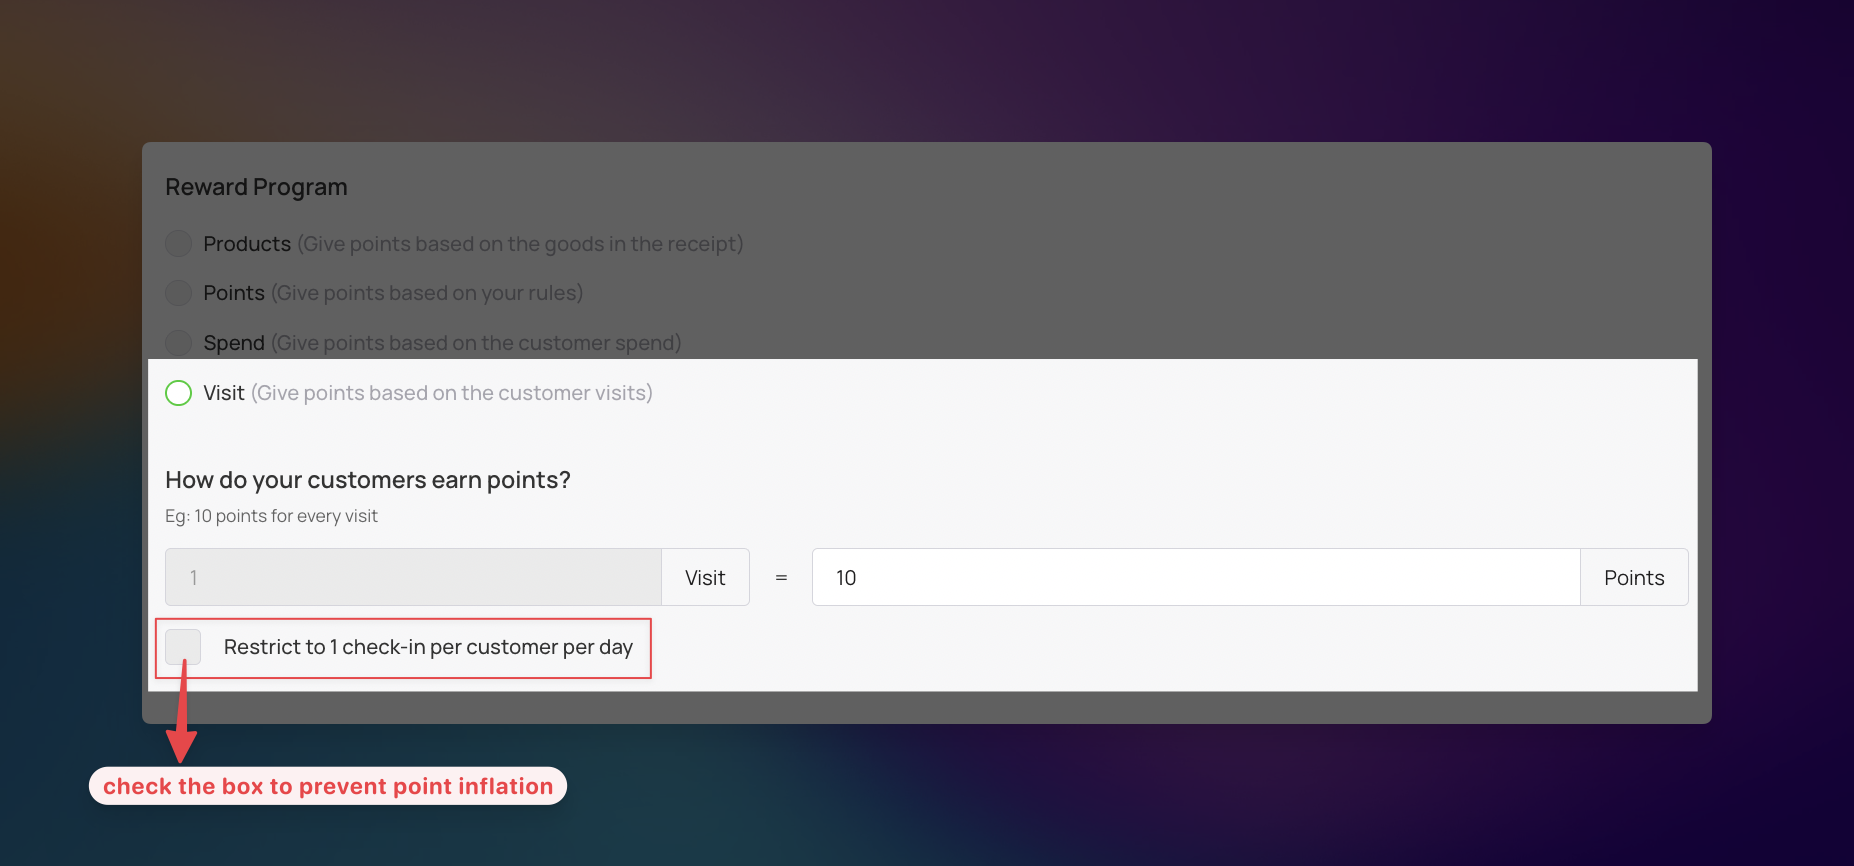
Reward program – This setting defines the primary mechanic for earning points and redeeming rewards. After selecting a program type, the "How do your customers earn points?" subfield appears for further customization:
Products – Customers earn points based on specific goods listed in their receipt. This function is only available if you have a connected Toast integration.
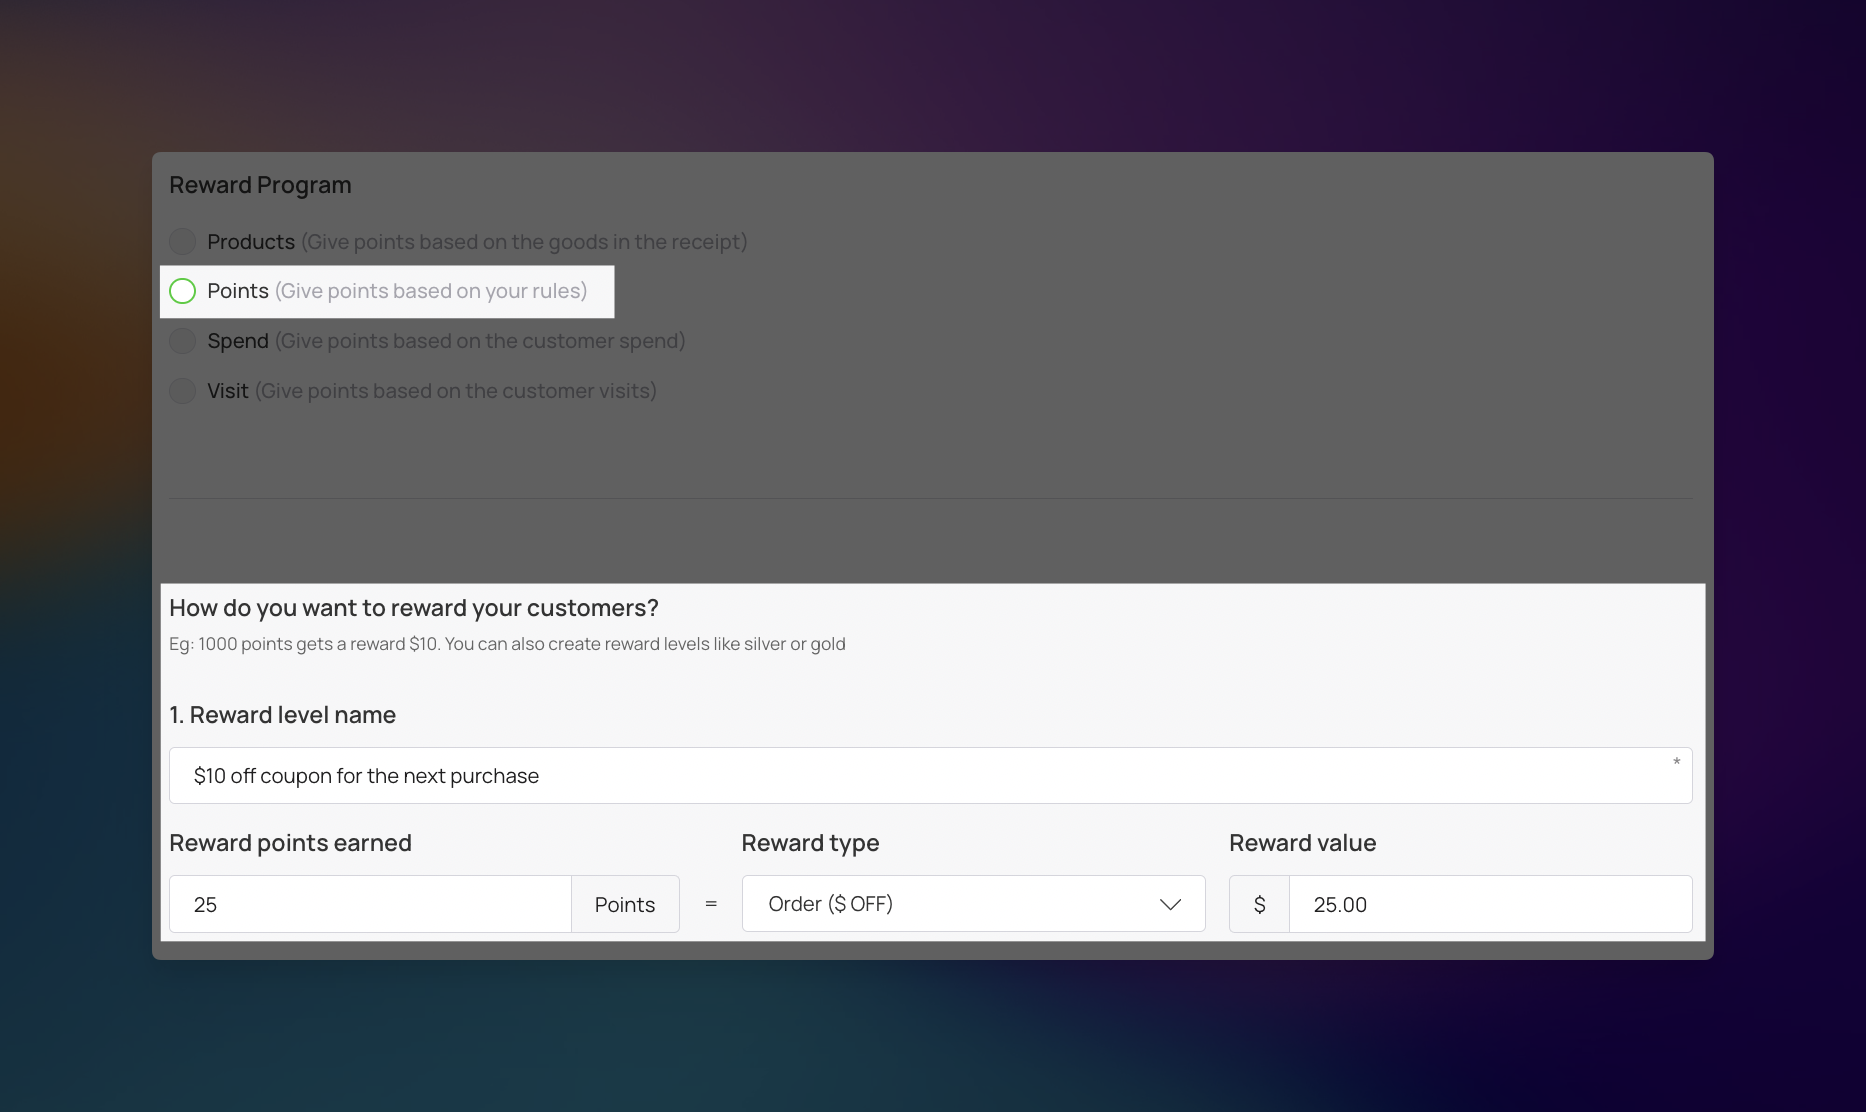
Points – Assign rewards based on specific point thresholds defined by your own custom rules. You can create multiple reward levels, such as Silver or Gold, by setting a Reward level name, the Reward points earned required, and the specific Reward type and Reward value (e.g., 25 points = $25.00 off).
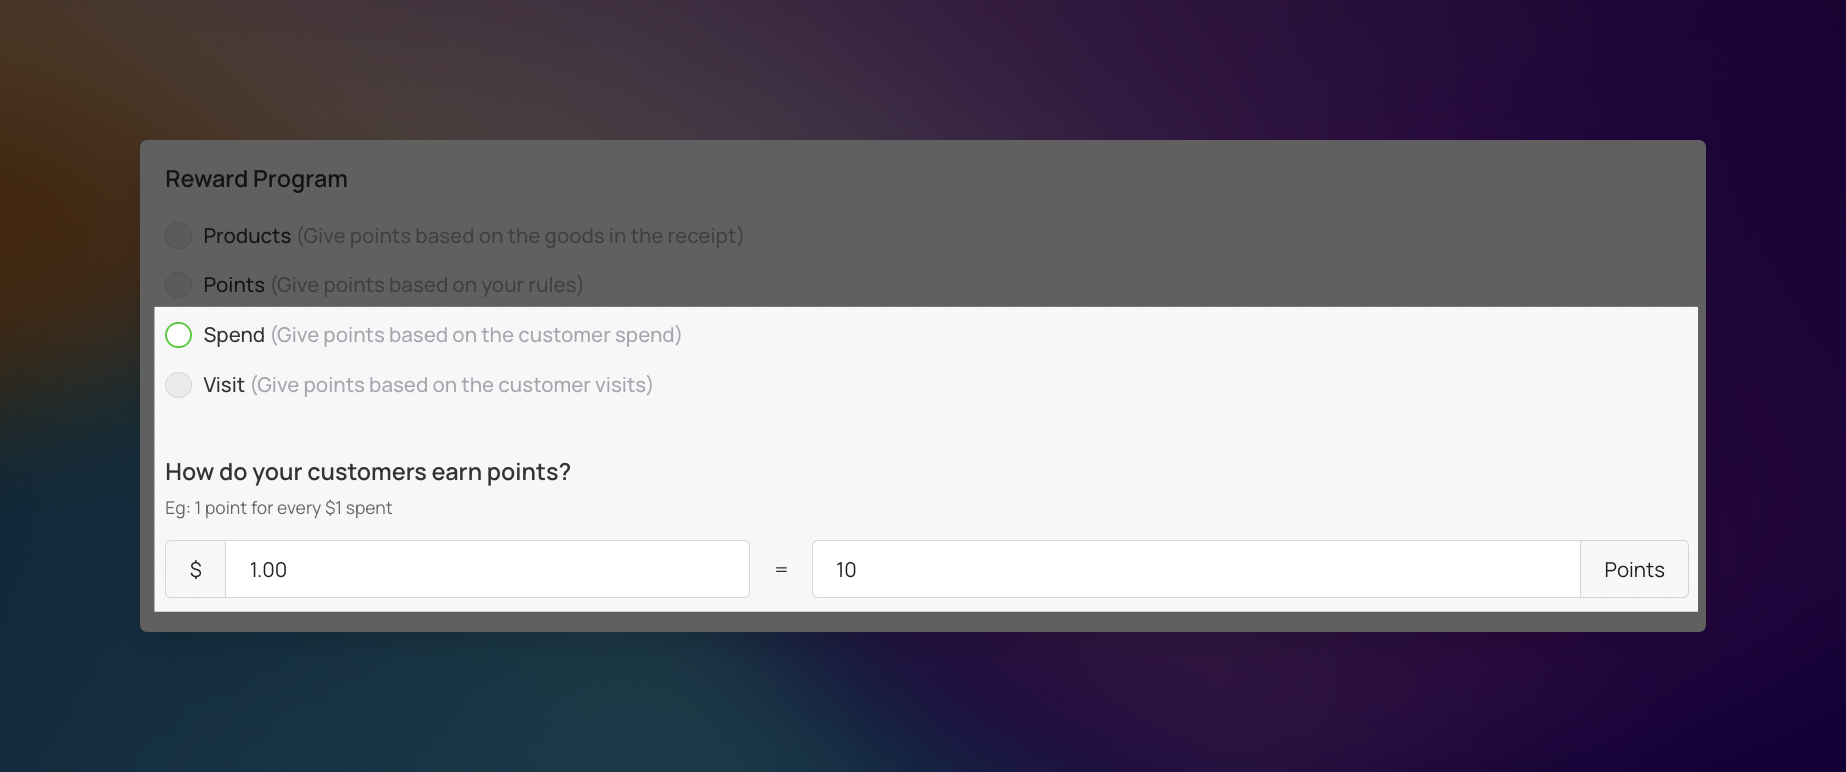
Spend – Customers earn points based on the total monetary amount of their purchase. You can customize the conversion rate by entering a specific dollar amount and the corresponding number of points earned, such as 10 points for every $1.00 spent.
Visit – Credit points based on the number of unique customer check-ins. You can set a specific point value per visit and enable the "Restrict to 1 check-in per customer per day" toggle to prevent point inflation.
Happy Hours (Points Multiplier) – This feature allows you to automatically increase the number of points a customer earns based on the specific time and day of their visit.
Multiplier (×) – Choose how many points are awarded per transaction. Use ×2 for standard promotions or ×3 for high-incentive events to drive engagement.
Time Range (From/Till) – Target your "dead zones" by setting specific hours. For example, setting 14:00 to 16:00 encourages visits during the mid-afternoon slump.
Days of the Week – Select specific days to boost revenue. You might activate this for Monday–Wednesday to supplement slower weekdays while keeping standard rates for busy weekends.

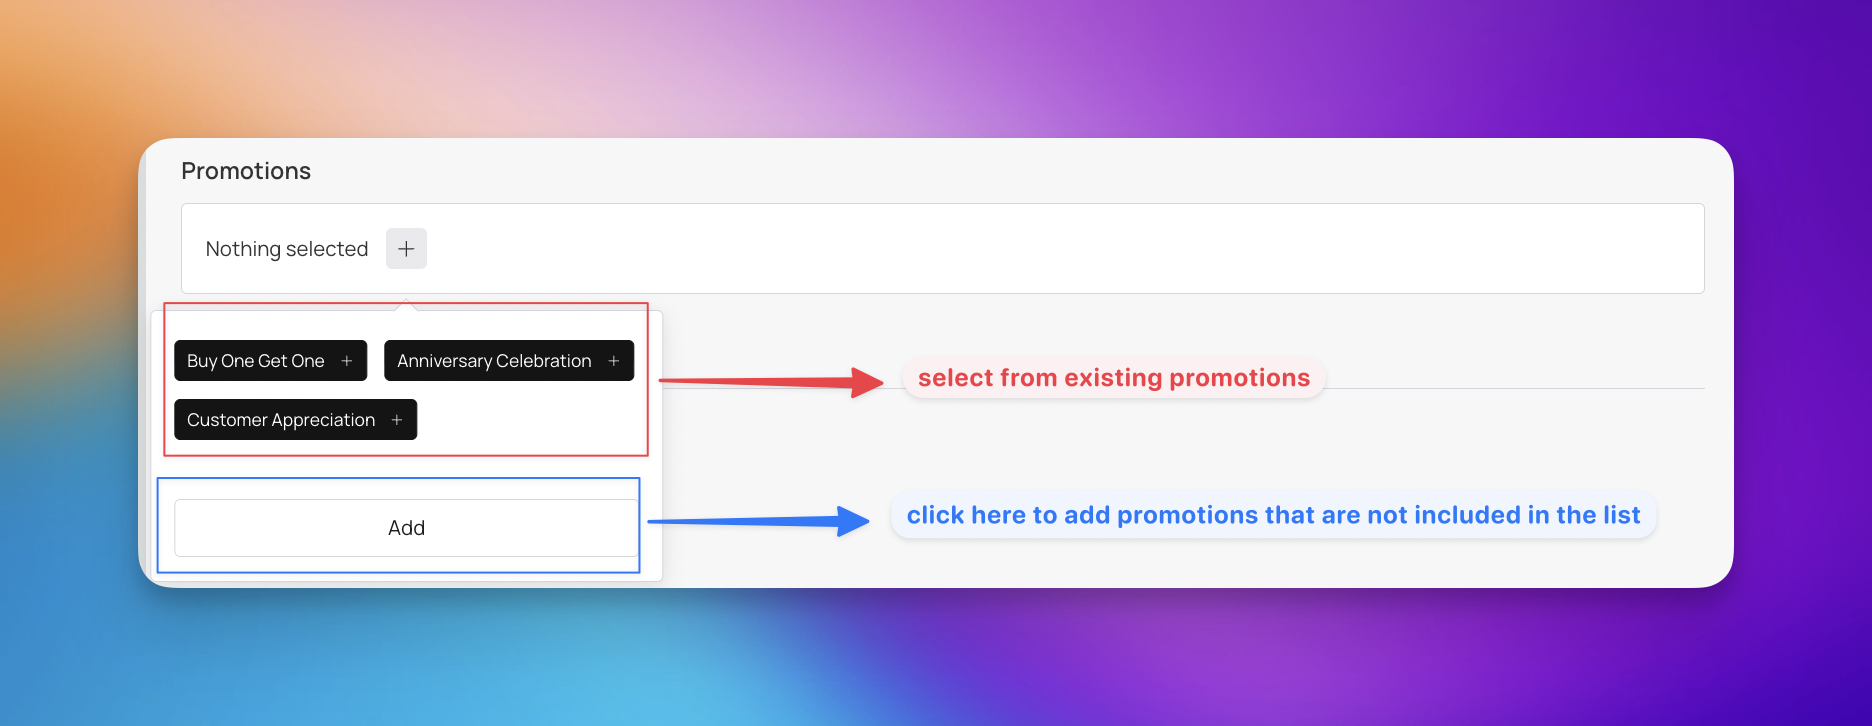
Promotion – This allows you to connect your reward card to specific marketing campaigns to drive even more engagement.
Add to Existing Promotion – Easily link your new card to an ongoing campaign you are already running to consolidate your marketing efforts.
Create a New Promotion – You can build a brand-new promotion specifically designed for this card by clicking ‘Add‘.
Card Expiration Date – Use this setting to determine how long a customer’s digital card remains valid. Select from the three options to set how long a customer’s digital card remains valid.
Unlimited – The card never expires. (Best for long-term loyalty.)
Fixed Term – The card expires on a set date and can be customized. (Great for seasonal promotions.)
Fixed Term After Card Issuing – The card expires a set number of days after issuance. (Encourages faster use.)
Lifetime Points – Use this setting to define how long accumulated points remain valid before expiring. Choose from the following options to manage point longevity.
Unlimited – Points never expire and will accumulate for the life of the card.
Fixed term after bonuses earned – Points expire after a specific amount of time has passed since they were credited to the customer's account. You can customize the exact duration by selecting the days, months or years.
Locations – Select specific store locations where the reward card is linked.
Language – Select the language displayed on the reward card.
Date Format – Choose how dates appear on the reward card (e.g., DD/MM/YYYY).
Thousands & Decimal Separator – Configure how large numbers and decimals are displayed by selecting your preferred thousands and decimal separators. You can select from the following options to match your regional currency or accounting standards:
Dot
Comma
Space
Purchase amount when charging – Switch this toggle to ON to require staff to enter the total purchase amount when issuing points via the scanner app.
Card issuing form – Customize the information customers must provide when filling out the loyalty card registration form. You can add a maximum of 6 fields, with common options including:
First Name
Last Name
Phone
Date of Birth

UTM – Track where your customers came from to measure the success of marketing campaigns like Facebook Ads or Google Ads.
Phone Mask – Select the telephone mask from the dropdown menu that corresponds to the country where the card will be used to ensure correct phone number formatting.
Privacy Policy – Customize the privacy message shown to customers and enable or disable the display of this text.
Consent to Processing Personal Data – Toggle this setting to enable or disable the display of the personal data processing consent checkbox on customer registration forms.
Privacy Policy (full text) – Enter the complete legal text of your privacy agreement here.
Google Wallet Installation button – Enables or disables the option for customers with Android phones to save their card directly to Google Wallet.
PWA Installation button – Allows customers to install the card as a web app on their phone for quick access.
Limit the Number of Cards Issued – Controls the total number of reward cards that can be issued.
Set to "0" – Allows an unlimited number of cards to be issued to customers.
Set to a Specific Number – Restricts the total number of reward cards available for issuance.
Card Installation Via Shared Link – Toggle this setting to control whether customers can install your reward card using a shared link.
Number of Points When Issuing a Card – Determines how many preloaded points are automatically added to a customer's card when they first receive it.
Set to "0" – The card starts with no points.
Set to a Specific Number – Customers receive a welcome bonus of points upon signup.
Number of Birthday Points – On the customer’s birthday, the specified number of additional points will be credited to their card. The customer will receive a push notification informing them that their points balance has increased.
Track visit when redeem reward – Switch this toggle to ON to automatically record a store visit whenever a customer redeems a reward.
Earn points when redeem reward – Switch this toggle to ON to allow customers to earn points for the purchase even when they are redeeming a reward.
Analytics (Optional) – Insert Google Tag Manager or other tracking tools to monitor card performance.

In this step, you can customize the visuals of your reward card by tweaking several elements to ensure it perfectly aligns with your brand identity. Adjusting these settings allows you to create a professional and cohesive brand experience for your customers.
Logo – Upload your brand logo to be displayed on the reward card.
Icon – Select an icon to represent your reward card.
Background of the central part – Upload a custom background image specifically for the central portion of the card.
Colors – Configure the color scheme, including the card background, text color, and the background of the center part.
Fields name – Customize the labels for the fields displayed on the card (first & last name, email or phone).
Show logo at the issuing form – Toggle this setting to display your logo on the card registration form.
Show background color on card issuing form – Toggle this setting to apply your chosen background color to the card registration form.

In this step, you will set up your card's basic information, reward rules, and contact details to clearly show customers how your loyalty program works.
Card description – Provide a brief overview of the reward program to inform customers about the benefits they can earn. This description helps set expectations for how the point system operates.
Company Name – Enter the official name of your business to be displayed on the reward card. This ensures customers instantly recognize which brand is offering the rewards.
Referral program – Choose whether to activate or deactivate the referral feature for your reward program. Activating this allows existing customers to earn bonus rewards by inviting others to join.
Get bonus at the moment when – Select the specific action that triggers a bonus reward for the referrer. Options include First visit / card use by a new customer or Card issuing to a new customer.
Number of points for the referrer – Define how many points the existing customer receives for successfully referring a new customer to the reward program. This incentivizes active promotion of your brand.
Number of points for the referral – Define how many points the new customer receives upon signing up through a referral link. This encourages new users to complete the registration process and begin earning rewards.
Active links – Add custom links to your card, including the link URL and display text. These links can direct customers to your email, phone, address, or other important resources.
Feedback links – Include a link that allows customers to easily submit feedback or reviews. Collecting this information helps you improve your services and reward offerings based on customer input.
Link for redirect after card installation – Specify a webpage where customers are directed immediately after installing the reward card. This is ideal for showcasing a welcome message or a special immediate promotion.
Terms of use – Outline the rules and conditions that customers must follow when using the reward card. Clear terms prevent misuse and ensure a smooth experience for both parties.
Link to the full terms and conditions (optional) – Provide a URL to a detailed document containing the comprehensive legal rules of the reward program. This is useful for providing exhaustive details without cluttering the card interface.
Issuer information – This section provides customers with a way to contact you if they have questions or issues with their reward card, typically found on the back of the digital card.
Company Name – Your official registered business name.
Email – A monitored customer support or business email address.
Phone Number – Use the international format (e.g., +1 for the US/Canada) so customers can tap the number to call you directly from their phone.

Review the final appearance of your reward card to ensure a polished look before distributing it to your customers. The platform provides a real-time preview, allowing you to see exactly how your branding and configuration will look on actual devices.
Use the three icons situated next to the mobile mockup to examine your card from different perspectives:
iOS View – Select the Apple icon to visualize how the reward card will be displayed within the Apple Wallet app.
Android View – Select the Android icon to see how the card appears inside Google Wallet.
Notification View – Select the Speech Bubble icon to preview how automatic updates and alerts will look on a user’s lock screen.

Thoroughly check all views to confirm your logo is positioned correctly and all text is easily readable. When you are ready to start issuing cards, click the ‘Finish’ button to finalize your settings.
Click 'Download PDF' to print a display for your table or counter, perfect for showcasing your new card. Share the QR code or link with your customers - they can simply scan or click to discover what you've created. Let's start spreading the word about your exciting new card! 🚀
Digital reward cards are versatile tools designed to boost customer retention and increase visit frequency. They are best suited for businesses with high transaction volume and repeat customers.
Cafes and Coffee Shops: Utilize the "Visit" or "Products" mechanic to reward customers for their daily caffeine fix.
Restaurants and Fast Casual Dining: Implement a "Spend" based system to reward higher checks or "Happy Hours" to drive traffic during slow periods.
Salons and Spas: Use reward cards to encourage repeat appointments and introduce referral programs for new clients.
Retail Stores: Reward customers based on spending thresholds to increase average transaction value.
Car Washes: Implement a simple "Visit" tracking system to offer a free wash after a certain number of visits.
Customer Profile: Reward Card
Learn how to manage transactions, points, and redemptions in customer profiles for Reward Card–based loyalty programs in Loyally.
Loyalty Card Editing: Understanding Greyed-Out Fields
Learn what specific fields lock once loyalty cards are active.